1. Product Overview
The Kiprim LD100 is a high-precision green laser distance meter designed for accurate and efficient measurement tasks. It features a bright green laser for enhanced visibility, multiple measurement modes, and a rechargeable battery for extended use. This manual provides detailed instructions for safe and effective operation of your device.
Key Features:
- Green Laser Beam: Up to 4 times brighter than standard red lasers for better visibility.
- Measurement Range: Up to 328 feet (100 meters).
- High Accuracy: ±1/16 inch (±2mm).
- Electronic Angle Sensor: For intuitive and faster angle measurements.
- Multiple Measurement Modes: Single, Continuous, Area, Volume, Pythagorean (1, 2, 3).
- Data Storage: Stores up to 99 data sets.
- Rechargeable Battery: 700mAh Lithium-Ion battery with USB Type-C charging.
- Durability: IP54 waterproof and dustproof rating.
2. Safety Information
WARNING: This device uses a Class II laser. Do not stare directly into the laser beam. Avoid direct eye exposure. Do not aim the laser at people or animals. Use only as described in this manual.
- Keep the device out of reach of children.
- Do not attempt to modify or disassemble the device.
- Avoid using the device in explosive environments or near flammable materials.
- Protect the device from extreme temperatures and moisture.
3. Controls and Display
Familiarize yourself with the buttons and display indicators of your Kiprim LD100.
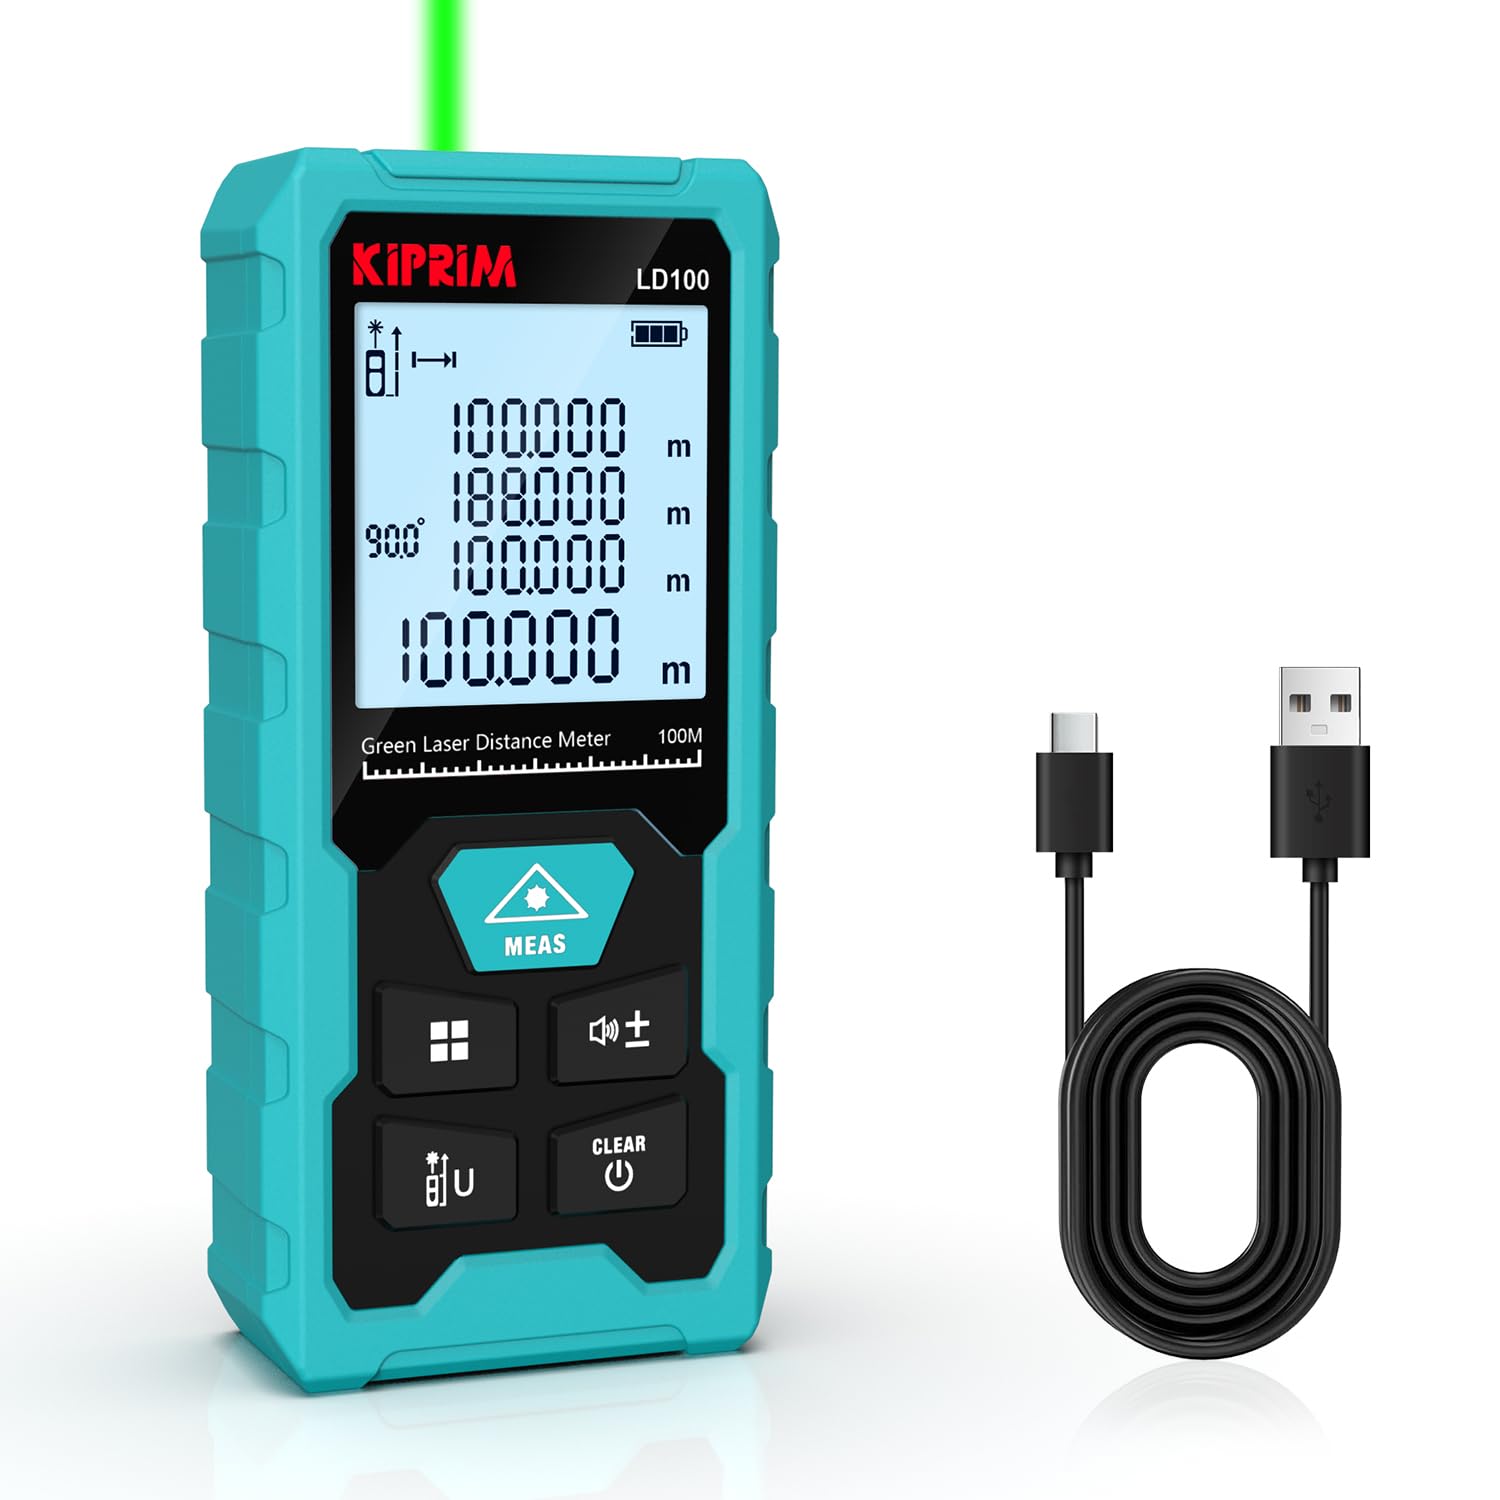
Figure 3.1: Kiprim LD100 device with labeled buttons and display elements. This image illustrates the location and function of each button and the various indicators on the screen, including measurement benchmark, laser emission, angle display, storage symbols, battery status, and different display rows for measurement results and units.
Button Functions:
- MEAS Button: Power On / Initiate Measurement.
- Function Key / Data Storage: Short press to cycle through measurement modes. Long press to enter data storage.
- Benchmark Switch / Unit Switch: Short press to switch measurement units (m, ft, in, ft+in). Long press to switch measurement benchmark (front/rear).
- Addition and Subtraction Keys: Perform addition or subtraction of measurements.
- Mute Button: Press and hold to turn the buzzer on or off.
- CLEAR / Power Off Button: Short press to clear the last measurement. Long press to power off the device.
4. Setup
4.1 Unpacking
Upon opening the package, ensure all components are present:
- Kiprim LD100 Laser Distance Meter
- USB Type-C Charging Cable
- Reflector Plate
- User Manual
- Carrying Pouch

Figure 4.1: Contents of the Kiprim LD100 package. This image displays the laser distance meter, its USB-C charging cable, a small reflector plate, the user manual, and a black carrying pouch.
4.2 Charging the Battery
The LD100 is equipped with a built-in 700mAh Lithium-Ion rechargeable battery. Before first use, fully charge the device.
- Connect the USB Type-C charging cable to the charging port on the side of the device.
- Connect the other end of the cable to a standard USB power adapter (not included) or a computer USB port.
- The battery indicator on the display will show charging status. A full charge typically takes about 3 hours and provides approximately 5000 measurements.

Figure 4.2: The Kiprim LD100 connected to a USB Type-C charging cable. This image highlights the charging port and the Type-C fast charging capability, indicating a 700mAh rechargeable battery, 5000 measurements per charge, and 3 hours for a full charge.
4.3 Power On/Off
- To Power On: Press the MEAS button. The laser will activate.
- To Power Off: Long press the CLEAR button. The device will also automatically power off after 180 seconds of inactivity.
5. Operating Instructions
5.1 Basic Measurement
- Ensure the device is powered on.
- Point the laser beam at the target object.
- Press the MEAS button once. The measured distance will appear on the main display line.
5.2 Switching Units
Short press the Benchmark Switch / Unit Switch button to cycle through available units: meters (m), feet (ft), inches (in), and feet+inches (ft+in).

Figure 5.1: The Kiprim LD100 displaying measurements in various units. This image shows the device's ability to quickly switch between meters, feet, inches, and feet+inches, along with its accuracy of ±1/16 inch and storage capacity for up to 99 data sets.
5.3 Measurement Benchmark
Long press the Benchmark Switch / Unit Switch button to toggle between front-edge and rear-edge measurement benchmarks. An icon on the display will indicate the active benchmark.
5.4 Measurement Modes
Short press the Function Key to cycle through the following measurement modes:
- Single Measurement: Standard distance measurement.
- Continuous Measurement (Tracking): Displays real-time distance as you move the device. The maximum and minimum values are also shown.
- Area Calculation: Measure two sides (length and width) to calculate the area.
- Volume Calculation: Measure three sides (length, width, and height) to calculate the volume.
- Pythagorean Measurement (Indirect Measurement): Use the Pythagorean theorem to calculate inaccessible heights or distances. There are three types:
- Pythagorean-1: Calculates one side of a right triangle from two other measured sides.
- Pythagorean-2: Calculates height from two measurements to the top and one to the bottom, forming two right triangles.
- Pythagorean-3: Calculates height from three measurements, useful for complex scenarios.

Figure 5.2: Visual representation of the 7 measurement modes available on the Kiprim LD100. This image shows examples for Single Measurement, Continuous Measurement, Area Calculation, Volume Calculation, and three types of Pythagorean functions.
5.5 Electronic Angle Measurement
The LD100 features an electronic angle sensor that replaces traditional bubble levels, providing more intuitive and faster angle measurements. The angle will be displayed on the screen automatically when the device is tilted.

Figure 5.3: The Kiprim LD100 performing an electronic angle measurement. The device is shown tilted on a wooden surface, displaying a 30-degree angle on its screen, demonstrating its capability to replace traditional bubble levels for quicker measurements.
5.6 Addition and Subtraction
After taking a measurement, press the + or - button to add or subtract subsequent measurements. The result will be displayed on the main line.
5.7 Data Storage
The device can store up to 99 data sets. Long press the Function Key to enter the data storage interface. Use the + and - buttons to navigate through stored measurements.

Figure 5.4: The Kiprim LD100 demonstrating its automatic storage feature. The image shows multiple measurement data sets appearing as if stored within the device, indicating its capacity to save up to 99 data sets.
5.8 Mute Function
To turn the buzzer sound on or off, press and hold the Mute Button (often combined with the addition/subtraction keys, refer to Figure 3.1).

Figure 5.5: The Kiprim LD100 being used in a quiet environment, with a mute icon displayed. This image highlights the mute button feature, allowing the user to silence the device's operational sounds.
6. Maintenance
6.1 Cleaning
- Clean the device with a soft, damp cloth. Do not use abrasive cleaners or solvents.
- Regularly clean the laser lens with a soft cloth, similar to cleaning camera lenses.
6.2 Storage
- Store the device in a dry, cool place, away from direct sunlight and extreme temperatures.
- If storing for an extended period, ensure the battery is partially charged (around 50%) and recharge it every few months to maintain battery health.
6.3 Durability
The Kiprim LD100 is rated IP54, meaning it is protected against dust ingress and splashing water from any direction. However, it is not designed for submersion in water.

Figure 6.1: The Kiprim LD100 demonstrating its IP54 waterproof and dustproof capabilities. The image shows the device in sandy and wet conditions, highlighting its resilience against environmental elements.
7. Troubleshooting
If you encounter issues with your Kiprim LD100, refer to the following common problems and solutions:
| Problem | Possible Cause | Solution |
|---|---|---|
| Device does not power on | Low battery | Charge the device using the USB Type-C cable. |
| Inaccurate measurements |
|
|
| Laser beam not visible | Strong ambient light | Use the reflector plate or perform measurements in lower light conditions. |
| Device freezes or malfunctions | Temporary software glitch | Power off the device by long pressing the CLEAR button, then power it back on. |
If the problem persists, please contact Kiprim customer support for assistance.
8. Specifications
| Feature | Specification |
|---|---|
| Model Number | LD100 |
| Measuring Range | 100.08 meters (328 feet) |
| Accuracy | ±1/16 inch (±2mm) |
| Laser Class | Class II |
| Laser Type | Green Laser |
| Measurement Speed | Up to 0.25 seconds |
| Battery Type | Lithium-Ion, 3.7V, 700mAh |
| Charging Port | USB Type-C |
| Data Storage | Up to 99 data sets |
| Units of Measurement | m, ft, in, ft+in |
| Automatic Power Off | 180 seconds of inactivity |
| IP Rating | IP54 (Waterproof & Dustproof) |
| Material | Plastic |
| Item Weight | 80 Grams |
| Dimensions (LxWxH) | 115 x 50 x 25 Millimeters |
| Country of Origin | China |
9. Applications
The Kiprim LD100 is suitable for a wide range of applications, including:
- Remodeling & Renovations
- Decorating Projects
- Surveying & Inspections
- Engineering
- DIY Projects
- House Inspections
- Road Section Distance Measurement
- Interior Design
- Viaduct Measurements
- Parking Layout Planning
- Crane Height Measurement

Figure 9.1: Examples of multiple applications for the Kiprim LD100. This image shows the device being utilized in different scenarios such as remodeling, decorating, surveying, engineering, and various DIY projects.
10. Warranty and Support
Kiprim products are designed for reliability and performance. For warranty information or technical support, please refer to the contact details provided with your purchase documentation or visit the official Kiprim website. Please have your model number (LD100) and purchase date ready when contacting support.


