
Introduction
This manual provides instructions for the installation, operation, and maintenance of your new Generic Refrigerator Ice Maker Assembly. This assembly is designed as a replacement part for various GE, Hotpoint, and Kenmore refrigerator models. Please read all instructions carefully before proceeding with installation or use.
What's in the Box:
- 1 x Ice Maker Assembly
Compatibility:
This ice maker assembly is compatible with a wide range of refrigerator models, including but not limited to:
- GE Models: GTS22KCPARWW, GTS22KCPBRBB, GTS22KHPBRCC, GTS22KHPBRWW, GTS22KHPDRBB, GTS22KHPDRCC, GTS22KHPDRWW, GTS22WCPARWW, GTS22WCPCRCC, GTS22WCPDRBB, GTS22WCPDRCC, GTS22WCPDRWW, ESL25JFWFBS, ESL25JFXALB, ESL25JFXBLB, ESL25JFXJLB, ESL25XGPDBS, ESL25XGRBBS, ESL25XGSBBS, ESL25XGSCBS, ESS22XGMACC, ESS22XGMAWW, ESS23SGSASS, ESS23XGSABB, ESS23XGSACC, ESS23XGSAWW, ESS23XGSBBB, ESS23XGSBCC, ESS25KSTFSS, ESS25KSTISS, ESS25KSTMSS, ESS25LGMEBB, ESS25LGMECC, ESS25LGMEWW, ESS25LGNACC, ESS25LSMABS, ESS25LSMEBS, ESS25LSRBSS, ESS25LSRESS, ESS25QSWASS, ESS25SGMABS, ESS25SGMBBS, ESS25XGMABB, ESS25XGMACC, ESS25XGMAWW, ESS25XGSABB, ESS25XGSACC, ESS25XGSBBB, ESS25XGSBCC, ESS25XGSBWW, ESS25XGSCBB, ESS25XGSCCC, ESS25XGSCWW, FBS15RCKJRWW, FBS15RCKLRWW, GAS18PGJFRWW, GAS18PGJJRWW, GAS18PGJLRWW, GAS18PSJFRSS, GAS18PSJJRSS, GAS18PSJLRSS, GBS20KBRCBB, GBS20KBRCCC, GBS20KBRCWW, GBS22HBSBWW, GBS22KBSBCC, GCF23KGWABB, GCF23KGWAWW, GCF23KGWCBB, GCF23KGWCWW, GCF23KGWDBB, GCF23KGWDWW, GCL22QGTGSV, GCR23UDPCWW, GCR23UDPDWW, GCR23YLRBWW, GCR23YLRCWW, GCR23YLRDWW, GDE20ESEARSS, GDE20ESEBRSS, GDE20ETEARBB, GDE20ETEARWW, GDE20ETEBRBB, GDE20ETEBRWW, GDE20GGHBRBB, GDE20GGHBRWW, GDE20GMHBRES, GDE20GSHBRSS, GDE23ESEARSS, GDE23ESEBRSS, GDE23ETEARBB, GDE23ETEARWW, GDE23ETEBRBB, GDE23ETEBRWW, GDE23GGHBRBB, GDE23GGHBRWW, GDE23GSHBRSS, GDS18LCPABB, GDS18LCPAWW, GDS18LCPBBB, GDS18LCPBCC, GDS18LCPBWW, GDS18LCRACC, GDS18LCRAWW, GDS18SCPBRSS, GDS20SCSDSS, GDSC0KCXCRBB, GDSC0KCXCRWW, GDSC3KCYBBB, GDSC3KCYBWW
- Hotpoint Models: HTH17BCT2RWW, HTH17BCTZLWW, HTH17BCTZRWW, HTH17BCZ2LWW, HTH17BCZ2RWW, HTH17BCZ4LWW, HTH17BCZ4RWW, HTH17BCZZLWW, HTH17BCZZRWW, HTH18CCT2LWW, HTH18CCT2RWW, HTH18CCT3LWW, HTH18CCT3RWW, HTH18CCTZLWW, HTH18CCTZRWW, HTH18GCT2RWW, HTH18GCT3RWW, HTH18GCTZRWW, HTJ18GCT2RSA, HTJ18GCT3RSA, HTJ18GCTZRSA, HTM18GCSARSA, HTM18GCSBRSA, HTM18GCSDRSA, HTM18GCSFRSA, HTN17BBZ2LCC, HTS16BCMBRWW, HTS16BCSELWW, HTS16BCSERWW, HTS17BCBHLWW, HTS17BCBHRWW, HTS17BCSBLWW, HTS17BCSBRWW, HTS17BCSDLWW, HTS17BCSDRWW, HTS17BCSGLWW, HTS17BCSGRWW, HTS17BCSHLWW, HTS17BCSHRWW, HTS18CCSBLWW, HTS18CCSBRWW, HTS18CCSDLWW, HTS18CCSDRWW, HTS18GCSARWW, HTS18GCSBRWW, HTS18GCSDRWW, HPE15BTHBRWW, HPE15BTHCRWW, HPE15BTHHRWW, HPE15BTHLRWW, HPE15BTHMRWW, HPE15BTMMLWW, HPS15BTHBLCC, HPS15BTHBLWW, HPS15BTHBRBB, HPS15BTHBRCC, HPS15BTHBRWW, HPS15BTHCLCC, HPS15BTHCLWW, HPS15BTHCRBB, HPS15BTHCRCC, HPS15BTHCRWW, HPS15BTHELWW, HPS15BTHERBB, HPS15BTHERCC, HPS15BTHERWW, HPS15BTHJLCC, HPS15BTHJLWW, HPS15BTHJRBB, HPS15BTHJRCC, HPS15BTHJRWW, HPS15BTHLLCC, HPS15BTHLLWW, HPS15BTHLRBB, HPS15BTHLRCC, HPS15BTHLRWW, HPS15BTHMLCC, HPS15BTHMLWW, HPS15BTHMRBB, HPS15BTHMRCC, HPS15BTHMRWW, HSH22IFTCBB, HSH22IFTCCC, HSH22IFTCWW, HSH22IFTDBB, HSH22IFTDCC, HSH22IFTDWW, HSH22IFTEBB, HSH22IFTECC, HSH22IFTEWW, HSH25GFBBBB, HSH25GFBBSA, HSH25GFBBWW, HSH25IFTDBB, HSH25IFTDCC, HSH25IFTDWW, HSH25IFTEBB, HSH25IFTECC, HSH25IFTEWW, HSH25IFTFBB, HSH25IFTFCC, HSH25IFTFWW, HSM22IFTBSA, HSM22IFTCSA, HSM22IFTESA, HSM25GFBBSA, HSM25GFTBSA, HSM25GFTCSA, HSM25GFTESA, HSM25GFTGSA, HSM25GFTHSA, HSM25GFTISA, HSM25GFTJSA, HSM25GFTNSA, HSM25GFTPSA, HSM25IFTBSA, HSM25IFTDSA, HSM25IFTESA, HSM25IFTFSA, HSS22GFTAWW, HSS22GFTBWW, HSS22GFTEWW, HSS22GFTFWW, HSS22GFTGWW, HSS22GFTJWW, HSS22GFTNWW, HSS25GFTBBB, HSS25GFTBCC, HSS25GFTBWW, HSS25GFTEBB, HSS25GFTECC, HSS25GFTEWW, HSS25GFTGBB, HSS25GFTGCC, HSS25GFTGWW, HSS25GFTHBB, HSS25GFTHCC, HSS25GFTHWW, HSS25GFTIBB, HSS25GFTICC, HSS25GFTIWW, HSS25GFTJBB, HSS25GFTJCC, HSS25GFTJWW, HSS25GFTNBB, HSS25GFTNCC, HSS25GFTNWW, HSS25GFTPWW, HSS25IETAWW, HTH17BCC2LWW, HTH17BCC2RWW, HTH17BCT2LWW
- Kenmore Models: 363.50232, 363.50222, 363.50221, 363.50622, 363.50227, 363.580629, 363.5806789, 363.5806289, 363.5806289, 363.59523, 363.59528, 363.7816789, 363.7996299, 363.950778, 363.50237, 363.50242, 363.50247, 363.5755279, 363.5804289, 363.5806289, 363.5806789, 363.5807289, 363.580779, 363.5947999, 363.5949299, 363.5949299, 363.5952299, 363.5957299, 363.5957799, 363.784729, 363.784779, 363.785629, 363.7996799, 3638335, 363.950771, 363.4804289, 363.4804289, 363.4804789, 363.4804789, 363.50627, 363.5755279, 363.5755779, 363.5755779, 363.5804289, 363.5804289, 363.5804289, 363.5804289, 363.580429, 363.580429, 363.5804789, 363.5804789, 363.5804789, 363.5804789, 363.5804789, 363.580479, 363.580479, 363.5806289, 363.5806289, 363.580629, 363.5806789, 363.5806789, 363.5806789, 363.580679, 363.580679, 363.5807289, 363.5807289, 363.580729, 363.5807589, 363.5807589, 363.5807589, 363.580759, 363.5807789, 363.5807789, 363.5807789, 363.5809289, 363.5809289, 363.5809289, 363.5809589, 363.5809589, 363.5809589, 363.5809789, 363.5809789, 363.5809789, 363.5825189, 363.5825189, 363.5825189, 363.5825189, 363.5825189, 363.5825289, 363.5825289, 363.5825289, 363.5825289, 363.5825289, 363.582529, 363.5825789, 363.5825789, 363.5825789, 363.5825789, 363.5825789, 363.582579, 363.5826189, 363.5826189, 363.5826189, 363.582619, 363.582619, 363.5826289, 363.5826289, 363.5826289, 363.582629, 363.582629, 363.5826789, 363.5826789, 363.5826789, 363.582679, 363.582679, 363.5827289, 363.5827289, 363.5827289, 363.5827289, 363.5827289, 363.582729, 363.5827589, 363.5827589, 363.5827589, 363.5827589, 363.5827589, 363.582759, 363.5827789, 363.5827789, 363.5827789, 363.5827789, 363.5827789, 363.582779, 363.5847289, 363.5847289, 363.5847289, 363.5847289, 363.5847289, 363.584729, 363.584729, 363.5847589, 363.5847589, 363.5847589, 363.5847589, 363.584759, 363.584759, 363.5847789, 363.5847789, 363.5847789, 363.5847789, 363.5847789, 363.584779, 363.584779, 363.5848289, 363.5848289, 363.5848289, 363.5848289, 363.5848589, 363.5848589, 363.5848589, 363.5854189, 363.5854289, 363.5854789, 363.5855189, 363.5855189, 363.5855189, 363.5855289, 363.5855289, 363.5855289, 363.5855789, 363.5855789, 363.5855789, 363.5857289, 363.5857289, 363.5857289, 363.5857589, 363.5857589, 363.5857589, 363.5857789, 363.5857789, 363.5857789, 363.5877289, 363.5877289, 363.5877289, 363.5877289, 363.587729
- Frigidaire Models: FRS24BGGB6, FRS24BGDB0, FRS24BGDW0, FRS24BGGB4, FRS24BGGB7, FRS24BGGB8, FRS24BGGW4, FRS24BGGW6, FRS24BGGW7, FRS24BGGW8
Please verify your refrigerator's model number to ensure compatibility before installation.
Safety Information
Always prioritize safety when working with appliances. Failure to follow these safety instructions could result in property damage, personal injury, or death.
- Disconnect Power: Before attempting any installation, maintenance, or repair, always disconnect the refrigerator from its power source by unplugging it or turning off the circuit breaker.
- Water Supply: Turn off the water supply to the refrigerator before beginning installation to prevent leaks.
- Wear Protective Gear: Wear appropriate personal protective equipment, such as gloves and safety glasses.
- Professional Assistance: If you are unsure about any step or uncomfortable performing the installation, consult a qualified appliance technician.
- Sharp Edges: Be aware of sharp edges or components inside the refrigerator.
Setup and Installation
Follow these general steps to install the ice maker assembly. Specific steps may vary slightly depending on your refrigerator model. Refer to your refrigerator's service manual for detailed instructions if available.
- Prepare the Refrigerator:
- Disconnect the refrigerator from the electrical outlet.
- Turn off the water supply valve to the refrigerator.
- Remove any existing ice bucket and old ice maker components if present.
- Access the Ice Maker Compartment:
- Locate the ice maker compartment, typically in the freezer section. You may need to remove shelves or other obstructions.
- Remove the Old Ice Maker (if applicable):
- Carefully disconnect the wiring harness from the old ice maker.
- Unscrew any mounting screws holding the old ice maker in place.
- Gently remove the old ice maker assembly.
- Install the New Ice Maker Assembly:
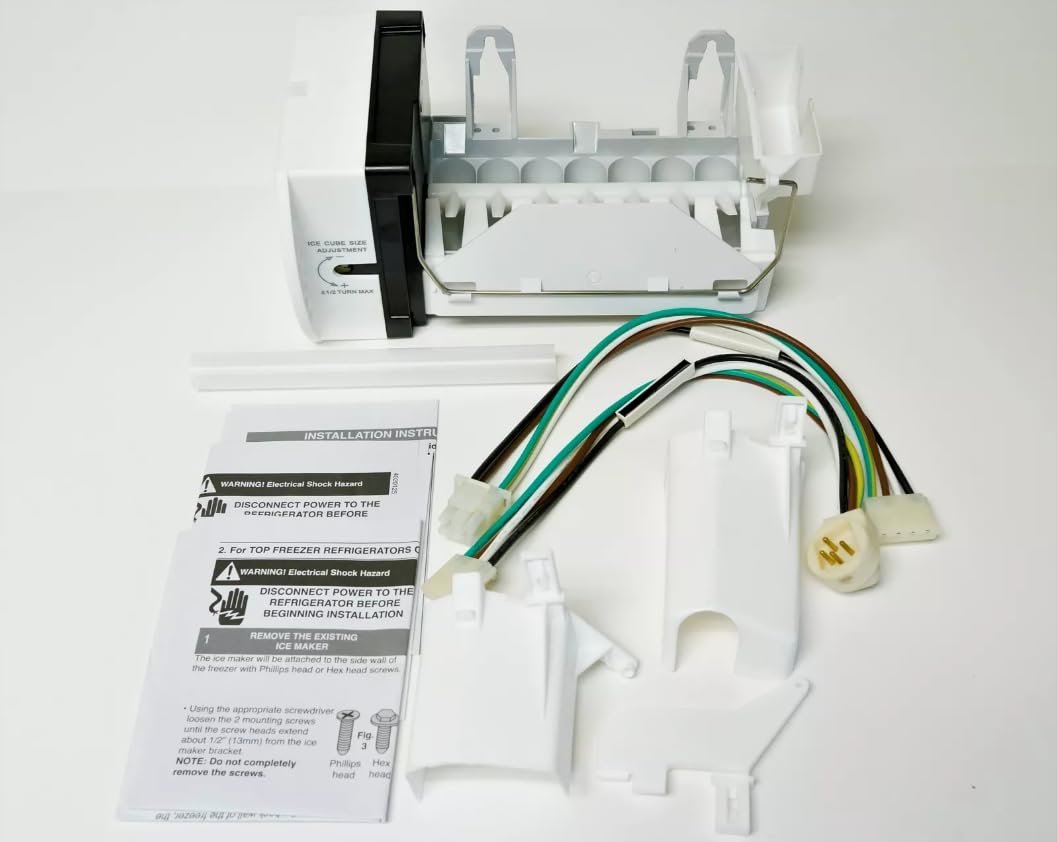
Image: The complete ice maker assembly. This is the main unit you will be installing.
- Position the new ice maker assembly in the compartment.
- Secure it with the appropriate mounting screws. Ensure it is firmly attached.
- Connect the wiring harness to the new ice maker. Ensure a secure connection.
- Ensure the water fill tube is properly aligned with the ice maker's water inlet.

Image: Side view of the ice maker assembly, showing mounting points.

Image: Wiring harness for connecting the ice maker to the refrigerator's electrical system.

Image: Additional components, possibly including the water fill tube or ice bucket guides.
- Restore Power and Water:
- Turn on the water supply valve to the refrigerator.
- Plug the refrigerator back into the electrical outlet or turn on the circuit breaker.
- Initial Operation:
- Listen for the water valve to fill the ice maker.
- Allow several hours for the freezer to reach the correct temperature and for the first batch of ice to be produced. Discard the first few batches of ice to ensure cleanliness.
Operating Instructions
Once installed, the ice maker operates automatically. Ensure the ice maker's shut-off arm is in the down position to allow ice production. When the ice bin is full, the shut-off arm will rise, pausing ice production until more space is available.
- First Use: After installation, it may take 12-24 hours for the ice maker to produce its first full batch of ice.
- Discard Initial Ice: Discard the first 2-3 batches of ice to flush out any air or impurities from the water line and new ice maker components.
- Ice Production Rate: The rate of ice production depends on freezer temperature, ambient room temperature, and frequency of door openings.
Maintenance
Regular maintenance helps ensure optimal performance and longevity of your ice maker.
- Cleaning the Ice Bin: Periodically remove and wash the ice storage bin with mild soap and warm water. Rinse thoroughly and dry completely before returning it to the freezer.
- Water Filter: If your refrigerator has a water filter, replace it regularly according to the manufacturer's recommendations to ensure clean ice and proper water flow.
- Check Water Line: Occasionally inspect the water supply line for kinks, leaks, or damage.
- Seasonal Use: If you will be away for an extended period, turn off the ice maker and the water supply to the refrigerator to prevent potential leaks or issues.
Troubleshooting
If your ice maker is not functioning correctly, refer to the following common issues and solutions:
| Problem | Possible Cause | Solution |
|---|---|---|
| No ice production |
|
|
| Small or hollow ice cubes |
|
|
| Ice tastes bad or has odor |
|
|
| Ice maker is noisy |
|
|
If troubleshooting steps do not resolve the issue, it may be necessary to consult a qualified technician or contact the product seller for further assistance.
Specifications
- Brand: Generic
- Model Name: Ice Maker
- Model Number: GTS22WCPDRCC
- Included Components: Ice Maker
- Number of Items: 1
Warranty and Support
For specific warranty information, please refer to the documentation provided with your purchase or contact the seller directly. If you require technical support or have questions regarding the installation or operation of this ice maker assembly, please reach out to the retailer or manufacturer for assistance.