1. Introduction
This manual provides detailed instructions for the installation, operation, and maintenance of your CAMECHO Android Car Stereo. This unit is designed for Mercedes-Benz W163 ML320, ML350, ML400, and ML500 models manufactured between 1998 and 2002. Please read this manual thoroughly before using the product to ensure proper function and safety.
2. Safety Information
- Always operate the device responsibly and in accordance with local traffic laws.
- Do not attempt to install or repair the unit if you are not qualified. Improper installation can lead to damage or injury.
- Avoid prolonged exposure to direct sunlight or extreme temperatures.
- Keep the screen clean and free from obstructions.
- Ensure all wiring is securely connected to prevent short circuits or malfunctions.
3. Package Contents
Verify that all items are present in the package:
- Android Car Stereo Unit (9-inch display)
- Power Cable
- RCA Input/Output Cables
- USB Cables (2)
- GPS Antenna
- Radio Antenna Adapter
- Reversing Camera Input Cable
- Rear Camera (AHD)
- Installation Tool
- Microphone
- CANBUS Decoder (if applicable for your vehicle)
- Accessories (mounting brackets, screws)
- User Manual (this document)

Figure 3.1: Overview of the car stereo unit, included accessories, and connection points.
4. Vehicle Compatibility
This Android Car Stereo is compatible with the following Mercedes-Benz models:
- Mercedes-Benz W163 ML320 (1998-2002)
- Mercedes-Benz W163 ML350 (1998-2002)
- Mercedes-Benz W163 ML400 (1998-2002)
- Mercedes-Benz W163 ML500 (1998-2002)
Important Note: Before purchasing and installing, verify the exact year, dimensions, and the shape of your car's central control panel. This product specifically supports vehicles with a manual air conditioning control panel (Option A). It is not compatible with automatic air conditioning control panels.
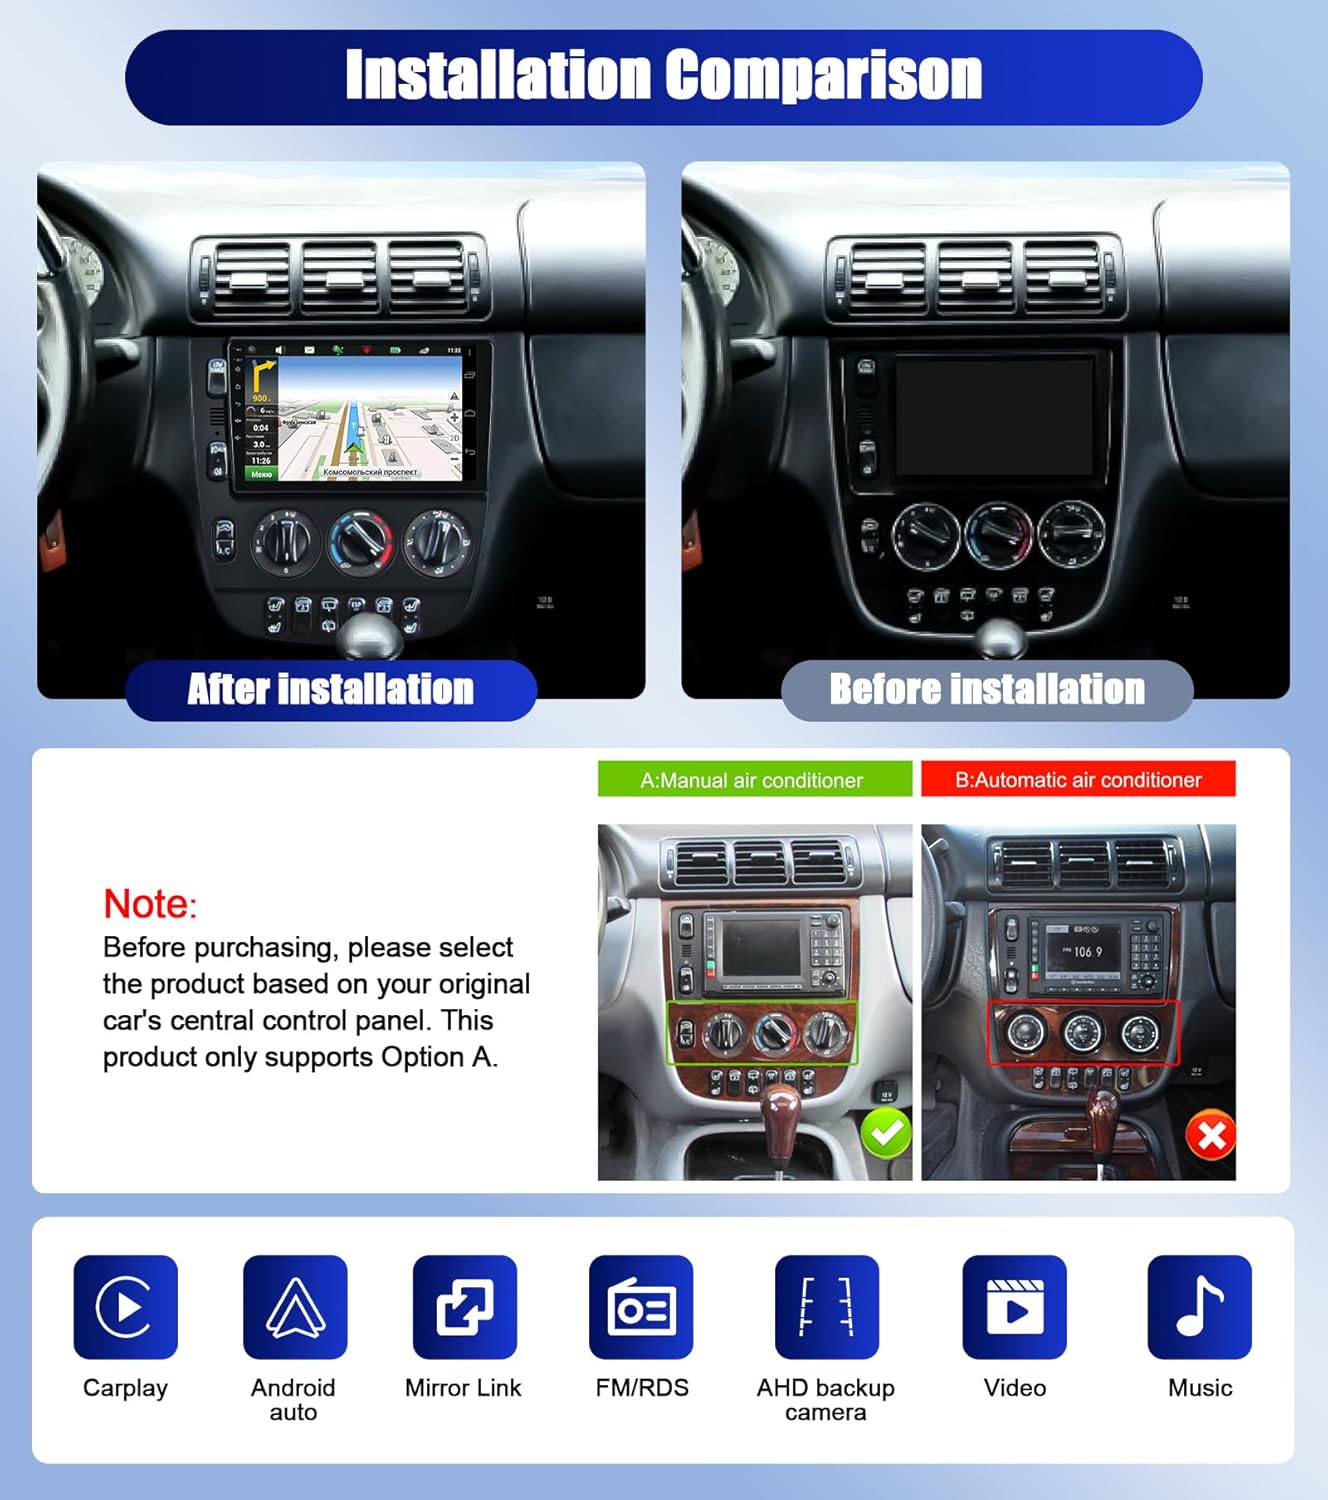
Figure 4.1: Comparison of car stereo installation and identification of compatible manual air conditioning panel.
5. Setup and Installation
Professional installation is recommended. Disconnect the vehicle's battery before beginning installation.
5.1. General Installation Steps
- Remove Original Unit: Carefully remove the existing car stereo and trim panels using appropriate tools.
- Connect Wiring Harness: Connect the provided power cable and RCA cables to the new head unit and the vehicle's wiring harness. Ensure all connections are secure.
- Connect Antennas: Attach the GPS antenna and the radio antenna adapter. Position the GPS antenna in a location with a clear view of the sky.
- Install Backup Camera (Optional): If installing the backup camera, route the camera cable from the rear of the vehicle to the head unit. Connect the camera's power to the reversing light circuit and the video signal to the "Reversing Camera Input" on the head unit.
- Test Connections: Before fully reassembling, temporarily connect the battery and power on the unit to test basic functions (power, audio, display).
- Secure Unit: Mount the new car stereo securely into the dashboard opening.
- Reassemble: Reinstall all trim panels.
5.2. Rear View Camera Wiring
The included rear camera provides reversing assistance. Follow these steps for wiring:
- Red Cable (1): Connect this to the positive pole of the car's reversing light.
- Black Cable (2): Connect this to the negative pole (ground) of the car's reversing light.
- Video Cable (3): Connect the yellow RCA connector from the camera to the "Reversing Camera Input" on the car stereo unit.
- Extension Cables (4): The two red extension cables on the video cable do not typically need to be connected for standard installations.
Tip: The reversing input on the head unit must be plugged in even if the reversing camera is not used, to ensure proper system operation.

Figure 5.1: Detailed wiring diagram for the rear view camera.
6. Operating Instructions
6.1. Basic Operations
- Power On/Off: Press and hold the power button on the unit or use the vehicle's ignition.
- Touch Screen: Navigate the interface by tapping, swiping, and pinching on the 9-inch touchscreen.
- Volume Control: Adjust volume using the physical knobs/buttons or on-screen controls.

Figure 6.1: Main interface of the Android Car Stereo.
6.2. Wireless/Wired CarPlay & Android Auto
Connect your smartphone for seamless integration of navigation, communication, and entertainment features.
- Wireless Connection: Enable Bluetooth and Wi-Fi on your phone. Pair your phone with the car stereo via Bluetooth, then follow on-screen prompts to establish the CarPlay or Android Auto connection.
- Wired Connection: Connect your phone to the car stereo using a USB cable. The system will automatically prompt you to launch CarPlay or Android Auto.
- Features: Access hands-free calls, messages, navigation (e.g., Apple Maps, Google Maps), music streaming (e.g., Spotify, Apple Music), and voice assistants (Siri, Google Assistant).

Figure 6.2: Wireless CarPlay and Android Auto functionality.
6.3. GPS Navigation
The unit supports both online and offline navigation. Pre-installed maps are available, and you can download additional navigation applications from the app store when connected to Wi-Fi.
- Online Navigation: Requires a Wi-Fi connection or mobile hotspot for real-time traffic updates and map data.
- Offline Navigation: Use pre-downloaded maps without an internet connection.

Figure 6.3: GPS Navigation display.
6.4. Wi-Fi Connection
Connect the car stereo to a Wi-Fi network or your phone's hotspot to access online features, download apps, and browse the internet.
- Go to "Settings" > "Network & Internet" > "Wi-Fi".
- Select your desired Wi-Fi network and enter the password if required.

Figure 6.4: Wi-Fi connectivity for online features.
6.5. FM/RDS Radio
Access FM radio stations with RDS (Radio Data System) for station information.
- Tuning: Use the on-screen controls to scan for stations or manually tune to a specific frequency (87.0M-108M FM).
- Presets: Save up to 18 favorite radio stations for quick access.
- RDS: Displays station name, program type, and other information where available.

Figure 6.5: FM/RDS Radio interface.
6.6. Bluetooth Hands-Free Calling & Music
Connect your phone via Bluetooth for hands-free calls and audio streaming.
- Pairing: Enable Bluetooth on your phone and search for the car stereo. Select the device and confirm pairing.
- Hands-Free Calls: Make and receive calls directly from the car stereo screen. The built-in microphone ensures clear communication. An external microphone can also be connected for improved audio quality.
- Music Streaming: Play audio from your phone through the car's speakers.
- Phonebook: Sync your phone's contacts for easy dialing.

Figure 6.6: Bluetooth hands-free calling interface.
6.7. Steering Wheel Control (SWC)
Configure your vehicle's steering wheel controls to operate the car stereo for safer driving.
- Access the SWC settings menu on the car stereo.
- Follow the on-screen instructions to map your steering wheel buttons to functions like volume up/down, track skip, mode change, and call answer/end.

Figure 6.7: Steering Wheel Control configuration screen.
6.8. Reversing Assistance (Backup Camera)
When properly installed, the included AHD backup camera automatically displays the rear view on the screen when the vehicle is shifted into reverse.
- Features: Night vision, waterproof design, and a 170-degree wide-angle lens for enhanced visibility.
- Guidelines: Dynamic parking guidelines may appear on the screen to assist with parking maneuvers.

Figure 6.8: Reversing assistance display with backup camera view.
6.9. Sound Quality (DSP & EQ)
The unit features a Digital Sound Processor (DSP) and Equalizer (EQ) for customizing audio output.
- Access the EQ settings to adjust frequency bands, balance, fader, and preset sound modes.
- Fine-tune the audio to your preference for an optimized listening experience.

Figure 6.9: DSP and EQ adjustment interface.
6.10. User Interface & Split Screen
The Android system offers customizable themes and a split-screen function.
- Multi-theme UI: Choose from various user interface themes to personalize the look of your stereo.
- Split Screen: Run two applications simultaneously on the screen, such as navigation and music playback.

Figure 6.10: Multi-theme UI and Split Screen feature.
6.11. Mirror Link (Android/iOS)
Mirror Link allows you to display your smartphone's screen content directly on the car stereo display.
- Connect your Android or iOS device via USB or Wi-Fi.
- Follow the on-screen instructions to activate screen mirroring.
- Note: Some applications or devices may not be fully compatible. Samsung devices are specifically noted as not supported for Mirror Link.

Figure 6.11: Mirror Link functionality for Android and iOS.
7. Maintenance
- Screen Cleaning: Use a soft, lint-free cloth to gently wipe the touchscreen. For stubborn smudges, slightly dampen the cloth with water or a screen-safe cleaner. Avoid harsh chemicals.
- Software Updates: Periodically check for software updates via the system settings when connected to Wi-Fi. Updates can improve performance and add new features.
- General Care: Keep the unit free from dust and debris. Ensure proper ventilation around the unit.
8. Troubleshooting
| Problem | Possible Cause | Solution |
|---|---|---|
| Unit does not power on. | Loose power connection, blown fuse, vehicle battery issue. | Check power cable connections. Inspect vehicle fuses. Ensure vehicle battery is charged. |
| No sound. | Volume too low, mute activated, incorrect audio source, loose speaker wires. | Increase volume. Check if mute is active. Select correct audio source. Verify speaker wire connections. |
| GPS signal lost or inaccurate. | GPS antenna obstructed or improperly placed, software issue. | Ensure GPS antenna has a clear view of the sky. Check antenna connection. Restart the unit. |
| CarPlay/Android Auto not connecting. | Incorrect phone settings, incompatible cable, software glitch. | Ensure Bluetooth/Wi-Fi is on (for wireless). Use a high-quality USB cable (for wired). Restart phone and stereo. Check phone permissions. |
| Backup camera not displaying. | Incorrect wiring, camera malfunction, reversing input not connected. | Verify camera wiring (refer to Section 5.2). Ensure the reversing input cable is connected to the head unit. Test camera power. |
| Steering wheel controls not working. | Incorrect wiring, SWC settings not configured. | Check CANBUS decoder connection (if applicable). Reconfigure SWC settings (refer to Section 6.7). |
9. Specifications
| Model Name | CAMECHO Android Car Stereo for Benz W163 ML Series |
| Display Size | 9 Inches |
| Operating System | Android (Specific version not provided, but implied by "8 Core Android 13" in feature bullets) |
| Processor | 8 Core |
| Memory/Storage | 4GB RAM + 64GB ROM |
| Connectivity | Bluetooth, USB, Wi-Fi |
| Special Features | Wireless/Wired CarPlay, Android Auto, Mirror Link, FM/RDS Radio, EQ, GPS Navigation, SWC, AHD Backup Camera Support, Split Screen, Multi-theme UI |
| Included Components | Backup Camera |
| Product Dimensions | 10 x 6 x 3 inches (Unit only, bezel dimensions vary) |
| Item Weight | 8.8 pounds |
Figure 9.1: Approximate dimensions of the car stereo unit.
10. Warranty Information
This product includes a 30-day free replacement policy as offered by the seller. For specific warranty terms, duration, and claim procedures, please refer to the documentation provided with your purchase or contact the seller directly. Extended protection plans may be available for purchase separately.
11. Customer Support
For technical assistance, troubleshooting, or any questions regarding your CAMECHO Android Car Stereo, please contact our customer support team.
How to Contact Support:
- Via Amazon:
- Go to the product page on Amazon.
- Locate the "Sold by Camecho" section (usually near the buy box).
- Click on the seller's name ("Camecho") to visit their storefront.
- On the storefront or seller information page, look for an "Ask a question" button or contact link.
- Email: You may also find direct email support information on the seller's Amazon storefront or within the product packaging.
Please provide your order number and a detailed description of the issue when contacting support for faster resolution.

Figure 11.1: Steps to contact CAMECHO customer support through Amazon.


