
1. Introduction
The VEVOR Magnetic Helping Hands Soldering Station (Model LFS0206) is a versatile tool designed to assist with electronic repair, craft, hobby, and DIY projects. It provides a stable platform and flexible arms to securely hold components, freeing your hands for precise work. Key features include a 3X LED magnifying lamp with adjustable brightness and color temperatures, a universal vise, a 360° hot air gun holder, and magnetic PCB holders, all mounted on a heavy-duty steel base.

Figure 1.1: Overview of the VEVOR Magnetic Helping Hands Soldering Station.
2. Safety Information
Please read and understand all safety instructions before using this product. Failure to follow these instructions may result in electric shock, fire, or serious injury.
- Always work in a well-ventilated area to avoid inhaling solder fumes.
- Wear appropriate personal protective equipment, including safety glasses, to protect your eyes from splashes or flying debris.
- Ensure the soldering station is placed on a stable, heat-resistant surface.
- Keep children and pets away from the work area.
- Do not touch hot components or soldering iron tips. Allow them to cool completely before handling.
- Disconnect the power supply when not in use or before cleaning.
- Do not modify the product or use it for purposes other than its intended use.
3. Package Contents
Verify that all items listed below are included in your package:
- Magnetic Helping Hands Soldering Station Base
- 3X LED Magnifying Lamp (USB powered)
- Universal Vise
- 360° Hot Air Gun Holder
- 4 Flexible Gooseneck Arms with Alligator Clamps
- 4 Magnetic PCB Holders
- 10 x Rubber Sleeves (for alligator clamps)
- 6 x Anti-Slip Pads (pre-installed on base)
- User Manual
4. Setup Instructions
Follow these steps to assemble your VEVOR Magnetic Helping Hands Soldering Station:
- Unpack Components: Carefully remove all components from the packaging. Place the heavy-duty steel base on a clean, stable work surface.
- Attach Magnetic PCB Holders: The four magnetic PCB holders can be placed anywhere on the steel base. Their strong magnets ensure a secure, damage-free installation. These are ideal for holding circuit boards or other flat items.
- Install Flexible Arms: Insert the magnetic bases of the flexible gooseneck arms into the desired positions on the steel base. The arms are designed to bend 360° for optimal positioning. Attach the alligator clamps to the ends of the flexible arms. You may add rubber sleeves to the clamps to prevent scratching delicate components.
- Mount the Universal Vise: Position the universal vise on the steel base. Its magnetic base will secure it in place. Adjust the jaw opening by turning the handle to fit your workpiece. The vise can rotate 360° for convenient access.
- Attach the 360° Hot Air Gun Holder: Place the magnetic base of the hot air gun holder onto the steel base. Adjust its height and angle as needed to securely hold your hot air gun.
- Connect the 3X LED Magnifying Lamp: Insert the magnetic base of the magnifying lamp onto the steel base. Connect the USB cable to a compatible 5V USB power source (e.g., computer, USB wall adapter).

Figure 4.1: Magnetic PCB holders securely placed on the base.

Figure 4.2: Flexible arms with clamps for holding components.
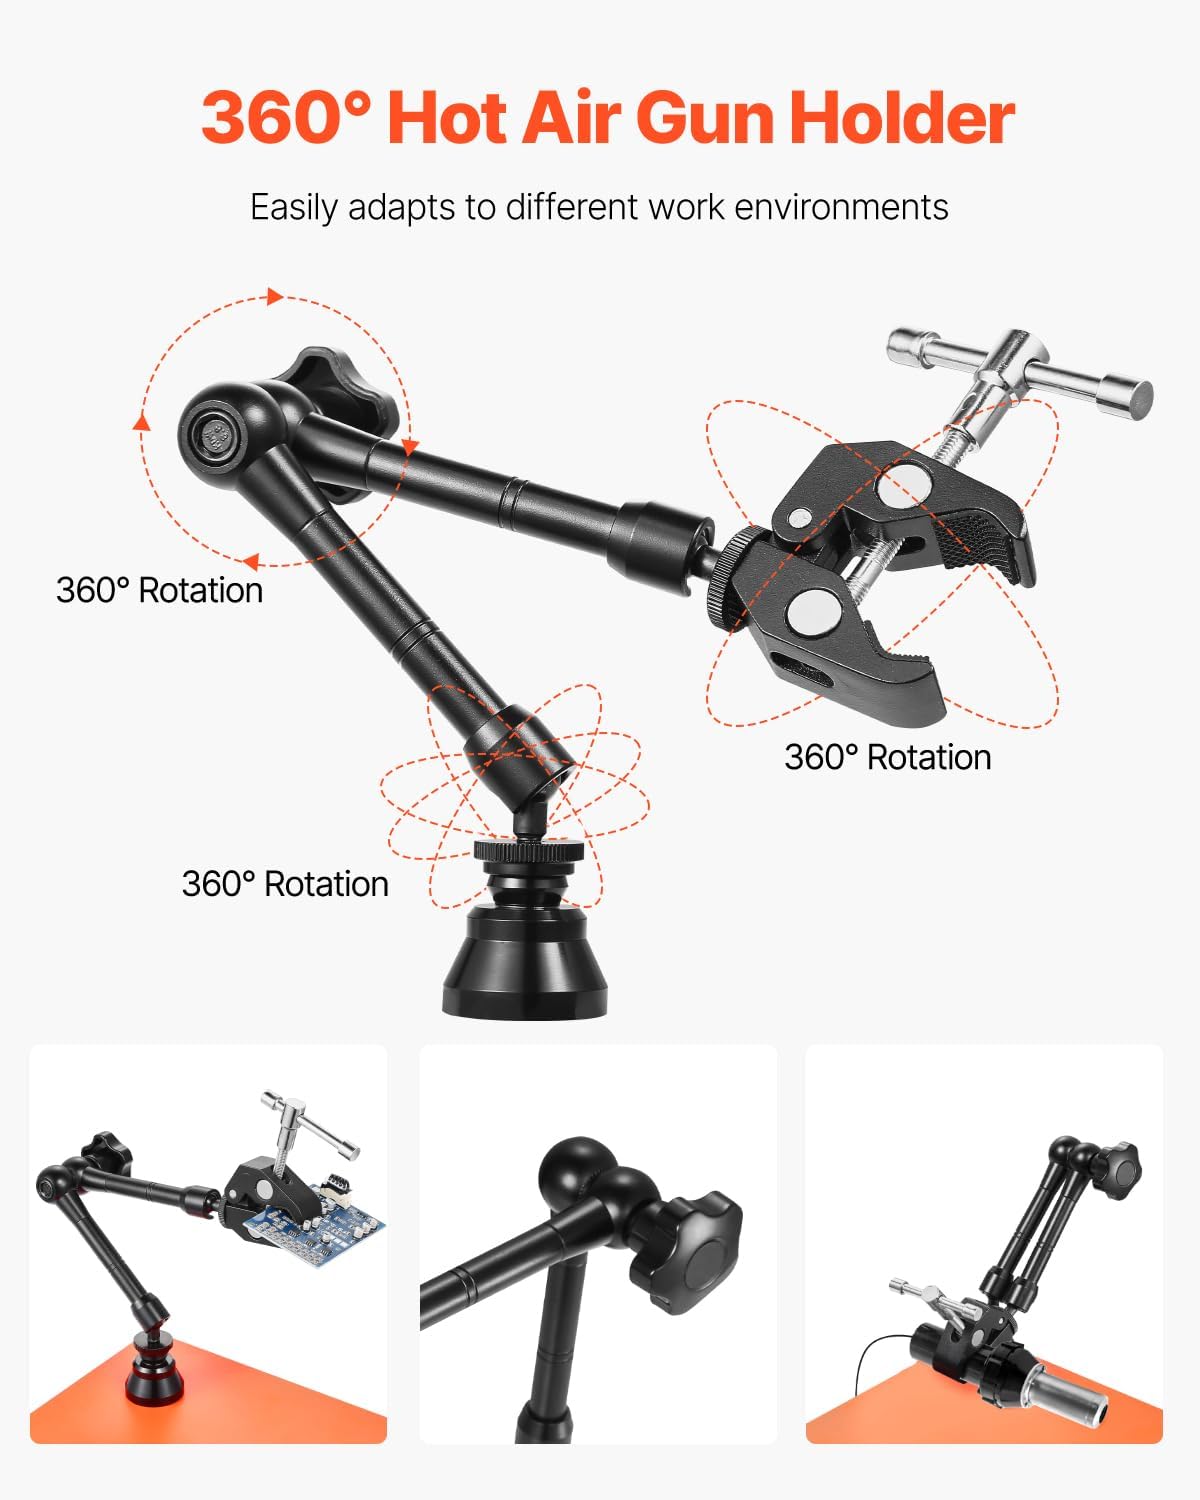
Figure 4.3: The universal vise in use, holding a circuit board.
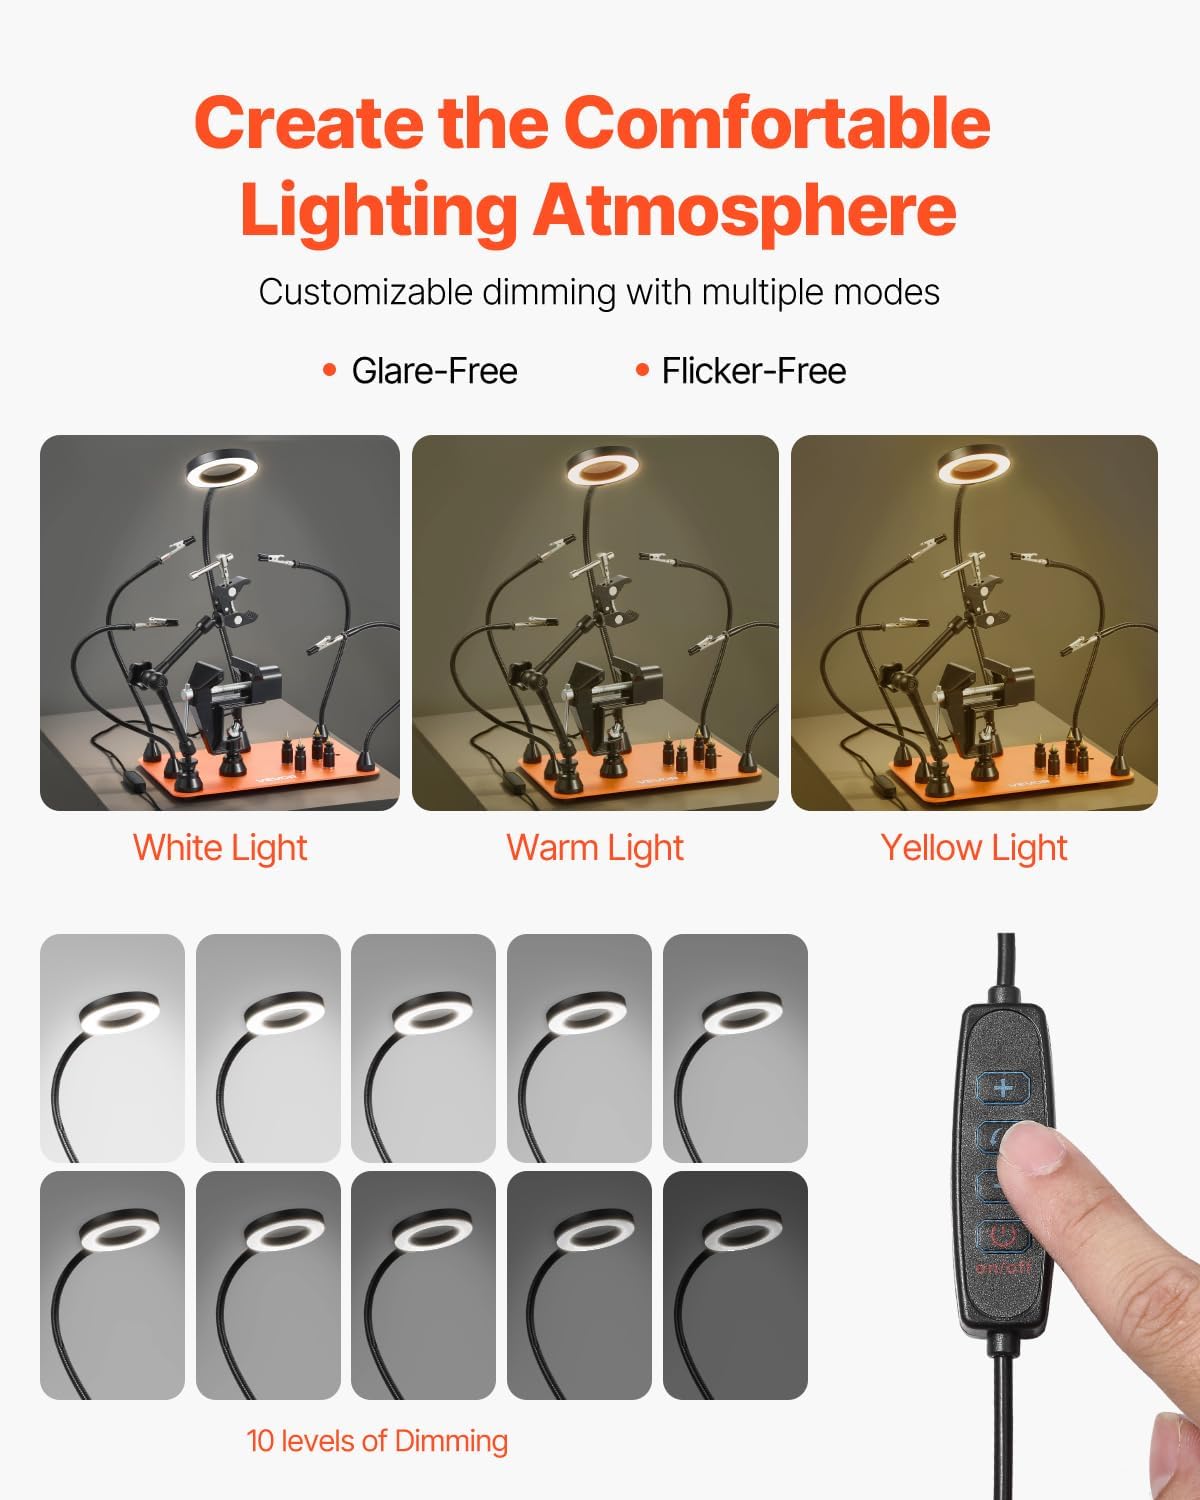
Figure 4.4: The 360° hot air gun holder, showing its adjustable joints.
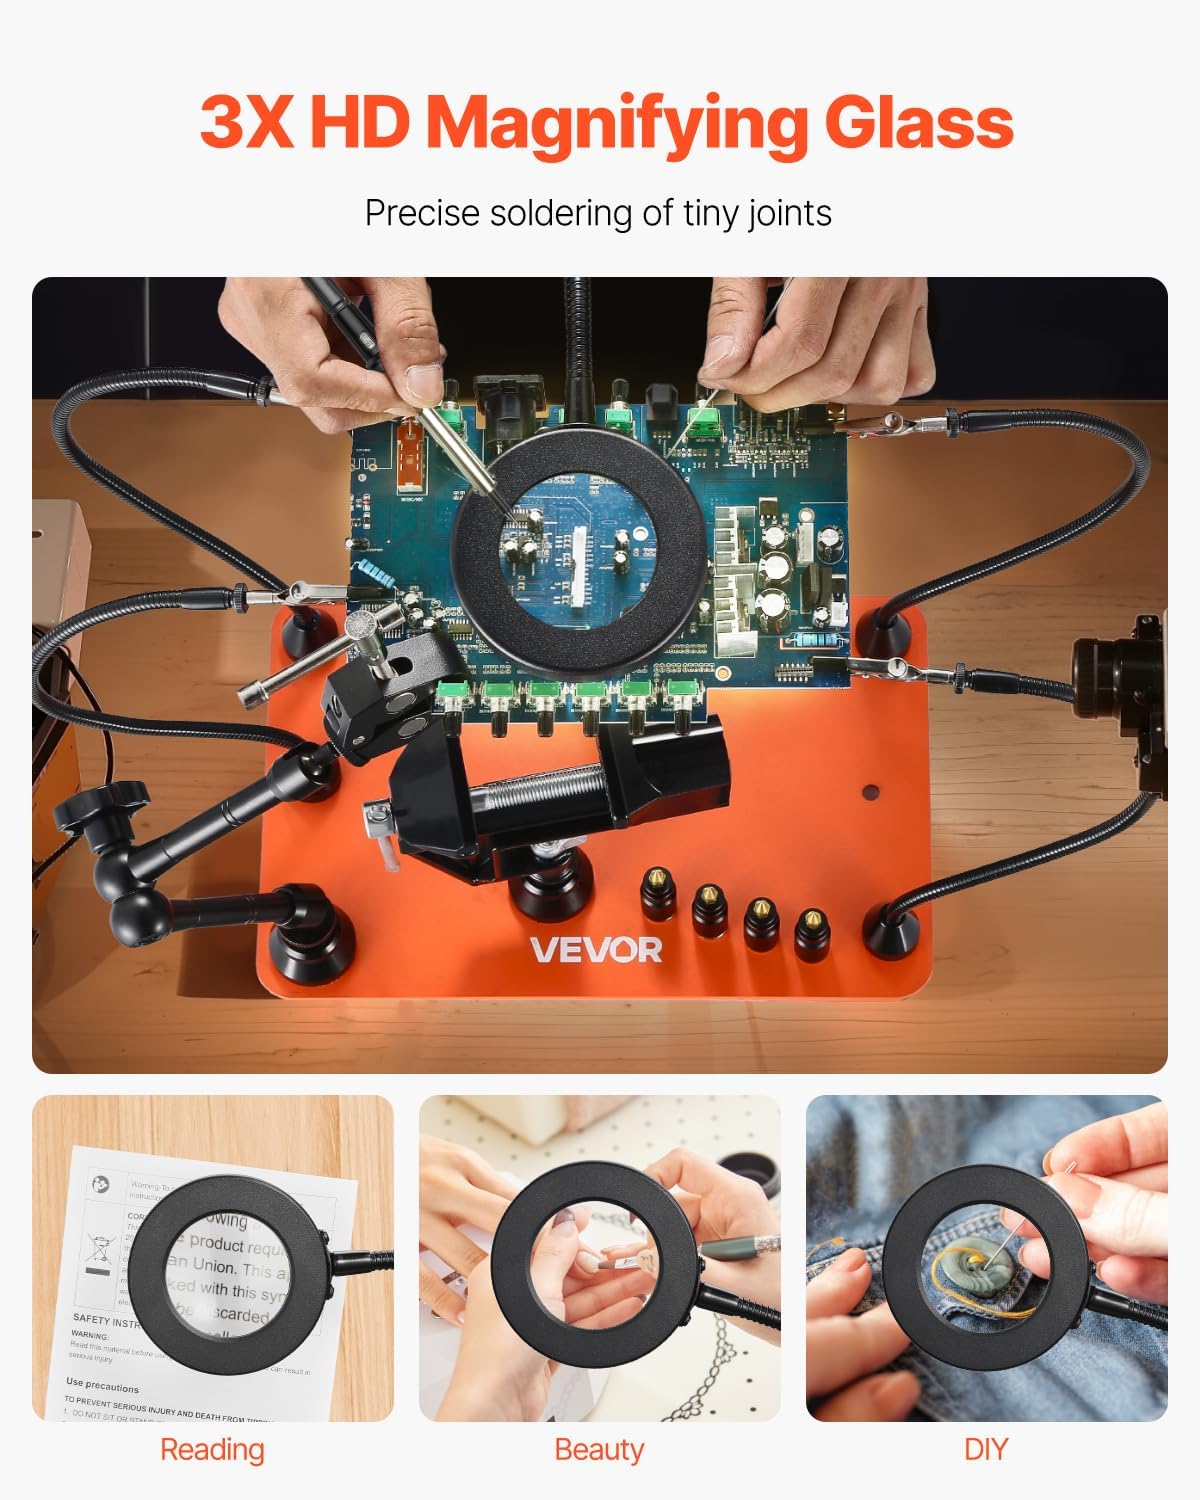
Figure 4.5: The 3X LED magnifying lamp providing illumination and magnification.
5. Operating Instructions
This section details how to effectively use the various features of your soldering station.
5.1 Using the Flexible Arms and PCB Holders
- Position the magnetic PCB holders to support your circuit board or workpiece.
- Adjust the flexible arms to hold wires, small components, or other parts using the alligator clamps. Bend the gooseneck arms to achieve the desired angle and height.
- Ensure components are securely clamped but not overtightened to prevent damage.
5.2 Using the Magnifying Lamp
- Once connected to a USB power source, press the power button on the inline controller to turn on the LED light.
- Use the '+' and '-' buttons to adjust the brightness (10 levels available).
- Press the mode button to cycle through the three color temperatures: White Light, Warm Light, and Yellow Light. Choose the setting that best suits your task and reduces eye strain.
- Adjust the flexible neck of the lamp to position the 3X magnifying glass directly over your work area for enhanced visibility of fine details.

Figure 5.1: The LED magnifying lamp offers multiple brightness and color settings for optimal viewing.
5.3 Using the Universal Vise
- Place the workpiece between the vise jaws.
- Turn the handle to tighten the jaws and secure the workpiece. Do not overtighten.
- Rotate the vise 360° to achieve the best working angle.
5.4 Using the 360° Hot Air Gun Holder
- Insert your hot air gun into the holder.
- Adjust the holder's position and angle to direct the hot air precisely onto your workpiece, allowing for hands-free operation during desoldering or heat shrinking tasks.
6. Maintenance
Regular maintenance ensures the longevity and optimal performance of your soldering station.
- Cleaning: After each use, wipe down the steel base and components with a dry, soft cloth to remove solder residue, flux, and dust. For stubborn grime, use a small amount of isopropyl alcohol on a cloth.
- Inspect Components: Periodically check the flexible arms, alligator clamps, and vise for any signs of wear or damage. Replace any damaged parts immediately.
- Storage: Store the soldering station in a clean, dry environment away from direct sunlight and extreme temperatures.
7. Troubleshooting
If you encounter issues with your VEVOR Magnetic Helping Hands Soldering Station, refer to the following common problems and solutions:
| Problem | Possible Cause | Solution |
|---|---|---|
| Magnifying lamp does not turn on. | No power, loose USB connection, faulty USB adapter. | Ensure USB cable is securely connected. Try a different USB port or power adapter. |
| Flexible arms do not hold position. | Overloaded arm, internal wear. | Reduce the weight of the item being held. If wear is evident, consider replacing the arm. |
| Magnetic components slide on the base. | Base or component magnet is dirty, excessive force applied. | Clean the magnetic surfaces. Ensure the base is on a flat, stable surface. Avoid applying excessive lateral force. |
| Vise jaws do not grip securely. | Jaws are worn, workpiece is too small/large. | Ensure the workpiece is within the vise's capacity. Check jaws for damage. |
8. Specifications
Detailed technical specifications for the VEVOR Magnetic Helping Hands Soldering Station (LFS0206):
| Feature | Specification |
|---|---|
| Item Model Number | LFS0206 |
| Power (Magnifying Lamp) | 3W |
| Power Plug | USB |
| Magnification | 3X |
| Arms Length | 12.2 in / 310 mm |
| Arms Diameter | 0.28 in / 7 mm |
| Main Materials | Steel Coating |
| Net Weight (Including All Accessories) | 6.83 lb / 3.1 kg |
| Product Dimensions (L x W x H) | 11.02 x 7.01 x 0.12 in / 279 x 178 x 3 mm (Base) |
| Voltage | 110 Volts (for general operation, lamp is USB 5V) |
| Wattage | 60 watts (general power rating, not specific to lamp) |

Figure 8.1: Product dimensions and key features.
9. Warranty and Support
VEVOR products are designed for durability and performance. For warranty information, technical support, or service inquiries, please refer to the official VEVOR website or contact their customer service directly. Keep your purchase receipt as proof of purchase.
Online Support: Visit www.vevor.com for product registration, user manuals, FAQs, and contact information.

