
KA-S710
Generic KA-S710 Solar/Battery WiFi Security Camera User Manual
Model: KA-S710
1. Introduction
This manual provides detailed instructions for the installation, operation, and maintenance of your Generic KA-S710 Solar/Battery WiFi Security Camera. This camera is designed for outdoor surveillance, offering wireless connectivity and flexible power options via solar energy or internal battery. It features 2MP resolution, night vision, motion detection, and two-way audio capabilities.
2. Package Contents
Please verify that all items listed below are present in your package. If any items are missing or damaged, please contact customer support.
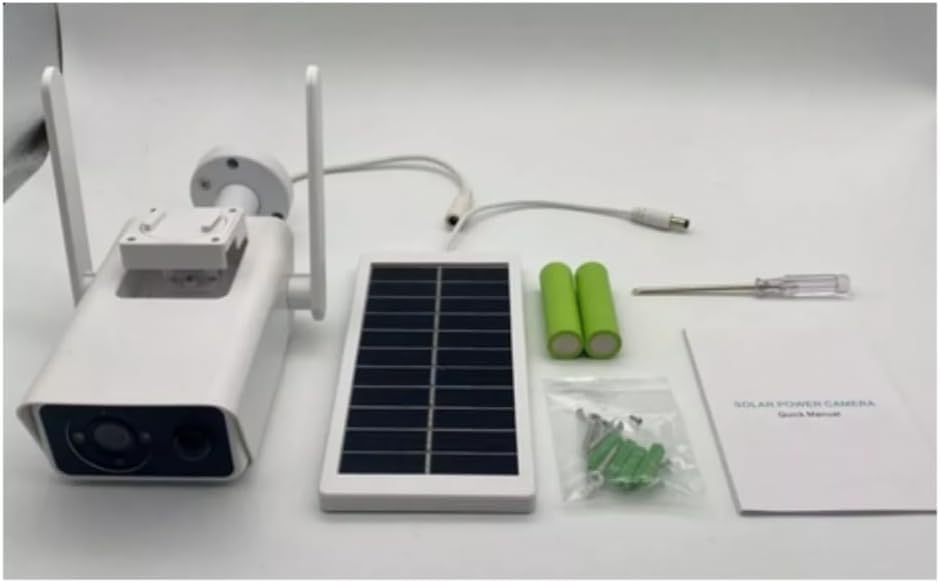
Figure 2.1: Included Components. The package typically contains the camera unit with integrated solar panel, two rechargeable batteries, a power adapter, mounting hardware (screws and wall anchors), a screwdriver, and a quick start guide.
- KA-S710 Security Camera Unit with Solar Panel
- Rechargeable Batteries (x2)
- Power Adapter
- Mounting Bracket and Screws
- Screwdriver
- User Manual (Quick Guide)
3. Product Overview and Components
Familiarize yourself with the various parts of your KA-S710 security camera.

Figure 3.1: Camera Component Diagram. This image labels key parts including the antennas for WiFi, solar panels for charging, built-in microphone, camera lens, infrared (IR) LED for night vision, PIR sensor for motion detection, and the mounting bracket. Dimensions are provided for reference.
- Antenna: For WiFi connectivity.
- Solar Panels: Recharge the internal battery using sunlight.
- Built-in MIC: Captures audio for two-way communication.
- Lens: The primary camera lens for video capture.
- R LED (Infrared LED): Provides illumination for night vision.
- PIR Sensor: Passive Infrared sensor for detecting motion.
- Bracket: Used for mounting the camera securely.
4. Setup and Installation
4.1. Battery Installation and Initial Charge
- Locate the battery compartment on the camera unit.
- Insert the two provided rechargeable batteries, ensuring correct polarity.
- Connect the camera to the power adapter for an initial full charge (approximately 8-10 hours) before relying solely on solar power.
4.2. App Download and Account Registration
The camera operates with the ICSEE application.
- Download the "ICSEE" app from your smartphone's app store (Google Play Store for Android or Apple App Store for iOS).
- Open the app and follow the on-screen instructions to register a new account.

Figure 4.1: ICSEE App Interface. The smartphone screen illustrates the ICSEE application, which is used to manage and view the camera feed.
4.3. Camera Pairing with App
- Ensure your smartphone is connected to a 2.4GHz WiFi network.
- In the ICSEE app, tap the "+" icon to add a new device.
- Select "Add Camera" or "Smart Camera" and follow the app's instructions to connect the camera to your WiFi network. This usually involves scanning a QR code on the camera or entering WiFi credentials.
- Once connected, name your camera and complete the setup process.
4.4. Mounting the Camera
Choose a location that provides optimal sunlight exposure for the solar panel and a clear view of the area you wish to monitor. Ensure the camera is within range of your WiFi network.
- Mark the drilling points for the mounting bracket on the desired surface.
- Drill pilot holes and insert wall anchors if mounting on masonry.
- Secure the mounting bracket using the provided screws.
- Attach the camera unit to the bracket and adjust its angle for optimal coverage and solar panel exposure.

Figure 4.2: Optimal Mounting for Solar Charging. The camera should be positioned to receive maximum direct sunlight on its solar panels for continuous power.
5. Operating Instructions
5.1. Live View and Recording
- Open the ICSEE app and select your camera from the device list to access the live video feed.
- From the live view, you can manually record video, take screenshots, and access recorded footage.
5.2. Motion Detection and Alarms
- The camera features a PIR sensor for motion detection.
- Configure motion detection sensitivity and alarm settings within the ICSEE app.
- When motion is detected, the camera can trigger an alarm, record video, and send notifications to your smartphone.
5.3. Night Vision
- The camera automatically switches to infrared (IR) night vision in low-light conditions.
- This feature ensures clear video monitoring even in complete darkness.
5.4. Two-Way Audio
- Utilize the built-in microphone and speaker for two-way audio communication through the ICSEE app.
- Tap the microphone icon in the app to speak, and release to listen.
5.5. Video Storage
The camera supports local storage via a MicroSD card (up to 128GB) and potentially cloud storage (check app for subscription options).

Figure 5.1: Storage Capacity and Recording Duration. This table provides an estimate of how many days of recording can be stored on different MicroSD card sizes, ranging from 16GB to 128GB.
| Storage Capacity | Estimated Recording Days |
|---|---|
| 16GB | 2-6 Days |
| 32GB | 4-12 Days |
| 64GB | 8-16 Days |
| 128GB | 16-32 Days |
6. Maintenance
6.1. Cleaning
- Regularly clean the camera lens and solar panel with a soft, damp cloth to ensure optimal performance.
- Avoid using harsh chemicals or abrasive materials.
6.2. Battery and Solar Panel Care
- Ensure the solar panel is free from obstructions (leaves, dirt, snow) to maximize charging efficiency.
- In prolonged periods of low sunlight, the camera's battery may deplete. Consider temporarily charging the camera via the power adapter if necessary.
- The camera is designed for outdoor use, but extreme weather conditions (e.g., heavy snow, prolonged sub-zero temperatures) may affect battery performance.
7. Troubleshooting
| Problem | Possible Cause | Solution |
|---|---|---|
| Camera not connecting to WiFi | Incorrect WiFi password; Camera too far from router; Router is 5GHz only. | Verify WiFi password. Move camera closer to router. Ensure router supports 2.4GHz WiFi. Reset camera and try pairing again. |
| Poor video quality | Dirty lens; Weak WiFi signal; Low light conditions. | Clean the camera lens. Improve WiFi signal strength. Ensure IR night vision is active in low light. |
| Battery not charging via solar panel | Insufficient sunlight; Solar panel obstructed; Faulty solar panel. | Relocate camera to an area with more direct sunlight. Clear any obstructions from the solar panel. If problem persists, contact support. |
| Motion detection not working | PIR sensor obstructed; Sensitivity set too low; Incorrect app settings. | Ensure PIR sensor is clear. Adjust motion detection sensitivity in the ICSEE app. Verify alarm settings are enabled. |
8. Specifications
| Feature | Detail |
|---|---|
| Model | KA-S710 |
| Brand | Generic |
| Connectivity Technology | Wireless (WiFi 2.4GHz) |
| Power Source | Solar Powered, Battery (Rechargeable) |
| Video Capture Resolution | 1080p (2MP) |
| Video Format | MP4 |
| Special Features | Motion Detection (PIR), Night Vision (IR), Two-Way Audio, Noise Reduction |
| Indoor/Outdoor Use | Outdoor Area |
| Storage | MicroSD Card (Max 128GB) |
| Recommended App | ICSEE |
| Dimensions (L x W x H) | Approx. 22 x 9.2 x 5.9 cm (camera body, excluding solar panel/antennas) |
| Weight | Approx. 785g (Product) |
9. Warranty and Support
For warranty information, technical support, or service inquiries, please refer to the retailer where you purchased this product or visit the manufacturer's official website. Keep your purchase receipt as proof of purchase.
Ask a question about this manual
Ask about setup, troubleshooting, compatibility, parts, safety, or missing instructions. Manuals+ will review the question and use this page’s manual context to help answer it.