1. Introduction
Welcome to the PAPIFEED Automatic Smart Pet Feeder user manual. This device is designed to simplify pet feeding with smart features, including scheduled feeding, remote control via an app, a built-in camera, and two-way audio communication. This manual provides detailed instructions to ensure proper setup, operation, and maintenance of your feeder.
2. Product Overview
Key Features:
- 6L Capacity: Large food container suitable for cats and small dogs.
- 2.4G WiFi & Bluetooth Connectivity: Seamless app control for remote feeding and monitoring.
- Manual Adjustable 480P Camera: Monitor your pet's feeding activity with adjustable viewing angle (no night vision).
- Two-Way Audio: Communicate with your pet remotely.
- Customizable Feeding Schedule: Program up to 10 meals per day with 1-6 portions each.
- Dual Power Supply: DC 5V adapter with 4xAA battery backup (batteries not included) for uninterrupted feeding.
- Easy to Clean: Detachable, BPA-free food container and stainless steel bowl are dishwasher safe.
- Anti-Clog Design: Ensures smooth food dispensing.
Package Contents:
- PAPIFEED Automatic Pet Feeder (Main Unit)
- Stainless Steel Food Bowl
- Food Container
- Lid with Desiccant Compartment
- DC 5V Power Adapter
- USB Power Cable
- User Manual
- Safety Lock Strap (Velcro)
3. Setup Guide
3.1 Physical Assembly
- Attach Food Bowl: Slide the stainless steel bowl into the designated slot at the base of the feeder. Ensure it clicks securely into place.
- Install Desiccant: Open the desiccant compartment on the underside of the lid. Insert the provided desiccant packet to help keep food fresh. Close the compartment securely.
- Secure Lid: Place the lid onto the food container, ensuring it is properly aligned and sealed.
- Apply Safety Lock (Optional): Attach the provided Velcro safety lock strap around the feeder and lid to prevent pets from opening the lid.
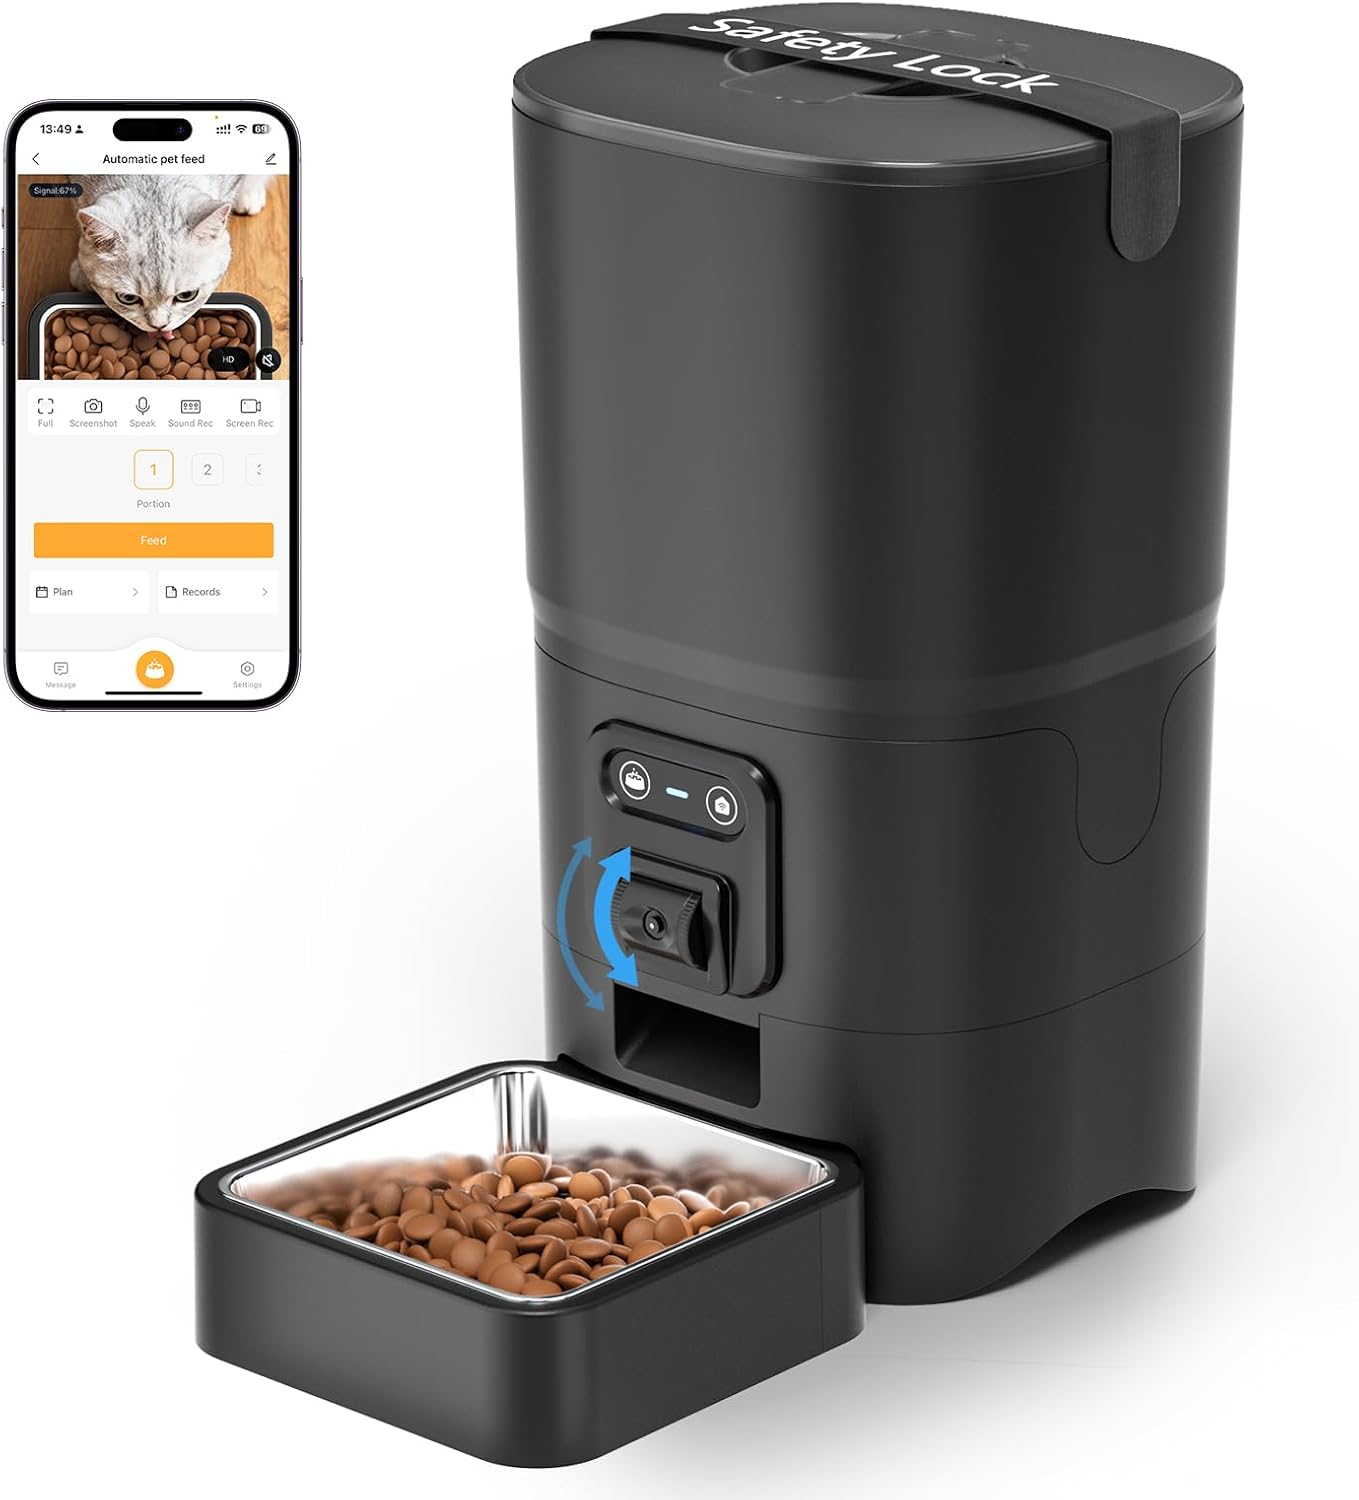
Figure 1: Assembled PAPIFEED Automatic Pet Feeder.

Figure 2: Pet feeder in use, demonstrating the live video feed on a smartphone.
3.2 Power Supply
- Connect Power Adapter: Plug the USB power cable into the DC 5V power adapter, then connect the adapter to a wall outlet. Insert the other end of the cable into the power port at the bottom of the feeder.
- Install Backup Batteries (Recommended): For uninterrupted operation during power outages, open the battery compartment at the bottom of the feeder. Insert 4 AA batteries (not included), ensuring correct polarity. Close the compartment securely.

Figure 3: Dual power supply setup for the feeder.
3.3 App Installation & Connection
- Download Smartlyn App: Scan the QR code in the user manual or search for "Smartlyn" in your smartphone's app store (App Store for iOS, Google Play for Android). Download the Smartlyn App here.
- Register/Log In: Open the Smartlyn app and follow the on-screen instructions to register a new account or log in if you already have one.
- Add Device:
- Ensure your phone's Bluetooth and WLAN (2.4GHz WiFi) are enabled. The feeder supports 2.4GHz WiFi only; 5GHz networks are not compatible.
- Power on the feeder. Press and hold the WiFi button on the feeder until the blue light flashes, indicating it's in network configuration mode.
- In the Smartlyn app, tap the "+" icon in the upper right corner to add a device. The app should automatically discover the "Automatic pet feeder".
- Follow the app prompts to connect the feeder to your 2.4GHz WiFi network by entering your WiFi password.
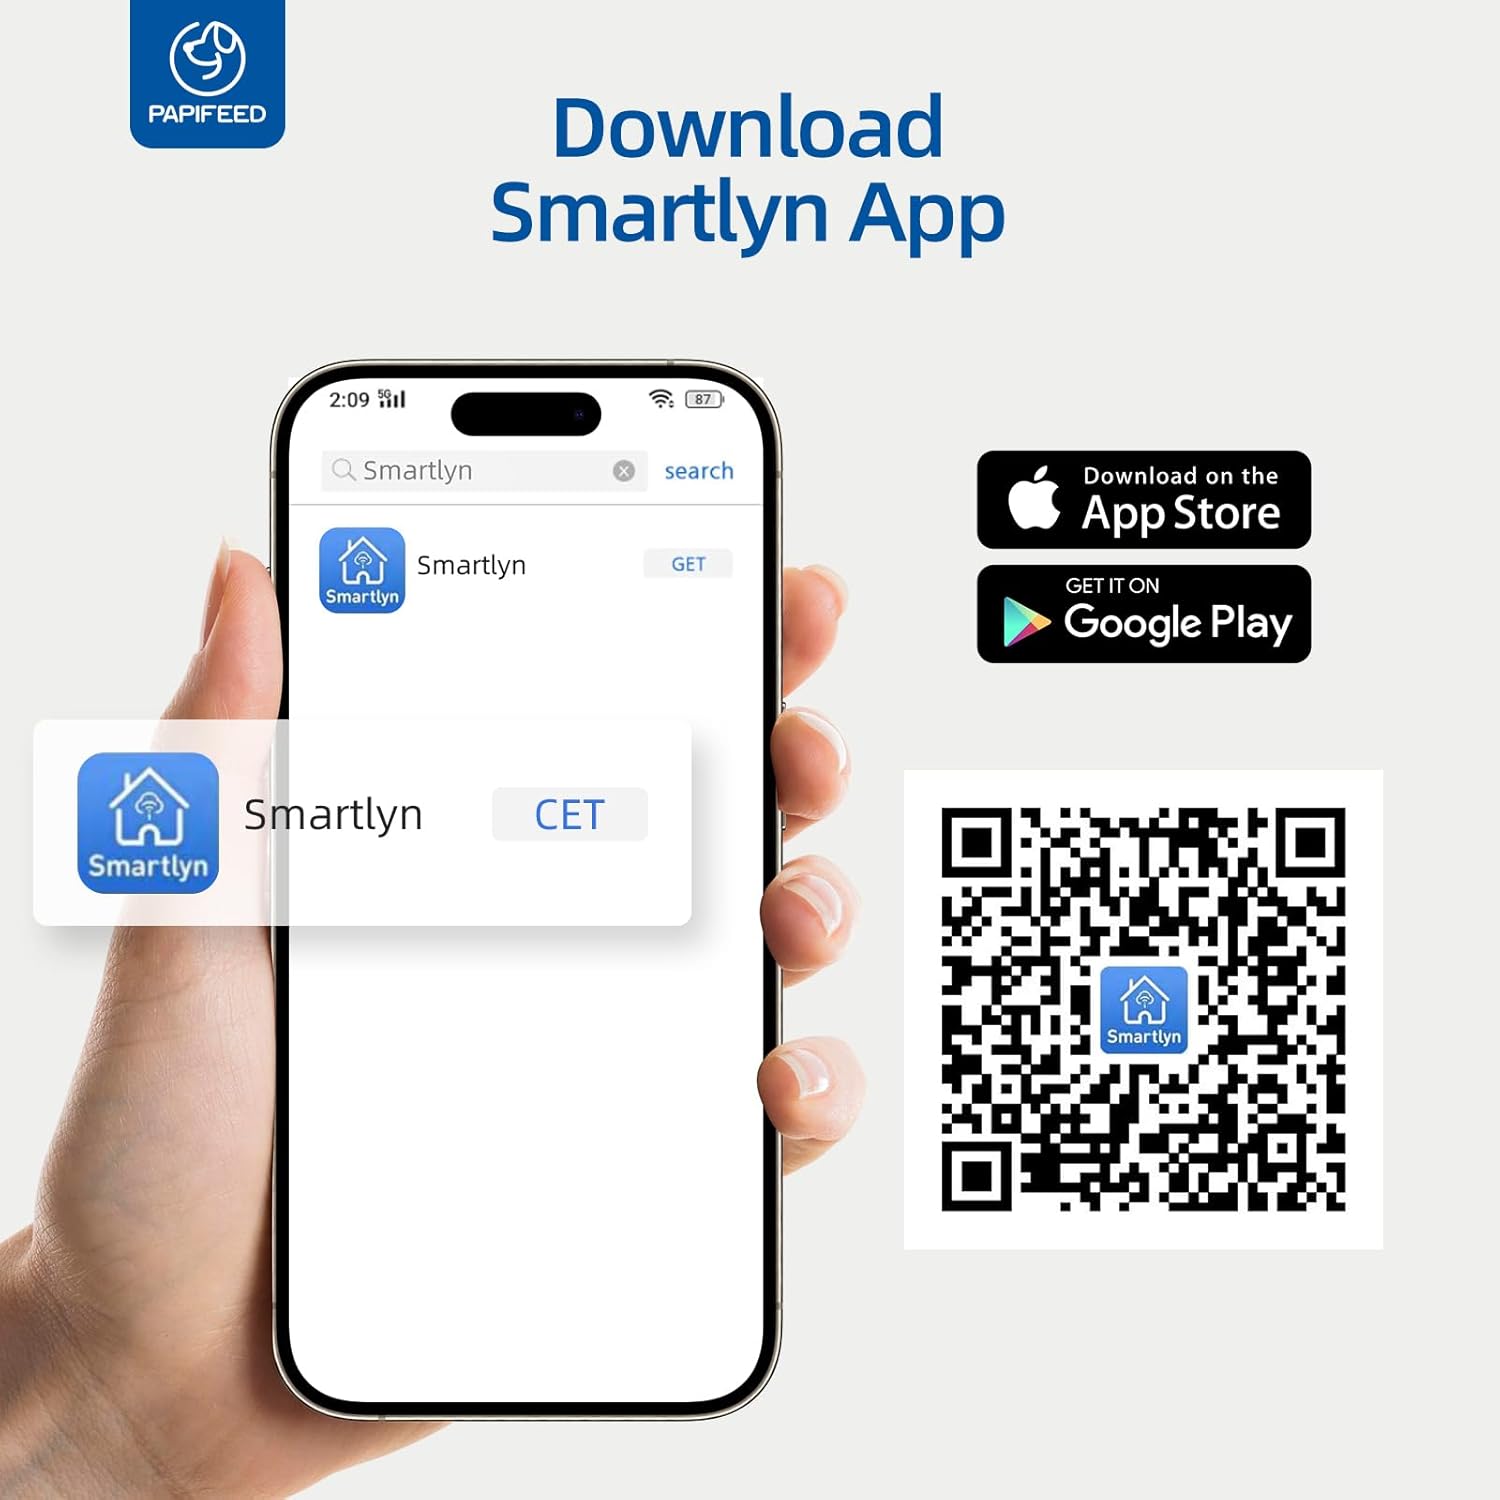
Figure 4: Smartlyn App download and installation guide.

Figure 5: Step-by-step guide for connecting the feeder to the Smartlyn app.
4. Operating Instructions
4.1 App Control
- Scheduled Feeding: In the Smartlyn app, navigate to the "Plan" section. You can set up to 10 meals per day, with each meal consisting of 1 to 6 portions (0.48 oz/portion). Select specific days of the week for repeat feeding.
- Remote Feeding: Use the "Feed" button in the app to dispense food instantly, regardless of the schedule.
- Portion Control: Adjust the number of portions per meal directly through the app.
- Feeding Records: The app maintains a record of all dispensed meals, allowing you to monitor your pet's consumption.
- Device Sharing: Share control access with up to 5 family members to manage feeding tasks collaboratively.

Figure 6: Smartlyn app interface for setting feeding schedules.

Figure 7: Detailed view of the scientific feeding schedule options.
4.2 Camera and Audio Features
- Live Video Monitoring: Access a real-time 480P video feed of your pet's feeding area through the app. The camera angle can be manually adjusted up and down on the feeder itself. Note: The camera does not have night vision.
- Two-Way Audio: Use the microphone and speaker icons in the app to listen to your pet or speak to them. The device volume can be adjusted in the app settings.
- Personalized Meal Voice: Record a custom voice message to play during feeding times to call your pet.
- Motion & Sound Detection: Enable motion and sound detection in the app settings to receive alerts when your pet approaches the feeder or makes sounds. Sensitivity can be adjusted.
- Capture Moments: Take screenshots or record video directly from the live feed within the app.

Figure 8: Two-way audio communication via the Smartlyn app.

Figure 9: Live camera view with manual 85-degree adjustment.
4.3 Manual Feeding
In addition to app control, you can manually dispense a single portion of food by pressing the feed button located on the front of the feeder. This is useful for immediate treats or extra meals.
5. Maintenance
5.1 Cleaning
- Detachable Parts: The food container and stainless steel bowl are fully detachable and dishwasher safe for easy and hygienic cleaning.
- Main Unit: The main unit containing electronic components is NOT washable. Wipe it clean with a damp cloth. Ensure no water enters the electronic parts.

Figure 10: Detachable and washable components of the feeder.

Figure 11: Exploded view highlighting detachable parts and anti-clog design.
5.2 Desiccant Replacement
Regularly check and replace the desiccant packet in the lid to maintain food freshness and prevent moisture buildup. The frequency of replacement depends on humidity levels.
6. Troubleshooting
| Issue | Possible Cause | Solution |
|---|---|---|
| Feeder not connecting to WiFi | Incorrect WiFi band (5GHz not supported); incorrect password; feeder not in pairing mode. | Ensure your router is broadcasting a 2.4GHz signal. Verify WiFi password. Press and hold the WiFi button on the feeder until the blue light flashes to enter pairing mode. |
| App download QR code not working | Outdated link or regional restrictions. | Search for "Smartlyn" directly in your device's app store (Google Play or App Store). |
| Food not dispensing | Food hopper empty; food jammed; power issue. | Check food level. Ensure kibble size is within recommended range (0.2-0.47 inch). Check power connection and battery backup. Clean the dispensing mechanism if necessary. |
| Camera view is dark/unclear at night | Camera lacks night vision. | The 480P camera does not include night vision. Ensure adequate lighting in the viewing area for clear images. |
| Pet opens the lid | Lid not securely fastened. | Ensure the lid is twisted securely into place. Utilize the provided Velcro safety lock strap for added security. |
7. Specifications
- Brand: PAPIFEED
- Model Name: PPATFD
- Item Model Number: PPATFD-001
- Color: Black
- Material: Plastic, Stainless Steel
- Capacity: 6 Liters (approx. 25 cups)
- Recommended Kibble Size: 0.2-0.47 inches (5-12mm) in diameter
- Item Dimensions (LxWxH): 7.56 x 7.56 x 13.43 inches
- Item Weight: 1.68 Kilograms (3.7 pounds)
- Power Supply: DC 5V (adapter included), 4xAA batteries (not included) for backup
- Connectivity: 2.4GHz WiFi, Bluetooth
- Camera: Manual adjustable 480P (no night vision)
- Audio: Two-Way Audio
- Feeding Schedule: Up to 10 meals/day, 1-6 portions/meal
- Target Species: Cat, Small Dogs

Figure 12: Product dimensions.

Figure 13: Recommended kibble size and food types.
8. Warranty & Support
The PAPIFEED Automatic Smart Pet Feeder comes with a 2-Year Manufacturer Warranty. For any support inquiries, troubleshooting assistance, or warranty claims, please refer to the contact information provided in your product packaging or visit the official PAPIFEED website.


