Introduction
The ASUS ROG Strix Impact III Wireless Gaming Mouse is engineered for precision and performance, featuring an ultralight 57-gram design, dual-mode wireless connectivity (2.4 GHz RF and Bluetooth), and an advanced ROG AimPoint optical sensor. This manual provides detailed instructions to help you set up, operate, and maintain your gaming mouse for an optimal experience.

Figure 1: Top view of the ASUS ROG Strix Impact III Wireless Gaming Mouse.
What's in the Box
Verify that all items are present in your product package:
- ROG Strix Impact III Wireless Optical Wireless Gaming Mouse
- Wireless Receiver (ROG Omni Receiver)
- AA battery
- AAA battery
- Quick Start Guide
Setup
1. Battery Installation
The ROG Strix Impact III Wireless Gaming Mouse supports both AA and AAA batteries. To install, remove the magnetic back cover and insert one AA or AAA battery into the compartment. Ensure correct polarity as indicated inside the compartment. The mouse is designed to be ultralight at 57 grams (excluding battery and receiver).

Figure 2: Battery compartment showing AA/AAA battery slot and magnetic back cover.
2. Connecting Your Mouse
The mouse offers two wireless connectivity options: 2.4 GHz RF via the ROG Omni Receiver or Bluetooth.
2.1. 2.4 GHz RF Connection (ROG Omni Receiver)
- Locate the ROG Omni Receiver. This compact USB dongle allows you to connect both your mouse and a compatible ROG keyboard using a single receiver.
- Insert the ROG Omni Receiver into an available USB port on your computer.
- On the bottom of the mouse, slide the power switch to the 2.4 GHz RF position (indicated by a wireless icon).
- The mouse will automatically pair with the receiver. The indicator light on the mouse will confirm connection.

Figure 3: The ROG Omni Receiver allows connection of both mouse and keyboard via a single USB dongle.

Figure 4: Close-up of the ROG Omni Receiver plugged into a USB port.
2.2. Bluetooth Connection
- On the bottom of the mouse, slide the power switch to the Bluetooth position (indicated by a Bluetooth icon).
- The mouse will enter pairing mode. The indicator light may blink.
- On your computer or device, navigate to Bluetooth settings and search for new devices.
- Select "ROG Strix Impact III" from the list of available devices to complete the pairing process.
Operating Your Mouse
1. DPI Adjustment
The ROG Strix Impact III features an ROG AimPoint optical sensor with a sensitivity range of 100-36,000 DPI. Use the DPI button located on the bottom of the mouse to cycle through preset DPI levels. For advanced customization and precise DPI settings, install the ASUS Armoury Crate software.
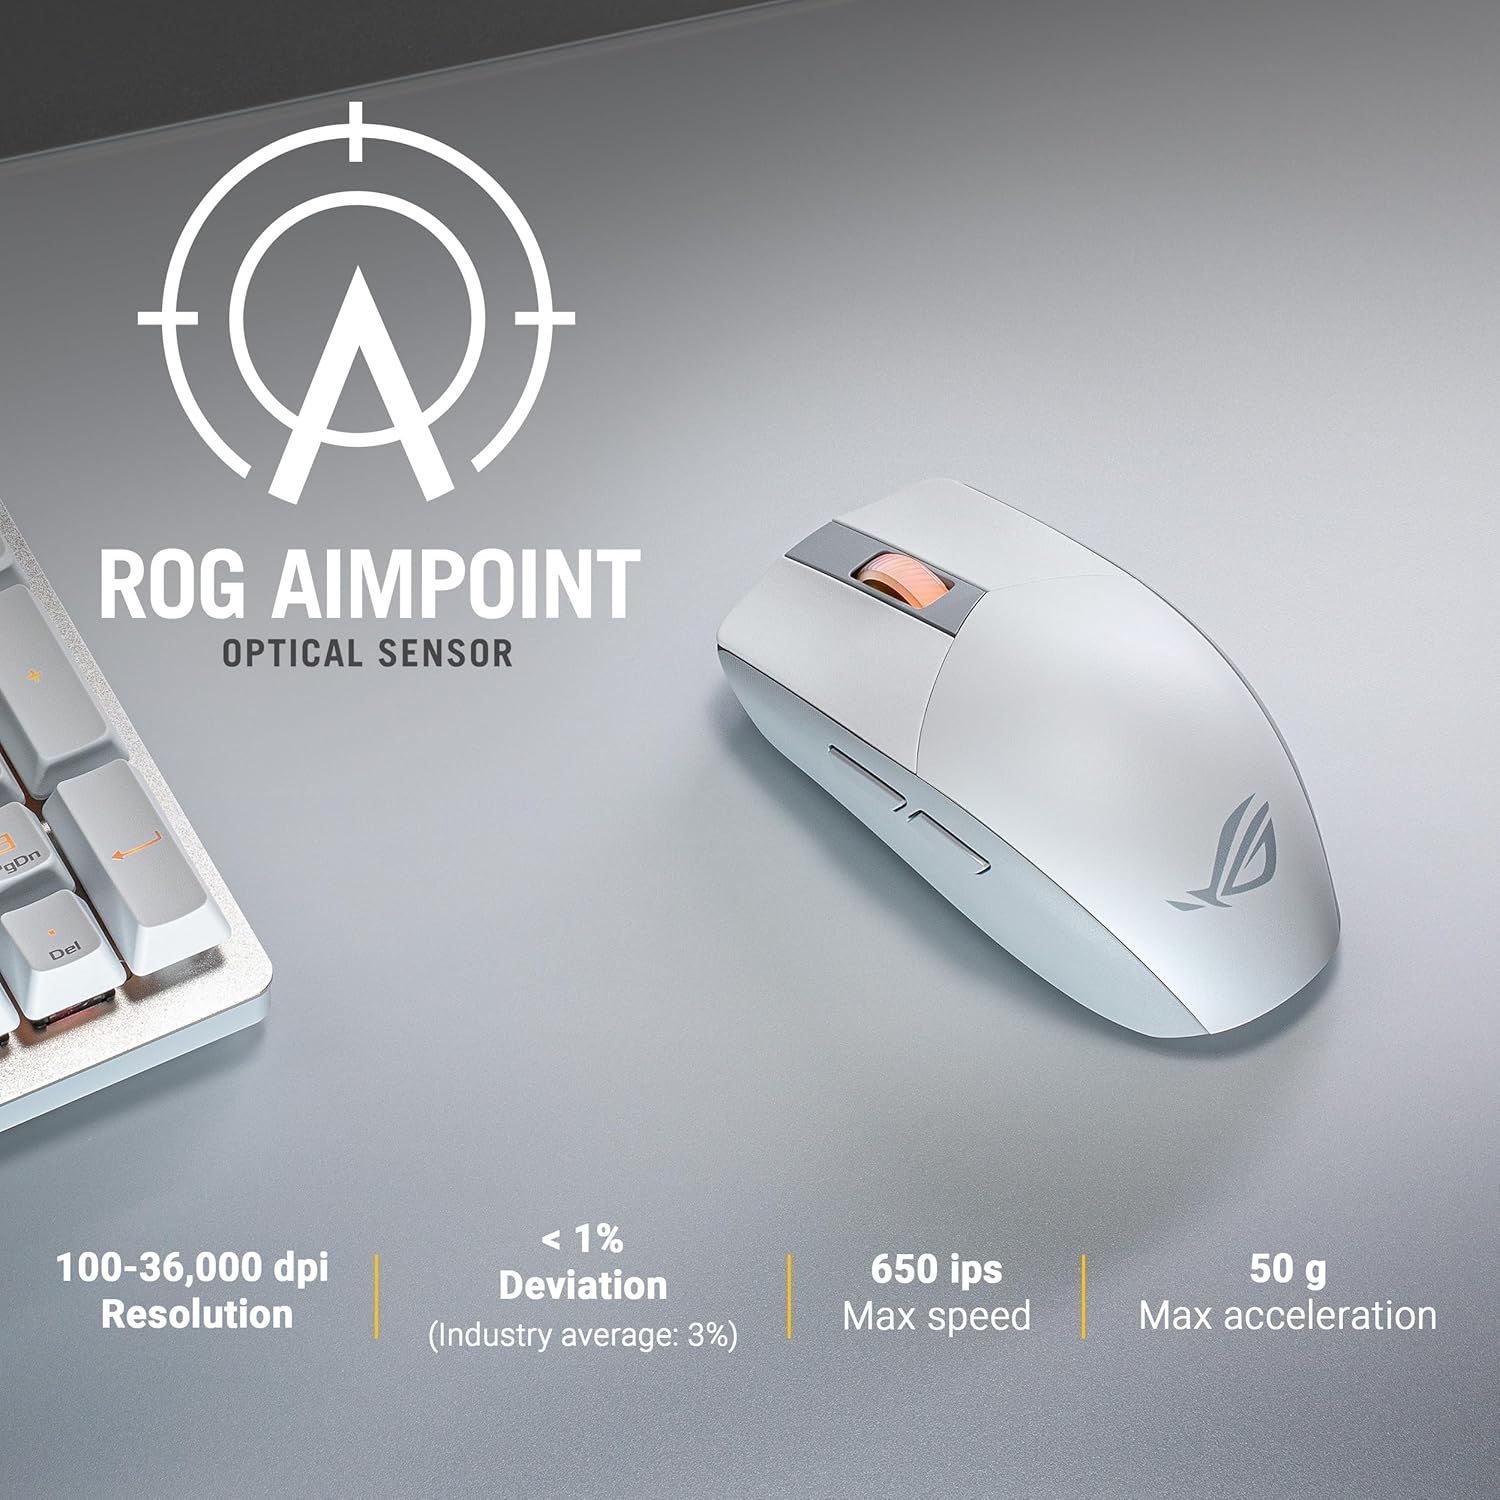
Figure 5: ROG AimPoint Optical Sensor specifications, including 100-36,000 DPI resolution.
2. Button Functions
The mouse features standard left and right click buttons, a scroll wheel, and two programmable side buttons. The left and right click buttons utilize durable L/R PBT material and ROG Micro Switches with a 70M click lifespan, providing a superior click feel.
3. Replaceable Switches
The ROG Strix Impact III is equipped with Push-Fit Switch Sockets, allowing for easy replacement of the mouse switches. This feature extends the lifespan of your mouse and allows for customization of click feel. To replace switches, carefully remove the magnetic back cover and then the top shell. Gently pull out the existing switches and insert new ones, ensuring they are properly seated.

Figure 6: Internal view highlighting the Push-Fit Switch Socket for easy switch replacement.
4. Battery Life and Power Efficiency
The mouse offers outstanding battery life, up to 450 hours in 2.4 GHz RF mode and up to 618 hours in Bluetooth mode, when using a single AA lithium or AAA battery. The ROG SpeedNova wireless technology ensures low-latency, reliable 2.4 GHz RF wireless performance with incredible energy efficiency.

Figure 7: ROG SpeedNova Wireless Technology emphasizes max speed, consistency, and power efficiency.
Maintenance
1. Cleaning
To clean your mouse, use a soft, dry cloth. For stubborn dirt, a slightly damp cloth with mild soap can be used, but ensure no liquid enters the mouse. Avoid using harsh chemicals or abrasive materials.
2. Battery Replacement
When the mouse's performance degrades or the indicator light signals low battery, replace the AA or AAA battery. Follow the battery installation steps outlined in the Setup section.
Troubleshooting
- Mouse not responding:
- Ensure the mouse is powered on and the correct connectivity mode (2.4 GHz RF or Bluetooth) is selected.
- Check battery level and replace if necessary.
- For 2.4 GHz RF, ensure the ROG Omni Receiver is securely plugged into a USB port. Try a different USB port.
- For Bluetooth, ensure Bluetooth is enabled on your device and the mouse is paired. Try re-pairing the mouse.
- Cursor movement is erratic or imprecise:
- Clean the optical sensor on the bottom of the mouse.
- Ensure you are using the mouse on a suitable surface. Avoid highly reflective or transparent surfaces.
- Adjust the DPI setting using the DPI button or Armoury Crate software.
- Connectivity issues (lag, disconnections):
- Reduce the distance between the mouse and the receiver/device.
- Minimize interference from other wireless devices (e.g., Wi-Fi routers, cordless phones).
- Ensure your computer's drivers are up to date.
Specifications
| Feature | Detail |
|---|---|
| Model Number | P520 ROG STRIX IMPACT III WL/WHT |
| Connectivity | 2.4 GHz RF (ROG SpeedNova), Bluetooth |
| Sensor | ROG AimPoint Optical Sensor |
| DPI Resolution | 100 - 36,000 DPI (with <1% deviation) |
| Max Speed | 650 IPS |
| Max Acceleration | 50 G |
| Weight | 57 grams (excluding battery and receiver) |
| Dimensions (LxWxH) | 4.72 x 2.44 x 0.04 inches |
| Battery Type | 1 x AA or 1 x AAA battery |
| Battery Life | Up to 618 hours (Bluetooth), Up to 450 hours (2.4 GHz RF) |
| Switches | ROG Micro Switches (70M click lifespan), Push-Fit Switch Socket |
| Buttons | L/R PBT Buttons, Scroll Wheel, 2 Side Buttons, DPI Button |

Figure 8: Bottom view of the mouse showing model and regulatory markings.
Warranty
ASUS products are manufactured to the highest quality standards. For detailed warranty information, please refer to the warranty card included with your product or visit the official ASUS support website. Keep your proof of purchase for warranty claims.
Support
For further assistance, technical support, or driver downloads, please visit the official ASUS support website. You can also refer to the Quick Start Guide included in your package for initial setup instructions.
- ASUS Support Website: www.asus.com/support/
- Quick Start Guide (Digital): https://qs.asus.com/C6MPMV000001


