
1. Product Overview
The GMKtec M3 Mini PC is a compact and powerful desktop computer designed for various applications, from daily office tasks to multimedia consumption and light gaming. It features an Intel Core i5-12450H processor, 16GB DDR4 RAM, and a 1TB M.2 NVMe SSD, offering efficient performance in a small form factor.

Figure 1: GMKtec M3 Mini PC, showcasing its compact design and front USB ports.
Key Features:
- Processor: Intel Core i5-12450H (up to 4.4 GHz, 8 cores, 12 threads, 12MB cache).
- Memory: 16GB DDR4 dual-channel RAM (expandable).
- Storage: 1TB M.2 2280 NVMe SSD (PCIe3.0), with an additional M.2 2242 SATA slot for expansion up to 2TB.
- Graphics: Intel Iris Xe Graphics G7 96EU GPU, supporting 4K UHD triple display output.
- Connectivity: Dual-band WiFi 6 (2.4G+5G), Bluetooth 5.2, and 2.5Gbps RJ45 Ethernet.
- Ports: Multiple USB 3.2, USB 2.0, HDMI, and Type-C (DP/DATA) ports.
Video 1: An overview of the GMKtec M3 Mini PC, highlighting its compact size, processor, and connectivity options.
2. Setup Guide
2.1 Package Contents
Before beginning, ensure all items are present in the package:
- 1 x GMKtec Nucbox M3 Intel Core i5-12450H Mini PC Computer
- 1 x Power Adapter
- 1 x VESA Mount with Screws
- 1 x HDMI Cable
- 1 x User Manual

Figure 2: All components included in the GMKtec M3 Mini PC package.
2.2 Initial Connection
- Connect Display: Use the provided HDMI cable to connect the Mini PC to your monitor or TV. The Mini PC supports up to three displays simultaneously via 2x HDMI and 1x Type-C port.
- Connect Peripherals: Plug in your USB keyboard and mouse into the available USB ports.
- Connect Power: Connect the power adapter to the DC IN port on the Mini PC, then plug the adapter into a power outlet.
- Power On: Press the power button located on the front of the Mini PC.
2.3 VESA Mount Installation
The included VESA mount allows you to attach the Mini PC to the back of a compatible monitor or under a desk for a clutter-free setup. Follow the instructions provided with the VESA mount for secure installation.
3. Operating Instructions
3.1 Windows 11 Pro Setup
Upon first boot, the Mini PC will guide you through the Windows 11 Pro initial setup process. Follow the on-screen prompts to configure your region, language, network, and user account settings.
3.2 Port Overview
The GMKtec M3 Mini PC offers a variety of ports for versatile connectivity:

Figure 3: Front and rear port layout of the GMKtec M3 Mini PC.
- Front Ports: 2x USB 3.2, Power Button.
- Rear Ports: DC IN (20V 5A), 3.5mm CTIA Audio Jack, 2x HDMI (4K@60Hz), 1x RJ45 (2.5GbE), 1x USB 3.2, 1x USB 2.0, 1x Type-C (DP/DATA).
3.3 Triple Display Support
The Mini PC supports connecting up to three independent 4K displays simultaneously. Use the two HDMI ports and the USB Type-C port (which supports DisplayPort Alt Mode) to extend your desktop across multiple screens.

Figure 4: Example of a triple display setup with the GMKtec M3 Mini PC.
3.4 Network Connectivity
- Wi-Fi 6: Connect to wireless networks for high-speed internet access.
- 2.5Gbps Ethernet: For stable and fast wired network connections, plug an Ethernet cable into the RJ45 port.
- Bluetooth 5.2: Pair with Bluetooth-enabled devices such as headphones, keyboards, or mice.
3.5 BIOS Setup
The BIOS (Basic Input/Output System) allows for advanced configuration of the Mini PC's hardware. To access the BIOS, press the designated key (usually DEL or F2) repeatedly during startup. Within the BIOS, you can adjust power limits, boot order, and other system settings. Exercise caution when changing BIOS settings, as incorrect configurations can affect system stability.
Video 2: A guide to navigating the BIOS setup utility for the GMKtec M3 Mini PC, including power limit adjustments.
4. Maintenance and Upgrades
4.1 Component Overview and Upgrades
The GMKtec M3 Mini PC is designed for easy maintenance and upgrades. You can expand its memory and storage capacity:
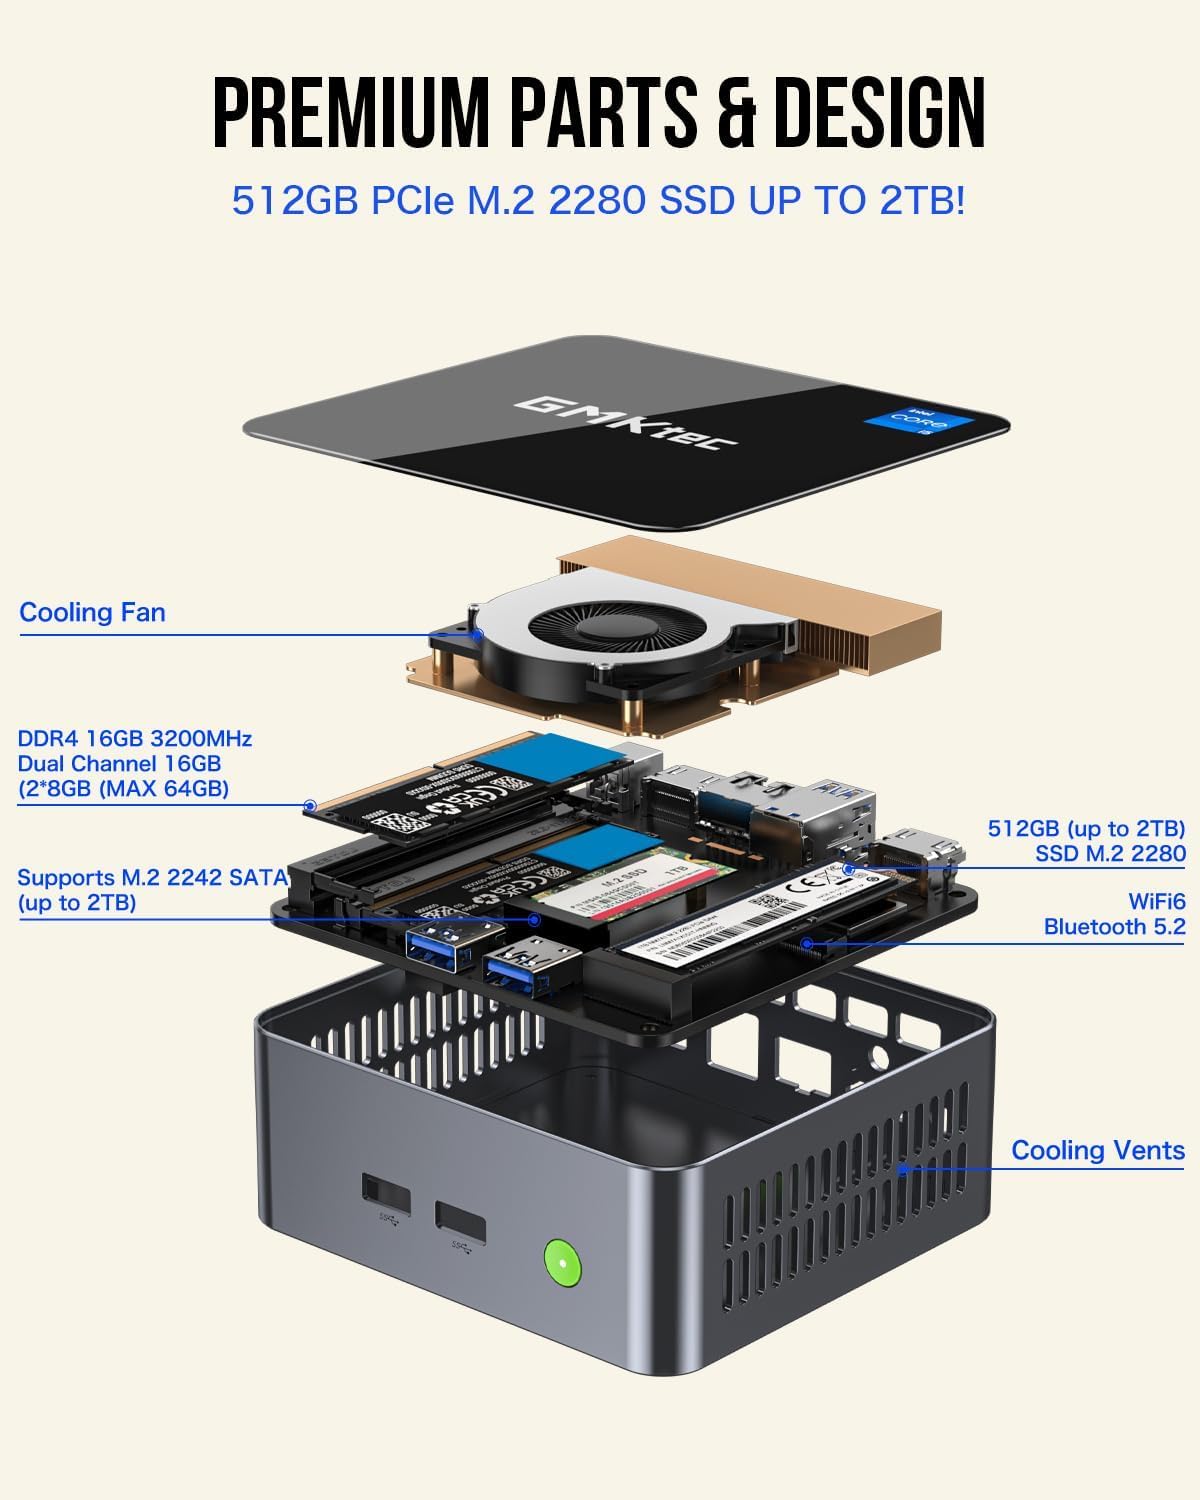
Figure 5: Internal layout of the GMKtec M3 Mini PC, highlighting upgradeable components.
- RAM: The device comes with 16GB dual-channel DDR4 RAM. It supports further upgrades, typically up to 64GB (2x 32GB SO-DIMM).
- SSD: It includes a 1TB M.2 2280 NVMe SSD. An additional M.2 2242 SATA slot is available for expanding storage up to 2TB.
To access internal components for upgrades, carefully remove the bottom cover of the Mini PC. Refer to the detailed instructions in the included user manual for specific steps.
Video 3: A demonstration of the internal components and potential upgrade paths for the GMKtec M3 Mini PC.
4.2 Cooling System
The Mini PC features a smart cooling fan with dual copper heat pipes to ensure efficient heat dissipation and stable performance during operation. Keep the air intake and exhaust vents clear of obstructions to maintain optimal airflow.
5. Troubleshooting
If you encounter issues with your GMKtec M3 Mini PC, consider the following basic troubleshooting steps:
- No Power: Ensure the power adapter is securely connected to both the Mini PC and a working power outlet. Check if the power button lights up when pressed.
- No Display: Verify that the HDMI or Type-C cable is firmly connected to both the Mini PC and the monitor. Try a different cable or monitor if possible. Ensure the monitor is set to the correct input source.
- Peripheral Issues: If your keyboard or mouse is not responding, try connecting them to different USB ports. For wireless peripherals, check battery levels and ensure they are properly paired.
- Network Connectivity Problems: For Wi-Fi, ensure the Wi-Fi adapter is enabled in Windows settings and you are connected to the correct network. For wired Ethernet, check the cable connection and router status.
- System Slowdown: Close unnecessary applications. Check for background processes consuming high CPU or RAM usage in Task Manager. Ensure adequate ventilation for the Mini PC.
For persistent issues or advanced troubleshooting, please refer to the support section or contact GMKtec customer service.
6. Technical Specifications
| Feature | Specification |
|---|---|
| Processor | Intel Core i5-12450H (4.4 GHz, 8 Cores, 12 Threads) |
| RAM | 16 GB DDR4 SDRAM (3200 MHz) |
| Storage | 1 TB M.2 NVMe SSD (PCIe 3.0), expandable with M.2 2242 SATA |
| Graphics Coprocessor | Intel Iris Xe Graphics G7 96EU GPU |
| Max Screen Resolution | 5120 x 2880 Pixels |
| Operating System | Windows 11 Pro |
| Wireless Type | WiFi 6 (802.11ax), Bluetooth 5.2 |
| Ethernet | 2.5 Gbps RJ45 |
| USB Ports | 3x USB 3.0, 1x USB 2.0, 1x USB Type-C (DP/DATA) |
| Item Weight | 3.3 pounds |
| Color | Black |
7. Warranty and Support
7.1 Warranty Information
GMKtec offers a 1-year limited warranty for each Mini PC, effective from the date of purchase. This warranty covers defects due to design and workmanship. Please retain your proof of purchase for warranty claims.
7.2 Customer Support
For any questions, technical assistance, or warranty inquiries, please contact GMKtec's professional after-sales team. Contact details are typically found in the included user manual or on the official GMKtec website.


