
MUSITREND T408
MUSITREND T408 Multimedia Record Player User Manual
Model: T408
1. Introduction
Thank you for choosing the MUSITREND T408 Multimedia Record Player. This device is designed to provide a versatile audio experience, combining a 3-speed turntable with a CD player, cassette player, USB and SD card playback, AM/FM radio, and Bluetooth connectivity. This manual will guide you through the setup, operation, and maintenance of your new audio system to ensure optimal performance and longevity.
Video 1: Overview of the MUSITREND Multimedia 9-in-1 Record Player, showcasing its various functions and design.
2. Important Safety Instructions
- Read all instructions carefully before operating the unit.
- Keep this manual for future reference.
- Do not expose the unit to rain, moisture, or extreme temperatures.
- Ensure proper ventilation; do not block any ventilation openings.
- Use only attachments/accessories specified by the manufacturer.
- Unplug the unit during lightning storms or when unused for long periods.
- Refer all servicing to qualified service personnel.
3. Package Contents
Verify that all items listed below are included in your package:
- MUSITREND T408 Multimedia Record Player
- Remote Control
- User Manual
- 45 RPM Adapter (for vinyl records)
- Power Adapter
4. Product Overview
The MUSITREND T408 integrates multiple audio playback options into a single compact unit. Familiarize yourself with the various components and their functions.
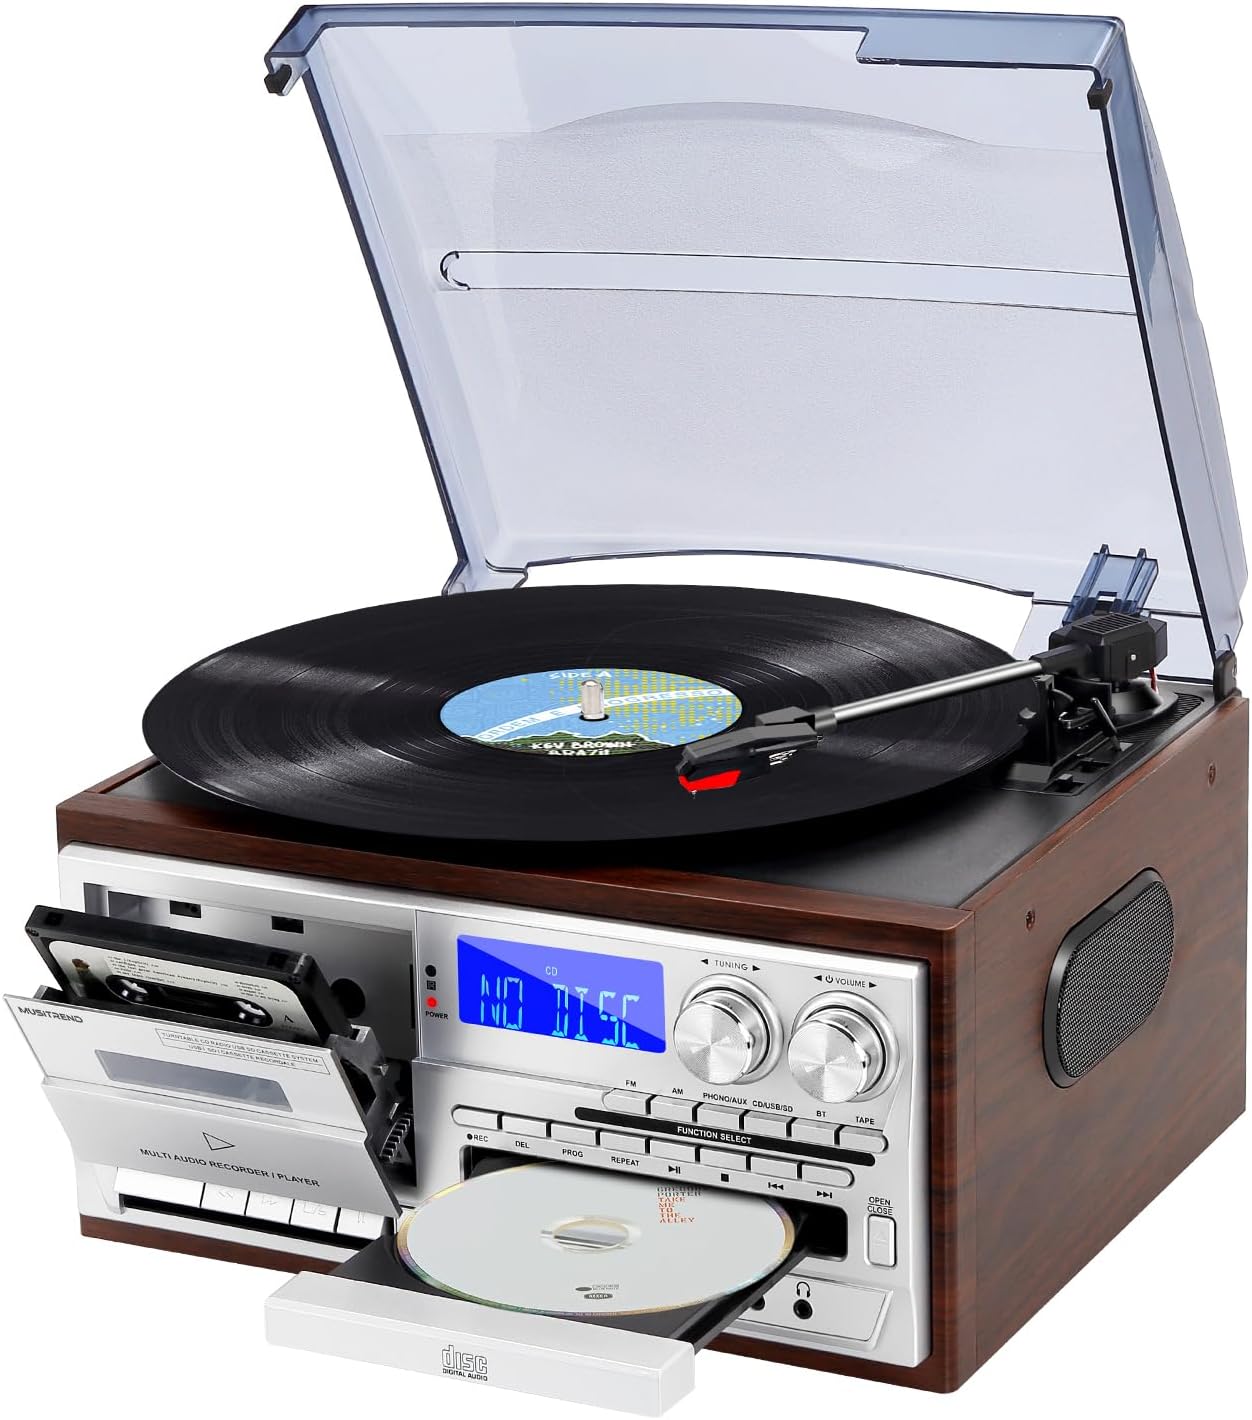
Image 1: Front-angle view of the MUSITREND T408 Multimedia Record Player, showcasing the turntable, cassette deck, CD tray, and control panel.

Image 2: Graphic illustrating the various functions of the MUSITREND T408, including Vinyl Player, SD/MMC Card, Cassette, CD Player, AM/FM Radio, USB Player, AUX in/RCA out, Bluetooth, Headphone, and Remote Control.
Front Panel Controls:
- Power Button: Turns the unit on/off.
- Function Select: Cycles through Phono/Aux/BT, CD, USB/SD, Tape, FM, AM modes.
- Tuning Knob: Adjusts radio frequency.
- Volume Knob: Controls audio output level.
- CD Tray: For inserting and removing CDs.
- Cassette Deck: For playing and recording cassette tapes.
- USB Port: For USB flash drive playback and recording.
- SD/MMC Card Slot: For SD/MMC card playback and recording.
- AUX IN Jack: Connect external audio devices.
- Headphone Jack: For private listening.
Rear Panel Connections:
- RCA Line Out (L/R): Connect to external amplifiers or powered speakers.
- FM Antenna: For improved FM radio reception.
- AC Power Input: Connect the power adapter.
5. Setup
- Placement: Place the unit on a flat, stable surface away from direct sunlight, heat sources, and excessive dust or moisture.
- Power Connection: Connect the AC power adapter to the AC Power Input on the rear of the unit, then plug the adapter into a standard wall outlet.
- FM Antenna: Extend the FM antenna wire for optimal radio reception. Position it for the best signal.
- External Speakers (Optional): If using external powered speakers, connect them to the RCA Line Out (L/R) jacks on the rear panel.
6. Operating Instructions
Video 2: A detailed demonstration of the MUSITREND Record Player's 9-in-1 functions, including turntable, CD, cassette, and radio playback.
6.1. Turntable (Vinyl) Operation
- Lift the dust cover.
- Place a vinyl record on the turntable platter. If playing a 45 RPM single, place the included 45 RPM adapter on the center spindle.
- Select the appropriate speed (33, 45, or 78 RPM) using the speed selector switch.
- Move the tonearm lock to release the tonearm.
- Gently lift the tonearm using the cue lever and position it over the desired track on the record.
- Lower the cue lever to slowly drop the tonearm onto the record. Playback will begin.
- At the end of the record, the turntable may stop automatically (if auto-stop is enabled). Manually return the tonearm to its rest and secure it with the tonearm lock.

Image 3: Close-up view of the turntable section, highlighting the 45 RPM adapter, auto-stop control, 3-speed record player selector, and ruby stylus.
Video 3: A demonstration focusing on the vinyl playback capabilities of the MUSITREND 9-in-1 Record Player, showing how to place a record and operate the tonearm.
6.2. CD Player Operation
- Press the Function Select button until "CD" is displayed.
- Press the OPEN/CLOSE button to open the CD tray.
- Place a CD with the label side facing up into the tray.
- Press the OPEN/CLOSE button again to close the tray. The unit will read the CD.
- Press PLAY/PAUSE to start or pause playback.
- Use the SKIP buttons to navigate between tracks.
6.3. Cassette Player Operation
- Press the Function Select button until "TAPE" is displayed.
- Open the cassette door and insert a cassette tape.
- Press the PLAY button to begin playback.
- Use REW (Rewind) and FF (Fast Forward) buttons to navigate the tape.
- Press STOP/EJ (Stop/Eject) to stop playback and eject the tape.
- Press PAUSE to temporarily stop playback.

Image 4: Detailed view of the CD player and cassette deck, showing the CD tray and cassette slot.
6.4. USB/SD Playback
- Insert a USB flash drive into the USB port or an SD/MMC card into the SD/MMC slot.
- Press the Function Select button until "USB" or "SD" is displayed.
- The unit will automatically detect and begin playing compatible audio files (e.g., MP3).
- Use the PLAY/PAUSE and SKIP buttons to control playback.
6.5. AM/FM Radio Operation
- Press the Function Select button until "FM" or "AM" is displayed.
- Rotate the Tuning Knob to search for radio stations.
- Adjust the Volume Knob to your desired listening level.
6.6. Bluetooth Connection
- Press the Function Select button until "BT" is displayed. The unit will enter pairing mode, indicated by a flashing Bluetooth icon on the display.
- Enable Bluetooth on your smartphone or other Bluetooth-enabled device.
- Search for "MUSITREND" in your device's Bluetooth settings and select it to pair.
- Once paired, the Bluetooth icon on the unit's display will stop flashing, and you can stream audio wirelessly.

Image 5: The MUSITREND T408 unit displaying 'Bluetooth' on its screen, with a smartphone nearby showing a successful Bluetooth connection to 'MUSITREND'.
6.7. Recording Function (to USB/SD)
The unit supports recording audio from the turntable, CD player, cassette player, or AUX input directly to a USB flash drive or SD card.
- Insert a USB flash drive or SD card into the appropriate slot.
- Select the desired source (Phono, CD, Tape, or AUX) using the Function Select button.
- Begin playback of the source audio.
- Press the REC (Record) button on the unit. The recording indicator will light up, and recording will begin.
- Press the STOP button to end the recording. The recorded file will be saved to the USB drive or SD card.
6.8. Remote Control
The included remote control allows for convenient operation of various functions from a distance.
- Power: Turns the unit on/off.
- Mute: Mutes/unmutes audio.
- Function Buttons: Directly select modes (CD, USB/SD, Tape, FM, AM, Phono/Aux/BT).
- Playback Controls: Play, Pause, Stop, Skip Forward/Backward, Fast Forward/Rewind (for tape).
- Volume +/-: Adjusts volume.
- Record: Initiates recording to USB/SD.
7. External Audio Connections
7.1. RCA Line Out
The RCA Line Out jacks (red for right, white for left) on the rear panel allow you to connect the T408 to an external amplifier or powered speakers for enhanced audio output.

Image 6: Rear view of the MUSITREND T408 unit, highlighting the RCA Line Out ports for connecting to external audio systems.
7.2. AUX IN
Connect external audio devices (e.g., MP3 players, smartphones) to the AUX IN jack on the front panel using a 3.5mm audio cable. Select the "Phono/Aux/BT" function and ensure the AUX input is active to play audio from the connected device.
7.3. Headphone Jack
For private listening, plug standard 3.5mm headphones into the headphone jack on the front panel. The internal speakers will automatically mute.
8. Maintenance
8.1. Cleaning
- Always unplug the unit from the power outlet before cleaning.
- Use a soft, dry cloth to clean the exterior surfaces. Do not use abrasive cleaners or solvents.
- For the turntable stylus, use a soft brush and gently brush from back to front.
- Keep the dust cover closed when not in use to prevent dust accumulation.
8.2. Stylus Replacement
The stylus (needle) is a consumable part and should be replaced periodically (approximately every 50 hours of playback) to maintain sound quality and prevent damage to your records. Contact MUSITREND customer support for replacement stylus information.
9. Troubleshooting
| Problem | Possible Cause | Solution |
|---|---|---|
| No power | Power cord not connected; outlet not active. | Ensure power cord is securely plugged in; test outlet with another device. |
| No sound from speakers | Volume too low; wrong function selected; headphones connected. | Increase volume; select correct function; disconnect headphones. |
| Turntable not spinning | Power off; belt dislodged (rare). | Ensure unit is powered on; contact support if belt issue suspected. |
| CD/USB/SD 'ERROR' | Disc/media dirty or damaged; incompatible file format. | Clean disc/media; try different media; ensure files are compatible (e.g., MP3). |
| Bluetooth not pairing | Device too far; Bluetooth not enabled on source device. | Ensure devices are within range; enable Bluetooth on your device and retry pairing. |
10. Specifications
- Product Dimensions: 12.79 x 11.41 x 7.87 inches
- Item Weight: 8.08 pounds
- Model Number: T408
- Brand: MUSITREND
- Maximum Rotational Speed: 78 RPM
- Included Components: Remote Control
- Special Features: Bluetooth Playback, CD and Cassette Player, USB and SD Inputs, AM/FM Radio, Remote Control, 3-Speed Playback (33/45/78 RPM)
- Compatible Devices: Speaker, Headphone, Personal Computer, Smartphone, Tablet
- Motor Type: Direct-Drive
- Signal Format: Line-level
- Power Source: Corded Electric
11. Warranty and Support
MUSITREND products are designed and manufactured to the highest quality standards. For warranty information or technical support, please refer to the warranty card included with your product or visit the official MUSITREND website. Please retain your proof of purchase for any warranty claims.
Related documentsT408


Ask a question about this manual
Ask about setup, troubleshooting, compatibility, parts, safety, or missing instructions. Manuals+ will review the question and use this page’s manual context to help answer it.