
1. Introduction
The hobbyant Pixhawk 6C Mini is an advanced flight controller designed for Unmanned Aerial Vehicles (UAVs), Vertical Take-Off and Landing (VTOL) aircraft, and various DIY RC projects. It is based on the Pixhawk FMUv6C Open Standard and Connector Standard, featuring the powerful STM32H743 microprocessor and a comprehensive sensor suite. This Mini version integrates a built-in PWM header and is optimized for a compact form factor, making it suitable for applications where space is a premium.
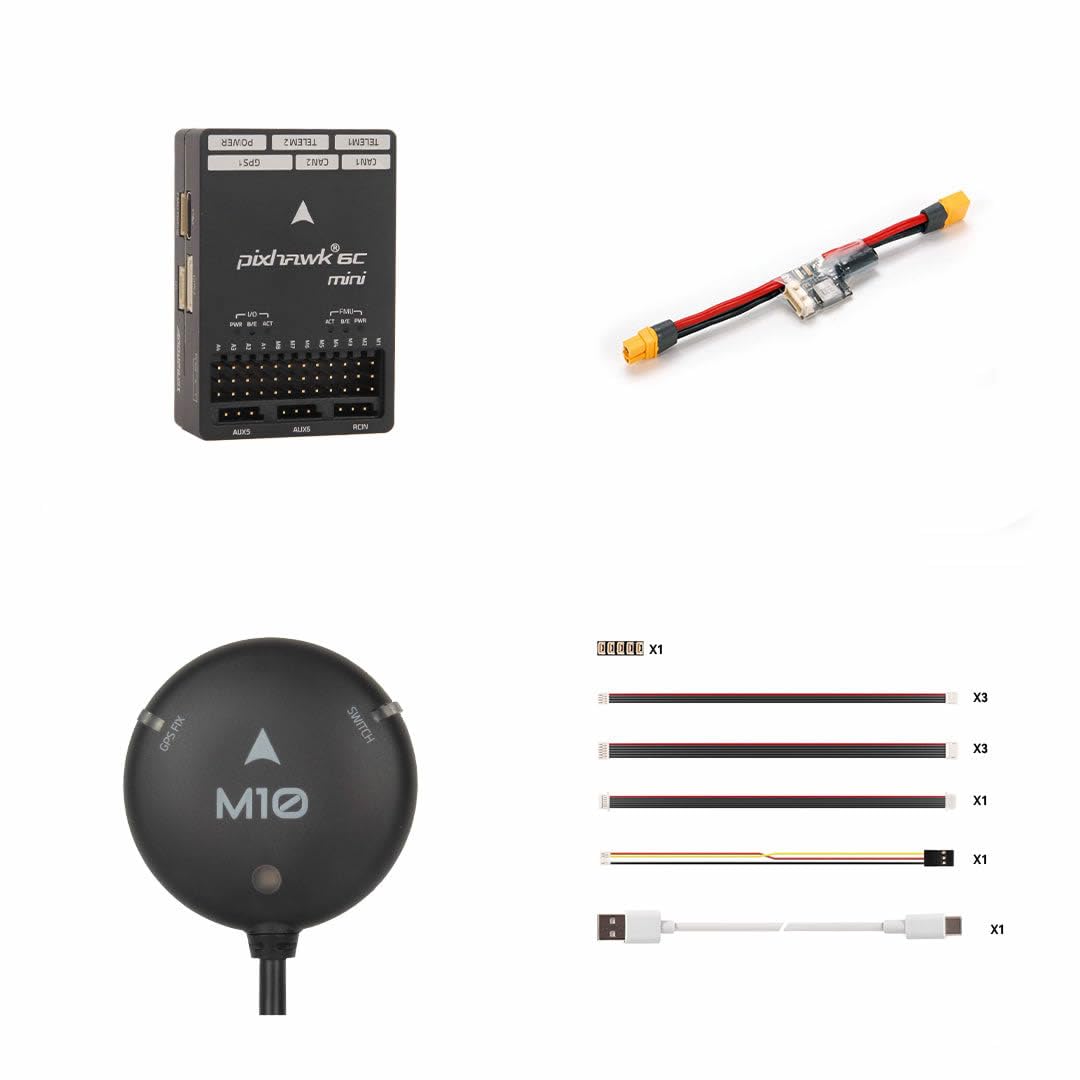
Figure 1: The Pixhawk 6C Mini Flight Controller, showcasing its compact design and various ports.
2. Key Features
- Powerful STM32H743 Processor: Equipped with a 32-bit ARM Cortex-M7 processor running at 480MHz, featuring 2MB flash memory and 1MB SRAM for high computing performance and rapid response.
- Redundant IMUs & Sensor Fusion: Incorporates dual Inertial Measurement Units (IMUs) (ICM-42688-P & BMI055), an IST8310 magnetometer, and an MS5611 barometer. This setup ensures accurate navigation, enhanced stability, and reliability in flight.
- Mini Form Factor with PWM Header: A compact design of the Pixhawk 6C, featuring integrated PWM ports, making it ideal for space-constrained drone builds and racing drones.
- Integrated Vibration Isolation & Temperature-Controlled IMUs: Designed to reduce noise and stabilize sensor readings even under harsh operating conditions. Onboard heating resistors maintain optimal operating temperatures for the IMUs.
- PX4 & ArduPilot Compatibility: Fully supported by PX4 firmware version 1.14 and newer, and ArduPilot firmware version 4.3 and newer, catering to a wide range of developers, robotics engineers, and drone enthusiasts.
- Hardware Switchable PWM Signal Mode: Offers a hardware switchable 3.3V or 5V PWM signal mode (requires opening the casing for adjustment).
3. Setup and Installation
Proper installation and setup are crucial for the safe and reliable operation of your Pixhawk 6C Mini. Always refer to the official PX4 or ArduPilot documentation for detailed wiring diagrams and configuration specific to your airframe.
3.1. Component Overview
Before installation, familiarize yourself with the main components:
- Flight Controller: The Pixhawk 6C Mini itself.
- Power Module (PM02): Provides regulated power to the flight controller and measures current/voltage.
- GPS Module (M10): For accurate positioning and navigation.
- Telemetry Radios: For ground station communication (optional, not included in this specific bundle).
- Receiver: For remote control input.
- ESCs and Motors: For propulsion.

Figure 2: An example of a power module (PM02), used to supply power and monitor battery status.

Figure 3: The M10 GPS Module, essential for accurate positioning and navigation.
3.2. Mounting the Flight Controller
- Choose a central location on your airframe, away from sources of electromagnetic interference (e.g., ESCs, power wires).
- Mount the Pixhawk 6C Mini using vibration-damping foam or standoffs to minimize vibrations transmitted to the internal IMUs. Ensure the arrow on the flight controller points towards the front of the aircraft.
- Secure the flight controller firmly to prevent movement during flight.
3.3. Wiring Connections
Connect the peripherals to the Pixhawk 6C Mini as follows:
- Power Module: Connect the power module to the "POWER" port. Ensure correct polarity.
- GPS Module: Connect the M10 GPS module to the "GPS1" port.
- Receiver: Connect your RC receiver to the "RCIN" port.
- ESCs: Connect the ESC signal wires to the appropriate "M1-M8" (PWM) or "AUX" ports, depending on your motor configuration and flight mode requirements.
- Telemetry: Connect telemetry radios to "TELEMETRY1" or "TELEMETRY2" ports for ground station communication.
- CAN Bus: Connect CAN peripherals (e.g., smart ESCs, external compasses) to "CAN1" or "CAN2" ports.
Refer to the official Pixhawk 6C Mini pinout diagrams for precise connection details.
3.4. Firmware Installation and Configuration
- Download and install the QGroundControl (for PX4) or Mission Planner (for ArduPilot) software on your computer.
- Connect the Pixhawk 6C Mini to your computer via a USB cable.
- Follow the software's instructions to install the desired firmware (PX4 or ArduPilot).
- Perform initial calibration steps, including accelerometer, compass, radio, and ESC calibration.
- Configure flight modes, safety parameters, and other settings according to your aircraft type and operational needs.
4. Operating Instructions
Once the Pixhawk 6C Mini is set up and configured, follow these general guidelines for operation:
- Pre-Flight Checks: Before every flight, ensure all connections are secure, the battery is charged, propellers are correctly installed, and the flight controller has acquired a GPS lock (if applicable). Check for any error messages in the ground station software.
- Arming the Aircraft: Arm the motors using your remote control's designated arming sequence (e.g., stick commands) or via the ground station software. Ensure you are in a safe area before arming.
- Takeoff: Gently increase throttle for takeoff. In manual modes, maintain control. In autonomous modes, the aircraft will follow its programmed flight plan.
- Flight Control: Operate the aircraft using your remote control. Monitor telemetry data (battery voltage, GPS status, altitude) via the ground station.
- Landing: Execute a controlled landing. Disarm the motors immediately after landing to prevent accidental propeller rotation.
- Post-Flight Review: Review flight logs for performance analysis and troubleshooting if necessary.
Always operate your UAV responsibly and in compliance with local regulations.
5. Maintenance
Regular maintenance ensures the longevity and reliability of your Pixhawk 6C Mini Flight Controller.
- Physical Inspection: Periodically inspect the flight controller for any signs of physical damage, loose connections, or corrosion.
- Cable Management: Ensure all cables are neatly routed and secured to prevent interference or accidental disconnection during flight.
- Firmware Updates: Keep the flight controller firmware updated to the latest stable version to benefit from bug fixes and new features. Always back up your configuration before updating.
- Sensor Calibration: Recalibrate sensors (accelerometer, compass) if you notice unusual flight behavior or after significant changes to the aircraft's setup.
- Environmental Protection: Protect the flight controller from moisture, dust, and extreme temperatures. Consider using a protective enclosure if operating in harsh environments.
6. Troubleshooting
This section addresses common issues you might encounter. For more detailed troubleshooting, consult the official PX4 or ArduPilot documentation and community forums.
- No Power/LEDs Off:
- Check power module connections and battery voltage.
- Ensure USB cable is properly connected if powering via USB.
- No GPS Lock:
- Ensure the GPS module has a clear view of the sky.
- Verify GPS module connection to the flight controller.
- Check for electromagnetic interference from other components.
- Unstable Flight/Drifting:
- Perform accelerometer and compass calibration.
- Check for excessive vibrations; improve flight controller mounting if necessary.
- Verify propeller balance and motor health.
- Ensure correct center of gravity for the aircraft.
- Motors Not Arming:
- Check pre-arm checks in ground station software for specific error messages.
- Ensure radio calibration is complete and stick endpoints are correctly set.
- Verify GPS lock (if required for arming in your configuration).
- Check battery voltage.
- Communication Issues with Ground Station:
- Verify USB or telemetry radio connections.
- Ensure correct COM port and baud rate are selected in the ground station software.
- Reinstall USB drivers if necessary.
7. Technical Specifications
7.1. Processors & Sensors
- FMU Processor: STM32H743 (32 Bit Arm® Cortex®-M7, 480MHz, 2MB memory, 1MB SRAM)
- IO Processor: STM32F103 (32 Bit Arm® Cortex®-M3, 72MHz, 64KB SRAM)
- On-board Sensors:
- Accel/Gyro: ICM-42688-P
- Accel/Gyro: BMI055
- Mag: IST8310
- Barometer: MS5611
7.2. Electrical Data
- Voltage Ratings:
- Max input voltage: 6V
- USB Power Input: 4.75~5.25V
- Servo Rail Input: 0~36V
- Current Ratings:
- Telem1 & GPS2 combined current limit: 1.5A
- All other ports combined current limit: 1.5A
- Operating Temperature: -40 ~ 85°C
7.3. Mechanical Data
- Dimensions (Model A): 53.3 * 39 * 16.2 mm
- Dimensions (Model B): 58.3 * 39 * 18.15 mm
- Weight (Model A): 39.2g
- Weight (Model B): 46.8g
- Product Dimensions (as per Amazon): 2 x 2 x 1 inches (approx. 50.8 x 50.8 x 25.4 mm)
8. Ports and Pinout
The Pixhawk 6C Mini features various ports for connecting peripherals. Detailed pinout diagrams and port functionalities are critical for correct wiring. Please refer to the official Pixhawk 6C Mini documentation or the PX4/ArduPilot hardware guides for comprehensive system diagrams and pinout information.
Common ports include:
- POWER (for power module)
- GPS1, GPS2 (for GPS modules)
- TELEMETRY1, TELEMETRY2 (for radio communication)
- CAN1, CAN2 (for CAN bus peripherals)
- RCIN (for RC receiver input)
- PWM outputs (M1-M8, AUX1-AUX6)
- DSM/SBUS (receiver input)
- RSSI (Received Signal Strength Indicator)
9. Firmware Compatibility
The Pixhawk 6C Mini is compatible with the following open-source firmwares:
- PX4: Supported on PX4 firmware version 1.14 and newer.
- ArduPilot: Supported on ArduPilot firmware version 4.3 and newer.
Ensure you are using a compatible and up-to-date firmware version for optimal performance and access to the latest features.
10. Pixhawk 6C vs. 6C Mini Differences
The Pixhawk 6C Mini shares core components with the standard Pixhawk 6C, including the STM32H743 microprocessor and sensor suite. The primary differences are:
- Form Factor: The Mini version is significantly more compact.
- PWM Header: The Mini version has a built-in PWM header.
- Port Configuration: Some ports present on the standard Pixhawk 6C have been removed or consolidated in the Mini version to achieve its smaller size.
11. Important Notes
- The M10 GPS module requires PX4 firmware version 1.14 or newer, and ArduPilot firmware version 4.3 or newer for full compatibility and functionality.
- For detailed information on power module comparison and selection, refer to the official documentation.
12. Package Contents
The standard package includes:
- 1 x hobbyant Pixhawk 6C Mini Flight Controller
- Other parts as selected in your specific bundle (e.g., PM02 Power Module, M10 GPS Module).
13. Warranty and Support
Warranty information for the hobbyant Pixhawk 6C Mini Flight Controller is typically provided by the retailer or manufacturer at the time of purchase. Please retain your proof of purchase for any warranty claims.
For technical support, firmware updates, and community resources, please refer to the official PX4 and ArduPilot websites, as well as the hobbyant support channels. These platforms offer extensive documentation, forums, and guides to assist with setup, configuration, and troubleshooting.