1. Introduction
Thank you for choosing the Redkey W15 Cordless Wet Dry Vacuum Cleaner. This manual provides essential information for safe and efficient use of your appliance. Please read it thoroughly before first use and keep it for future reference.

Image 1.1: Redkey W15 Cordless Wet Dry Vacuum Cleaner with included accessories. This image displays the main unit, charging base, power adapter, roller brush, and cleaning brush.
2. Important Safety Instructions
Always follow basic safety precautions when using electrical appliances to reduce the risk of fire, electric shock, or injury.
- Read all instructions before use.
- Do not immerse the appliance in water or other liquids.
- Keep hair, loose clothing, fingers, and all parts of the body away from openings and moving parts.
- Use only as described in this manual. Use only manufacturer's recommended attachments.
- Do not use with a damaged cord or plug. If appliance is not working as it should, has been dropped, damaged, left outdoors, or dropped into water, return it to a service center.
- Do not handle plug or appliance with wet hands.
- Do not pick up flammable or combustible liquids, such as gasoline, or use in areas where they may be present.
- Do not pick up anything that is burning or smoking, such as cigarettes, matches, or hot ashes.
- Exercise extreme care when cleaning on stairs.
- Do not use without filters in place.
- Store the appliance indoors.
- This appliance is not intended for use by persons (including children) with reduced physical, sensory or mental capabilities, or lack of experience and knowledge, unless they have been given supervision or instruction concerning use of the appliance by a person responsible for their safety.
3. Product Components
3.1. Package Contents
- Redkey W15 Main Unit
- Handle Assembly
- Charging Base
- Power Adapter
- Roller Brush
- HEPA Filter
- Cleaning Brush
3.2. Main Unit Diagram
Refer to the image below for a visual representation of the main components of your Redkey W15.
Image 3.1: Overview of the Redkey W15 Cordless Wet Dry Vacuum Cleaner and its accessories. Key components include the clean water tank, dirty water tank, LED display, handle, and brush head.
4. Setup and Assembly
4.1. Handle Installation
- Insert the handle assembly into the main unit until it clicks securely into place.
- Ensure the handle is firmly attached before use.
4.2. Charging the Appliance
- Place the main unit onto the charging base.
- Connect the power adapter to the charging base and then to a power outlet.
- The LED display will indicate charging status.

Image 4.1: The Redkey W15 vacuum cleaner placed on its charging station. The image highlights the long battery life of up to 35 minutes and a cleaning area of 150 square meters.
4.3. Filling the Clean Water Tank
- Remove the clean water tank from the main unit.
- Open the tank cap and fill with clean tap water. You may add a small amount of non-foaming floor cleaning solution if desired. Do not exceed the MAX fill line.
- Close the cap securely and reattach the tank to the main unit.
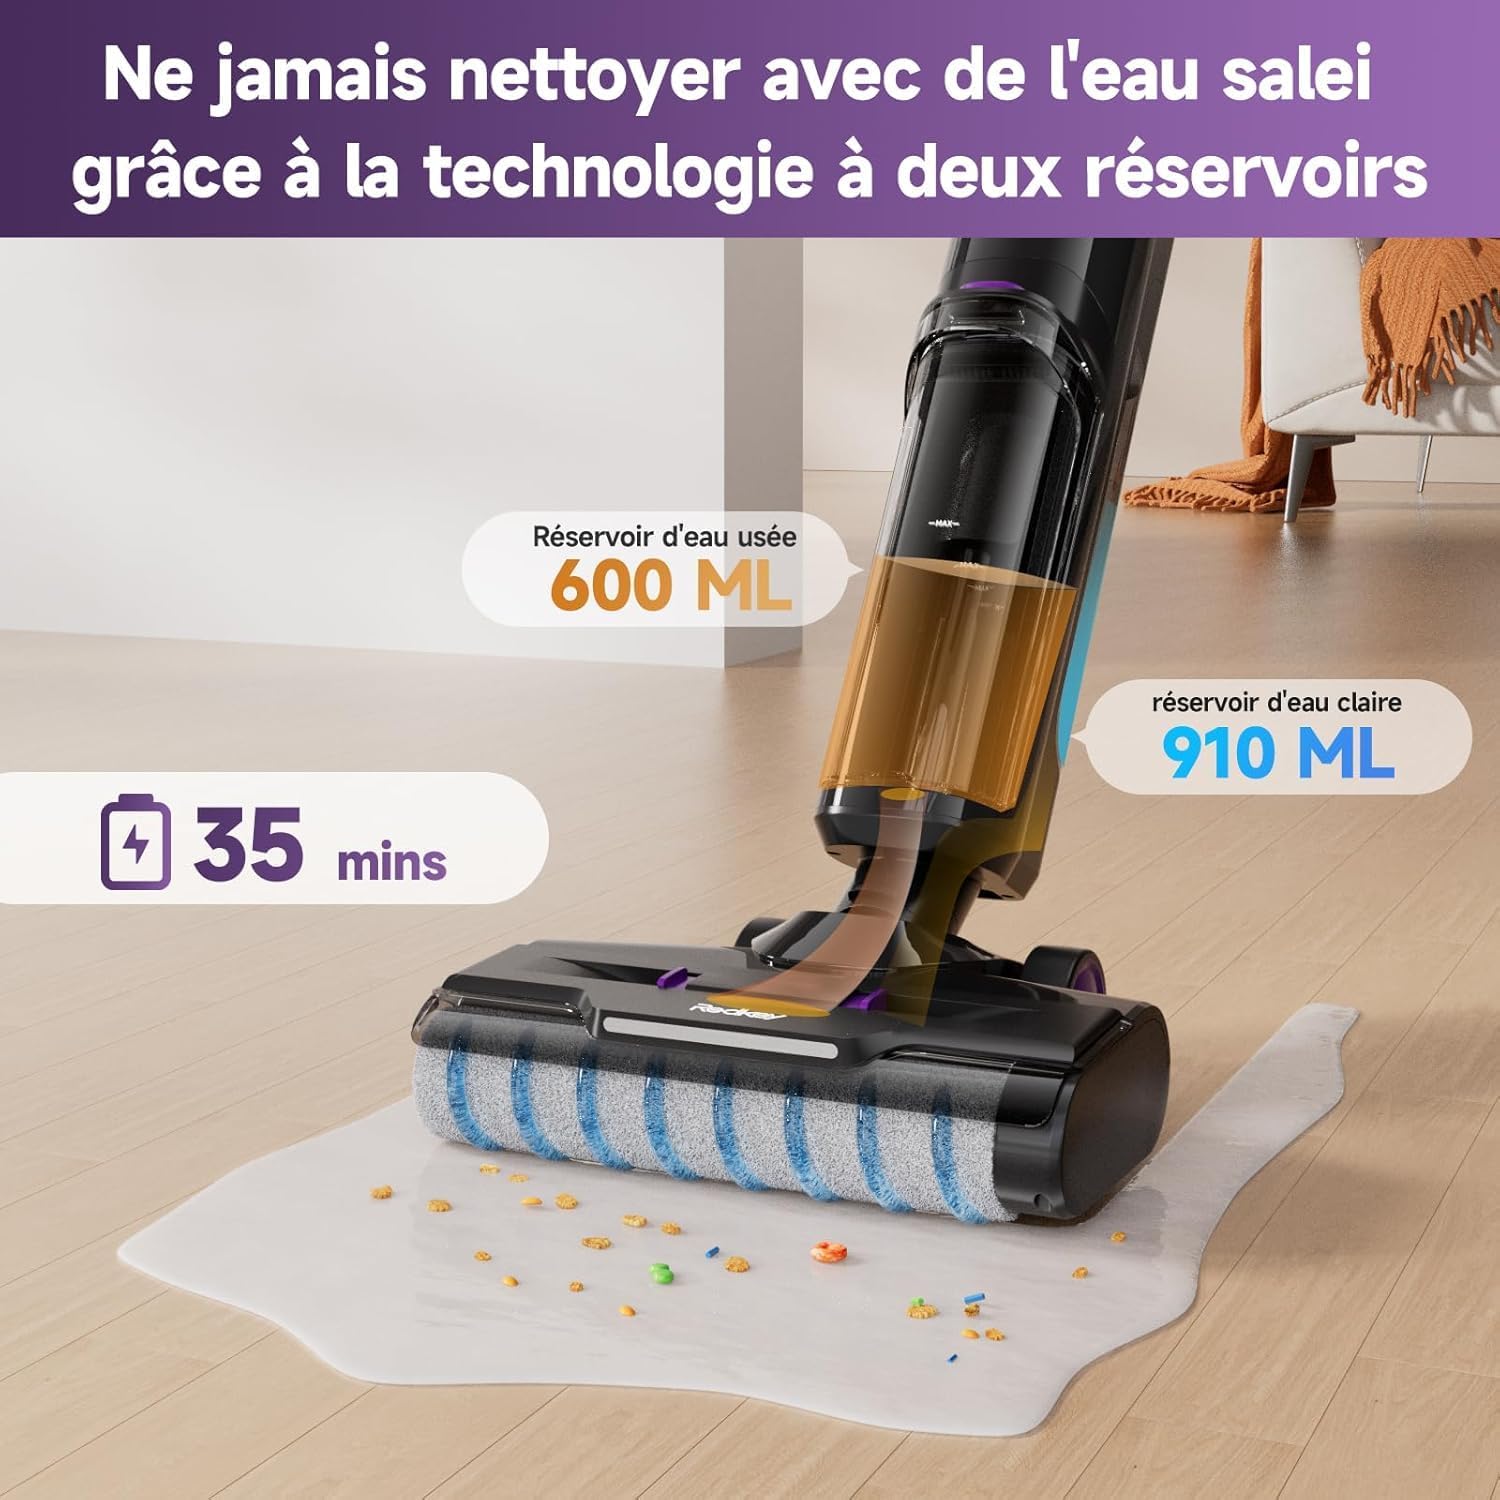
Image 4.2: Illustration of the Redkey W15's dual-tank system, showing the 910 ml clean water tank and the 600 ml dirty water tank. This design ensures cleaning is always done with fresh water.
5. Operating Instructions
5.1. Powering On/Off
Press the power button on the handle to turn the appliance on or off.
5.2. Selecting Cleaning Modes
The Redkey W15 offers three adjustable cleaning modes: Standard, Wash, and Strong Suction. Use the mode selection button on the handle to cycle through these options.
- Standard Mode: For general cleaning of light dirt and dust.
- Wash Mode: For wet cleaning and mopping hard floors.
- Strong Suction Mode: For stubborn dirt, spills, and heavy debris.

Image 5.1: The Redkey W15's LED display, illustrating different operational modes. The display shows battery level, current mode (e.g., Smart/Dry in blue, Powerful in red), and other status indicators.
5.3. Cleaning Hard Floors
The Redkey W15 is designed for effective cleaning of various hard floor types, including marble, laminate, parquet, and tile.
- Ensure the clean water tank is filled and the dirty water tank is empty.
- Select the appropriate cleaning mode for your task.
- Move the vacuum cleaner slowly and steadily across the floor. The self-propelled system assists in movement.
- For wet cleaning, the appliance will dispense water and scrub the floor simultaneously, then vacuum up the dirty water.
- For dry vacuuming, ensure the wash mode is off.

Image 5.2: The Redkey W15 demonstrating its wet and dry cleaning capabilities on various hard floor surfaces like parquet, marble, and tile, effectively handling different types of debris and spills.
5.4. Edge Cleaning
The Redkey W15 features a specialized design for cleaning close to edges and baseboards, reaching within 5mm of walls.
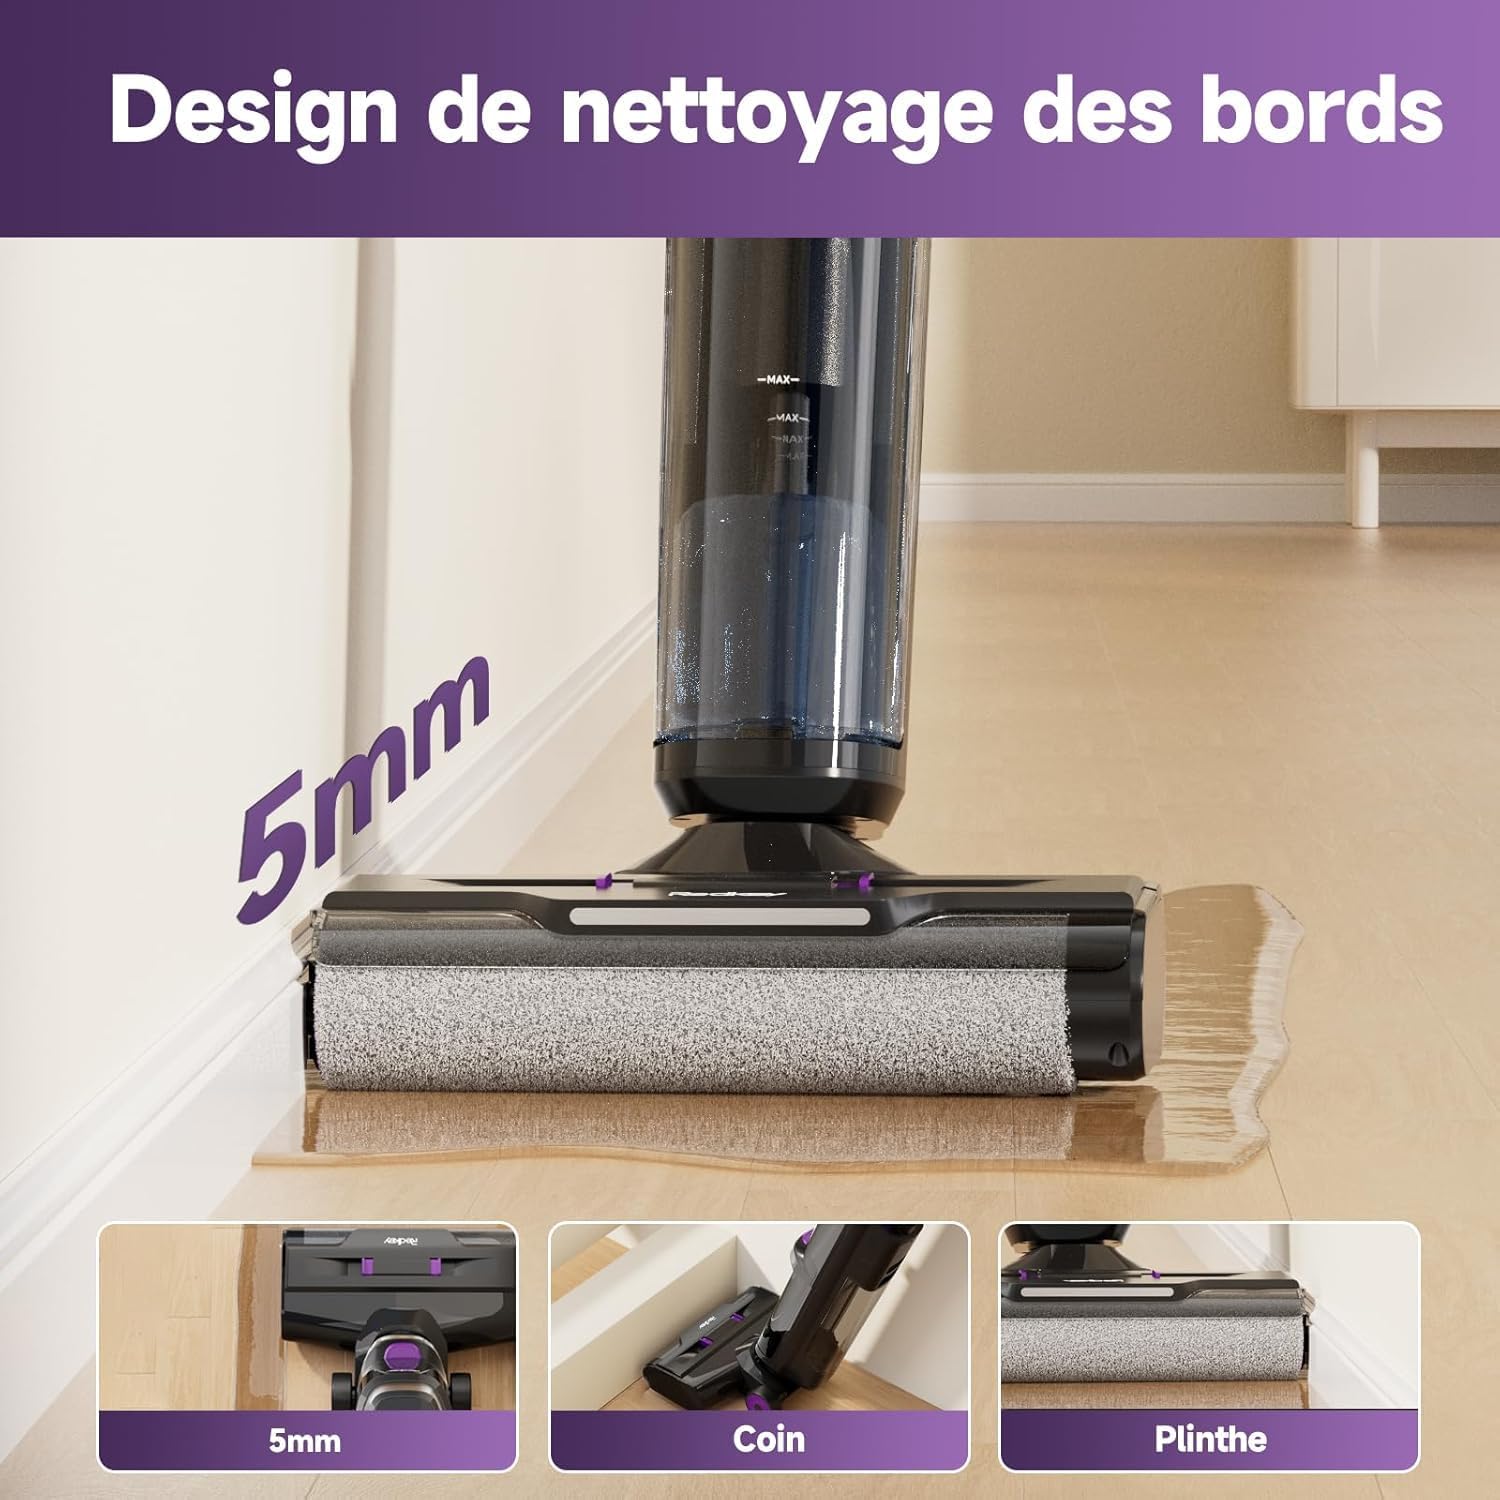
Image 5.3: The Redkey W15 showcasing its 5mm edge cleaning design, allowing it to clean effectively along walls, corners, and baseboards without leaving uncleaned areas.
6. Maintenance and Care
Regular maintenance ensures optimal performance and extends the lifespan of your Redkey W15.
6.1. Self-Cleaning Function
- After each use, place the vacuum cleaner on its charging base.
- Press the dedicated self-cleaning button (usually indicated on the handle or base).
- The appliance will automatically clean the roller brush and internal tubing. Ensure the dirty water tank is empty before starting self-cleaning and the clean water tank has sufficient water.
- Once complete, empty the dirty water tank.
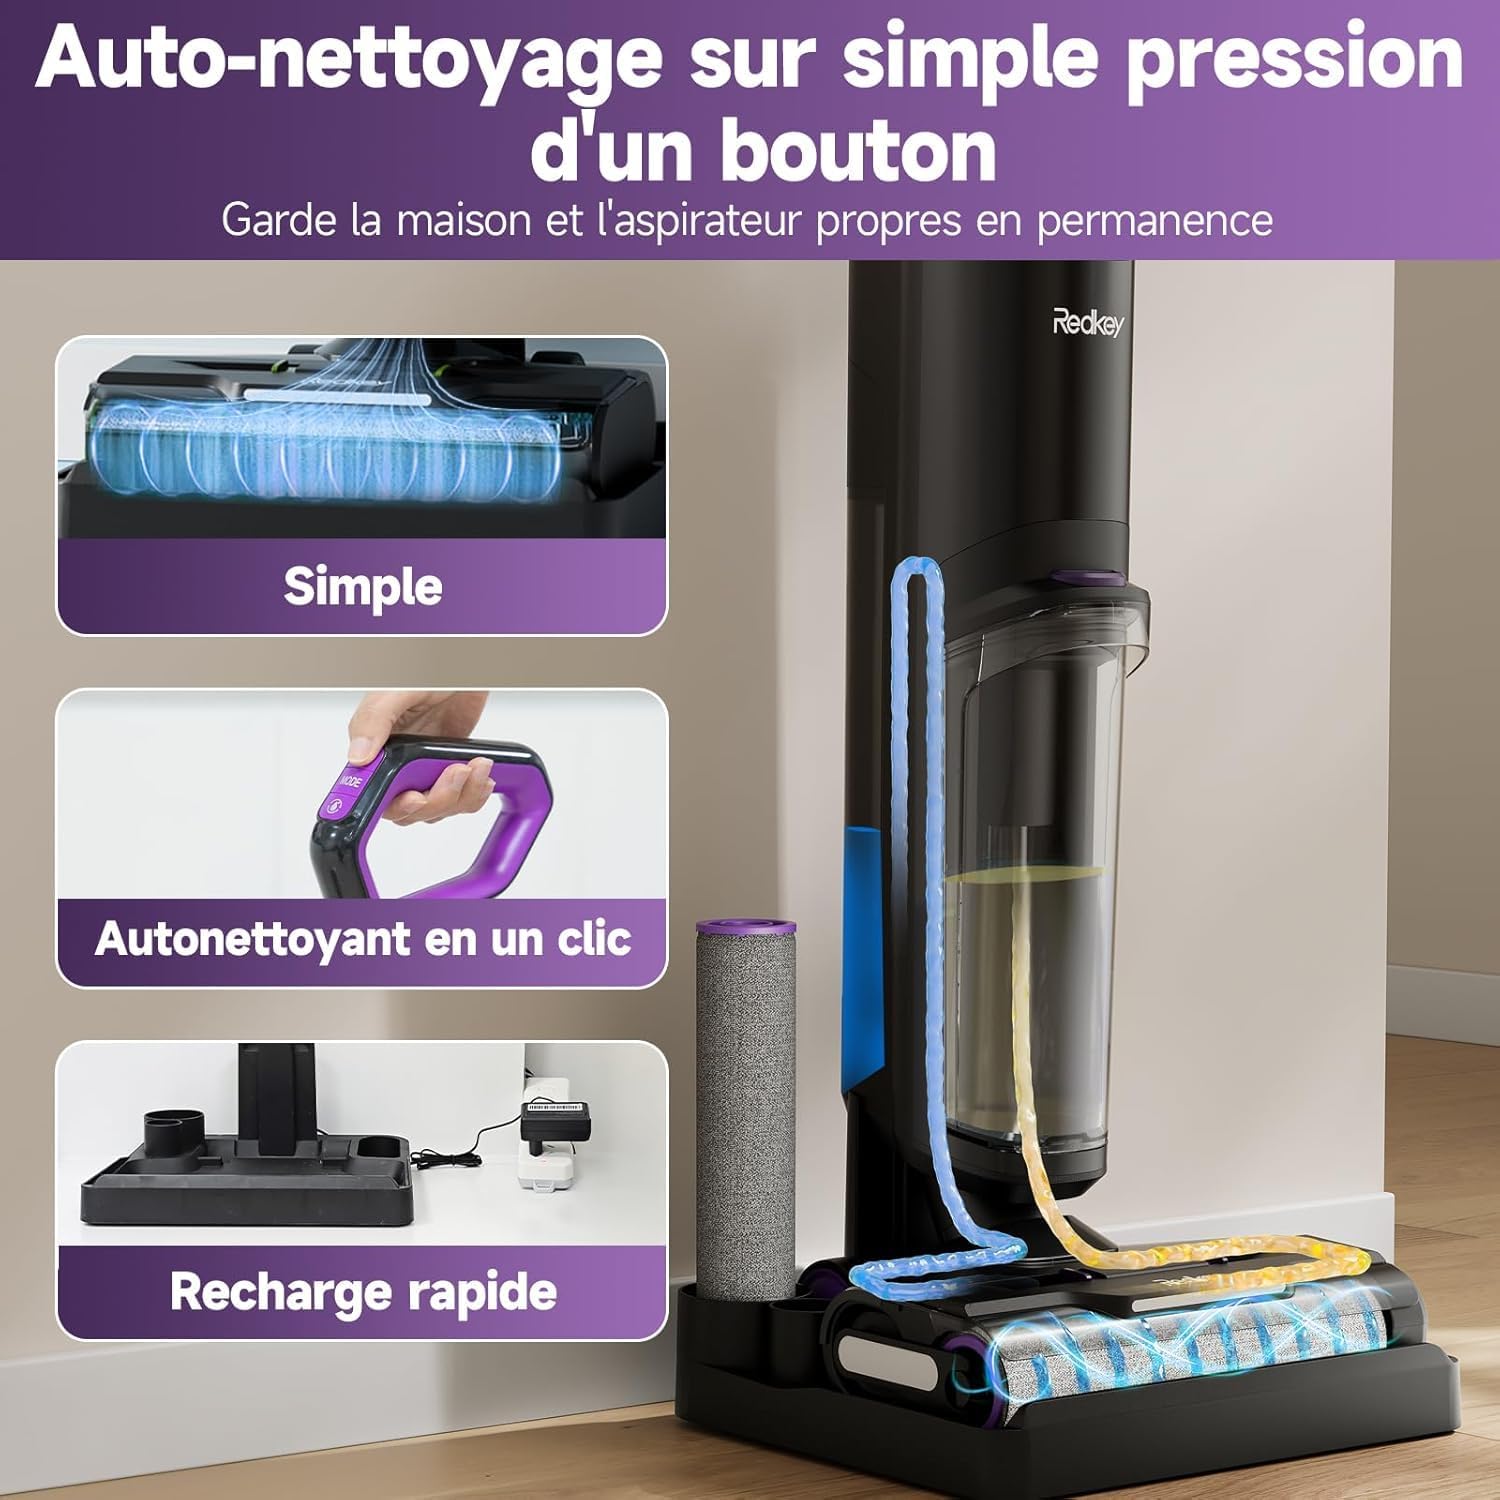
Image 6.1: The Redkey W15's one-touch self-cleaning feature. This image illustrates the internal cleaning process of the roller brush and tubes, ensuring the device remains hygienic and ready for next use.
6.2. Emptying the Dirty Water Tank
- Remove the dirty water tank from the main unit.
- Open the tank and dispose of the dirty water.
- Rinse the tank thoroughly with clean water.
- Reattach the tank securely.
6.3. Cleaning the Roller Brush
While the self-cleaning function is effective, occasional manual cleaning of the roller brush may be necessary.
- Turn off and unplug the appliance.
- Remove the roller brush cover and then the roller brush.
- Use the provided cleaning brush to remove any tangled hair or debris.
- Rinse the roller brush under running water. Allow it to air dry completely before reinstallation.
6.4. Cleaning/Replacing the HEPA Filter
The HEPA filter should be cleaned regularly and replaced periodically to maintain suction performance.
- Remove the HEPA filter from its housing (usually located within the dirty water tank assembly).
- Tap the filter gently to remove loose dust.
- Rinse the filter under cool running water. Do not use detergent.
- Allow the filter to air dry completely for at least 24 hours before reinstallation. Do not use a wet filter.
- Replace the HEPA filter every 3-6 months, depending on usage.

Image 6.2: Instructions for easy maintenance, specifically recommending regular cleaning of the HEPA filter by rinsing it under water.
7. Troubleshooting
Before contacting customer support, please refer to the following troubleshooting guide for common issues.
| Problem | Possible Cause | Solution |
|---|---|---|
| Appliance does not turn on. | Battery is depleted. | Charge the appliance fully. |
| No suction or weak suction. | Dirty water tank is full. Clean water tank is empty. Filter is clogged. Roller brush is blocked. | Empty the dirty water tank. Fill the clean water tank. Clean or replace the HEPA filter. Clean the roller brush. |
| Water leakage. | Water tanks not properly installed. Tank caps not securely closed. | Ensure both clean and dirty water tanks are correctly seated. Check that all tank caps are tightly closed. |
| Error Code E3 (Roller brush issue). | Roller brush is jammed or obstructed. | Turn off the appliance, remove the roller brush, and clear any obstructions. Reinstall the brush and restart. |
| Voice assistant not in desired language. | Language setting needs adjustment. | Refer to the product's quick start guide or contact support for instructions on changing voice assistant language settings. |
8. Technical Specifications
| Feature | Specification |
|---|---|
| Brand | Redkey |
| Model Number | W15 |
| Color | Violet-01 |
| Clean Water Tank Capacity | 910 Milliliters |
| Dirty Water Tank Capacity | 600 Milliliters |
| Number of Speeds | 3 |
| Runtime | Up to 35 minutes |
| Special Features | Wet/Dry Cleaning, Self-Cleaning, LED Display, Edge Cleaning (5mm) |
| Item Weight | 6.67 Kilograms (Package Weight) / Approx. 4 kg (Operating Weight) |
| Filter Type | Foam, Fabric (HEPA) |
| Recommended Use | Hard Floors |
| Product Dimensions (L x W x H) | 64.3 x 66.5 x 113.2 cm |
9. Warranty Information
The Redkey W15 Cordless Wet Dry Vacuum Cleaner comes with a 2-year free warranty from the date of purchase. This warranty covers manufacturing defects and malfunctions under normal use conditions.
Please retain your proof of purchase for warranty claims. The warranty does not cover damage caused by misuse, neglect, unauthorized repairs, or normal wear and tear.
10. Customer Support
For any questions, concerns, or technical assistance regarding your Redkey W15, please contact our customer support team.
- Online Support: 24-hour online service is available.
- Quick Support: Expect a response within 12 hours.
- Product Protection: 2 years of product protection.
To contact support via Amazon:
- Go to your Amazon account.
- Navigate to "Your Orders".
- Find your order for the Redkey W15.
- Select "Get product support" or "Ask a question" for the seller (WHSJ-EU).

Image 10.1: Redkey customer support details, indicating 12-hour quick support and a 2-year product protection plan. Instructions for contacting support via Amazon are also provided.


