
Introduction
This manual provides instructions for the installation, operation, and troubleshooting of your Comfort Direct TR214D remote control for Harbor Breeze ceiling fans. Please read these instructions carefully before use to ensure proper function and longevity of your device.

Image: The Comfort Direct TR214D remote control shown with its included wall mount and mounting screws.
Setup and Installation
1. Battery Installation
The remote control requires one 23A 12V battery (not included).
- Locate the battery compartment on the back of the remote control.
- Slide the battery cover off.
- Insert one 23A 12V battery, ensuring the polarity (+/-) matches the diagram inside the compartment.
- Replace the battery cover.

Image: The rear view of the remote control with the battery cover removed, showing the battery compartment and spring contacts.
2. Pairing Instructions
Follow these steps to pair your remote control with your existing ceiling fan receiver. Only one remote can be programmed per fan.
- Turn Power Off To Fan: Ensure the power supply to your ceiling fan is completely off at the wall switch or circuit breaker.
- Turn Power Back On To Fan: Restore power to the ceiling fan.
- Press and Hold "0" Key: Within 30 seconds of restoring power, press and hold the "0" (Off) key on the remote control for 5 seconds.
- The fan light should blink or the fan should briefly turn on to indicate successful pairing.

Image: A visual guide illustrating the three steps for pairing the remote control, highlighting the "0" button.

Image: A close-up view of the remote control, specifically highlighting the '0' button used for pairing.
3. Wall Mount Installation
The included wall mount allows for convenient storage of your remote control.
- Choose a suitable location on a wall, away from direct sunlight or heat sources.
- Use the provided screws to secure the wall mount to the desired surface.
- Place the remote control into the mounted holder.

Image: The remote control, its wall mount, and two mounting screws, illustrating the components for wall installation.

Image: The remote control securely placed in its wall mount, positioned on a wall in a room with a ceiling fan.
Operating Instructions
The TR214D remote control provides full control over your ceiling fan's speed and light functions.
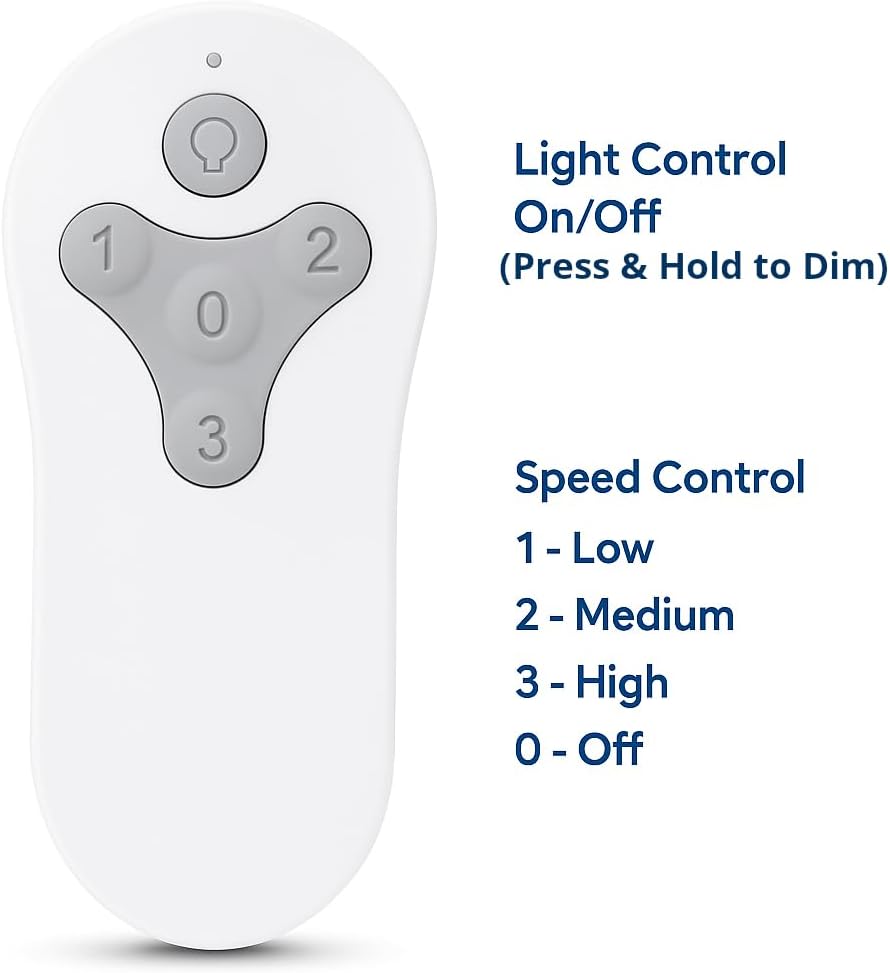
Image: The remote control with labels indicating the functions of each button: Light Control (On/Off, Press & Hold to Dim) and Speed Control (1-Low, 2-Medium, 3-High, 0-Off).
Fan Speed Control
- Button 1: Sets fan speed to Low.
- Button 2: Sets fan speed to Medium.
- Button 3: Sets fan speed to High.
- Button 0: Turns the fan off.
Light Control
- Light Button (Bulb Icon): Press once to turn the fan light On or Off.
- Dimming Function: Press and hold the Light Button to dim or brighten the fan light to your preferred level. Release the button when the desired brightness is reached.
Compatibility
This Comfort Direct TR214D remote control is designed as a replacement for various Harbor Breeze ceiling fan remote models and is compatible with specific fan models.
Compatible Remote Models:
- A25-FA0138
- KUJCE10311
- TR214B
- KUJCE10712
- TR214A
- KUJCE10610
Compatible Fan Models:
- BRD48MWW6LR
- BRD60BNK6LRS
- BRD60MBK6LR
- BRD60OSB6LR
- MZ44BNK3LR
- MZ44MBLK3LR
- MZ44ORB3LR
- MZ44WW3LR
- TG44BNK3D1RC
- TG44LW3D1RS
- TG44MBK3D1RS
- TG44OSB3D1RC
- TG52BNK3D1RC
- TG52LW3D1RCS
- TG52MBK3D1RC
- TG52OSB3D1RC

Image: A graphic displaying a comprehensive list of Harbor Breeze fan models that are compatible with this remote control.
Troubleshooting
If your remote control is not functioning as expected, refer to the following guide:
| Bad Remote Control Symptoms | Good Remote Control Symptoms |
|---|---|
| 1. Red indicator light does not illuminate when buttons are pressed. | 1. Red indicator light only illuminates when buttons are pressed. |
| 2. Red indicator light illuminates when no buttons are pressed. | 2. Red indicator light stays illuminated when you PRESS and HOLD buttons. |
| Action: Replace remote control if you experience any of these symptoms. | Action: DO NOT replace remote control if you experience these symptoms. You likely have a different problem with your fan. |

Image: A troubleshooting chart detailing symptoms related to the remote control's red indicator light and recommended actions.
If the remote is not pairing, ensure you have followed the pairing instructions precisely, especially the timing of pressing the "0" button after restoring power to the fan. Also, verify that the battery is correctly installed and has sufficient charge.
Specifications
| Model Number | CDTR214D |
| Brand | Comfort Direct |
| Power Source | Battery Powered (1 x 23A 12V battery, not included) |
| Control Method | Remote (Radiofrequency) |
| Number of Power Levels | 4 (Off, Low, Medium, High) |
| Product Dimensions | 2.76 x 1.8 x 4.57 inches |
| Item Weight | 1.13 ounces |
| Indoor/Outdoor Usage | Indoor |
Warranty and Support
This product comes with a 1 Year Manufacturer Warranty. For warranty claims or technical support, please contact Comfort Direct customer service. Refer to your purchase documentation for specific contact details or visit the official Comfort Direct website.
Note: The manufacturer warranty covers defects in materials and workmanship under normal use. It does not cover damage caused by misuse, accidents, or unauthorized modifications.