
1. Introduction
Thank you for purchasing the Reshow Portable Cassette Player and MP3 Recorder. This device allows you to enjoy your favorite cassette tapes and convert them into digital MP3 format via USB. It features a built-in microphone for recording, a loud speaker for playback, and a 3.5mm headphone jack for private listening. Please read this manual carefully to ensure proper use and maintenance of your device.
2. Safety Information
- Do not expose the device to rain, moisture, or extreme temperatures.
- Avoid dropping or subjecting the device to strong impacts.
- Do not attempt to disassemble or repair the device yourself. Refer all servicing to qualified personnel.
- Use only the specified power sources (USB or 2xAA batteries). Do not use both simultaneously.
- Keep the device away from strong magnetic fields to prevent damage to tapes.
- Dispose of batteries responsibly according to local regulations.
3. Package Contents
Please check the box for the following items:
- Reshow Portable Cassette Player and MP3 Recorder
- USB Cable (for power and data transfer)
- User Manual

Image: Contents of the Reshow Portable Cassette Player package, including the player, USB cables, and user manual. Please note that AA batteries are not included.
4. Product Overview
Familiarize yourself with the various parts and controls of your Reshow Portable Cassette Player.

Image: The Reshow Portable Cassette Player shown from multiple angles, highlighting the playback controls (Play, Stop, Fast Forward, Rewind), volume dial, built-in microphone, headphone jack, and USB-C port.
Controls and Ports:
- PLAY Button: Starts cassette playback.
- STOP Button: Stops playback or recording.
- FF (Fast Forward) Button: Advances the tape quickly.
- REW (Rewind) Button: Rewinds the tape quickly.
- Volume Dial: Adjusts the output volume for the speaker and headphones.
- Built-in Microphone: For recording audio directly to the cassette.
- Headphone Jack (3.5mm): Connect headphones for private listening.
- USB-C Port: For power supply and connecting to a computer for MP3 conversion.
- Battery Compartment: Holds 2xAA batteries (not included).
5. Setup
5.1 Powering the Device
The Reshow Portable Cassette Player can be powered in two ways:
- USB Power: Connect the provided USB cable to the USB-C port on the device and the other end to a USB power adapter (not included) or a computer's USB port.
- Battery Power: Open the battery compartment on the back of the device and insert two (2) AA batteries (not included), ensuring correct polarity.
Important: Do not use both USB power and batteries simultaneously.
5.2 Loading a Cassette Tape
- Gently open the cassette compartment door.
- Insert a cassette tape with the open edge facing upwards and the side you wish to play/record facing the playback head.
- Close the cassette compartment door firmly until it clicks.
6. Operating Instructions
6.1 Playing a Cassette Tape
- Ensure a cassette tape is loaded and the device is powered on.
- Press the PLAY button to start playback.
- Adjust the volume using the Volume Dial.
- To fast forward, press the FF button. To rewind, press the REW button. Press STOP to resume playback after fast forwarding or rewinding.
- To stop playback, press the STOP button.
- For private listening, connect 3.5mm headphones to the headphone jack. The built-in speaker will automatically mute.
6.2 Recording Audio to Cassette
The device can record audio using its built-in microphone.
- Load a blank or recordable cassette tape into the device.
- Press the RECORD button (often combined with PLAY, or a separate red button). The PLAY button will also engage.
- Speak clearly into the built-in microphone.
- To stop recording, press the STOP button.
6.3 Converting Cassette to MP3 via USB
This feature allows you to digitize your cassette tapes to MP3 format on your computer.
- Connect the Reshow Portable Cassette Player to your computer using the provided USB cable.
- Your computer should recognize the device as an audio input.
- Open an audio recording software on your computer (e.g., Audacity, available for free online).
- In the software, select the Reshow device as the audio input source.
- Start recording in your software, then press the PLAY button on the cassette player.
- Once the tape has finished playing, stop the recording in your software and save the audio file in MP3 format.

Image: The Reshow Portable Cassette Player connected to a laptop via a USB cable, illustrating the process of digital conversion from cassette to MP3 format.
7. Maintenance
To ensure optimal performance and longevity of your cassette player, follow these maintenance guidelines:
- Cleaning the Heads: Regularly clean the tape heads, capstan, and pinch roller using a specialized cassette head cleaner or a cotton swab lightly dampened with isopropyl alcohol. This prevents sound degradation and tape damage.
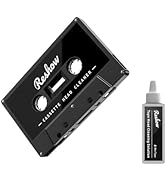
Image: A Reshow Cassette Head Cleaner kit, recommended for maintaining optimal audio quality and preventing tape damage.
- Exterior Cleaning: Wipe the exterior of the device with a soft, dry cloth. Do not use abrasive cleaners or solvents.
- Battery Removal: If the device will not be used for an extended period, remove the batteries to prevent leakage.
- Storage: Store the device in a cool, dry place away from direct sunlight and dust.
8. Troubleshooting
If you encounter issues with your device, refer to the following common problems and solutions:
| Problem | Possible Cause | Solution |
|---|---|---|
| No power | Batteries are dead or incorrectly inserted; USB cable not connected properly. | Replace batteries or check USB connection. Ensure correct battery polarity. |
| No sound during playback | Volume is too low; headphones connected; tape heads are dirty. | Increase volume; disconnect headphones; clean tape heads. |
| Tape not playing or jamming | Tape is damaged or tangled; dirty capstan/pinch roller. | Inspect tape for damage; clean capstan and pinch roller. |
| Poor recording quality | Microphone too far from sound source; dirty recording head; tape quality. | Ensure microphone is close to sound source; clean recording head; use a high-quality tape. |
| USB conversion not working | USB cable not connected; incorrect audio input selected on computer; software issue. | Check USB connection; select the correct audio input in your recording software; ensure software is properly installed. |
9. Specifications
| Feature | Detail |
|---|---|
| Model Number | 235White |
| Dimensions | 18.9 x 11.5 x 4.4 cm |
| Weight | 310 g |
| Power Supply | USB-C (DC 5V) or 2 x AA Batteries (not included) |
| Hardware Interface | USB-C |
| Headphone Jack | 3.5 mm |
| Microphone | Built-in, Mono |
| Recording Format | WAV (for direct recording to cassette) |
| Digital Recording Time | 45-60 minutes (typical cassette length) |
| Compatible Devices | Laptop, Personal Computer, Tablet, Smartphone, MP3 Player, Headphones |
10. Warranty and Support
Reshow products are designed for reliability and performance. For any questions, technical support, or warranty claims, please contact Reshow customer service through the retailer where you purchased the product or visit the official Reshow brand store online.
Please retain your proof of purchase for warranty purposes.