1. Introduction
Thank you for purchasing the VANBAR Motorcycle Drive Recorder. This manual provides detailed instructions for the installation, operation, and maintenance of your device. Please read this manual thoroughly before use to ensure proper functionality and safety. Keep this manual for future reference.
Product Overview
The VANBAR BR01 is a state-of-the-art motorcycle drive recorder designed to enhance your riding experience with advanced features and robust construction. It combines a large touch screen display with front and rear cameras, smart connectivity, and durable design to capture your journeys and provide essential information on the go.

Image: Overview of the VANBAR BR01 Motorcycle Drive Recorder, highlighting its main display and dual camera system.
2. Product Features
- 6.25-inch Capacitive Touch Screen: Large display for clear visibility and responsive operation, even with gloves. Supports various display modes including navigation, music, and recording views.
- Front & Rear FHD 1080P Simultaneous Recording: Captures high-definition video from both front and rear cameras concurrently.
- WDR/HDR Functionality: Ensures clear footage in challenging lighting conditions by balancing exposure.
- Automatic Brightness Adjustment: Integrated light sensor automatically adjusts screen brightness for optimal viewing.
- Wireless CarPlay/Android Auto Compatibility: Seamlessly integrate your smartphone for navigation, calls, and music playback.
- Voice Control Support: Hands-free operation via Siri or Google Assistant for enhanced safety.
- IP67 Waterproof & Dustproof: Robust design protects the device from rain, dust, and mud.
- Enhanced Vibration Resistance: Ensures stable performance and durability on various road conditions.
- Built-in WiFi & Smartphone App Control: Easily manage recordings, view live feeds, and share content via a dedicated app.
- TPMS (Tire Pressure Monitoring System) Included: Real-time tire pressure and temperature monitoring for enhanced safety.
- Technical Qualification Certified: Complies with Japanese radio regulations (Certification No. 214-240535).

Image: The device display showing compatibility with CarPlay and Android Auto, enabling smartphone integration.
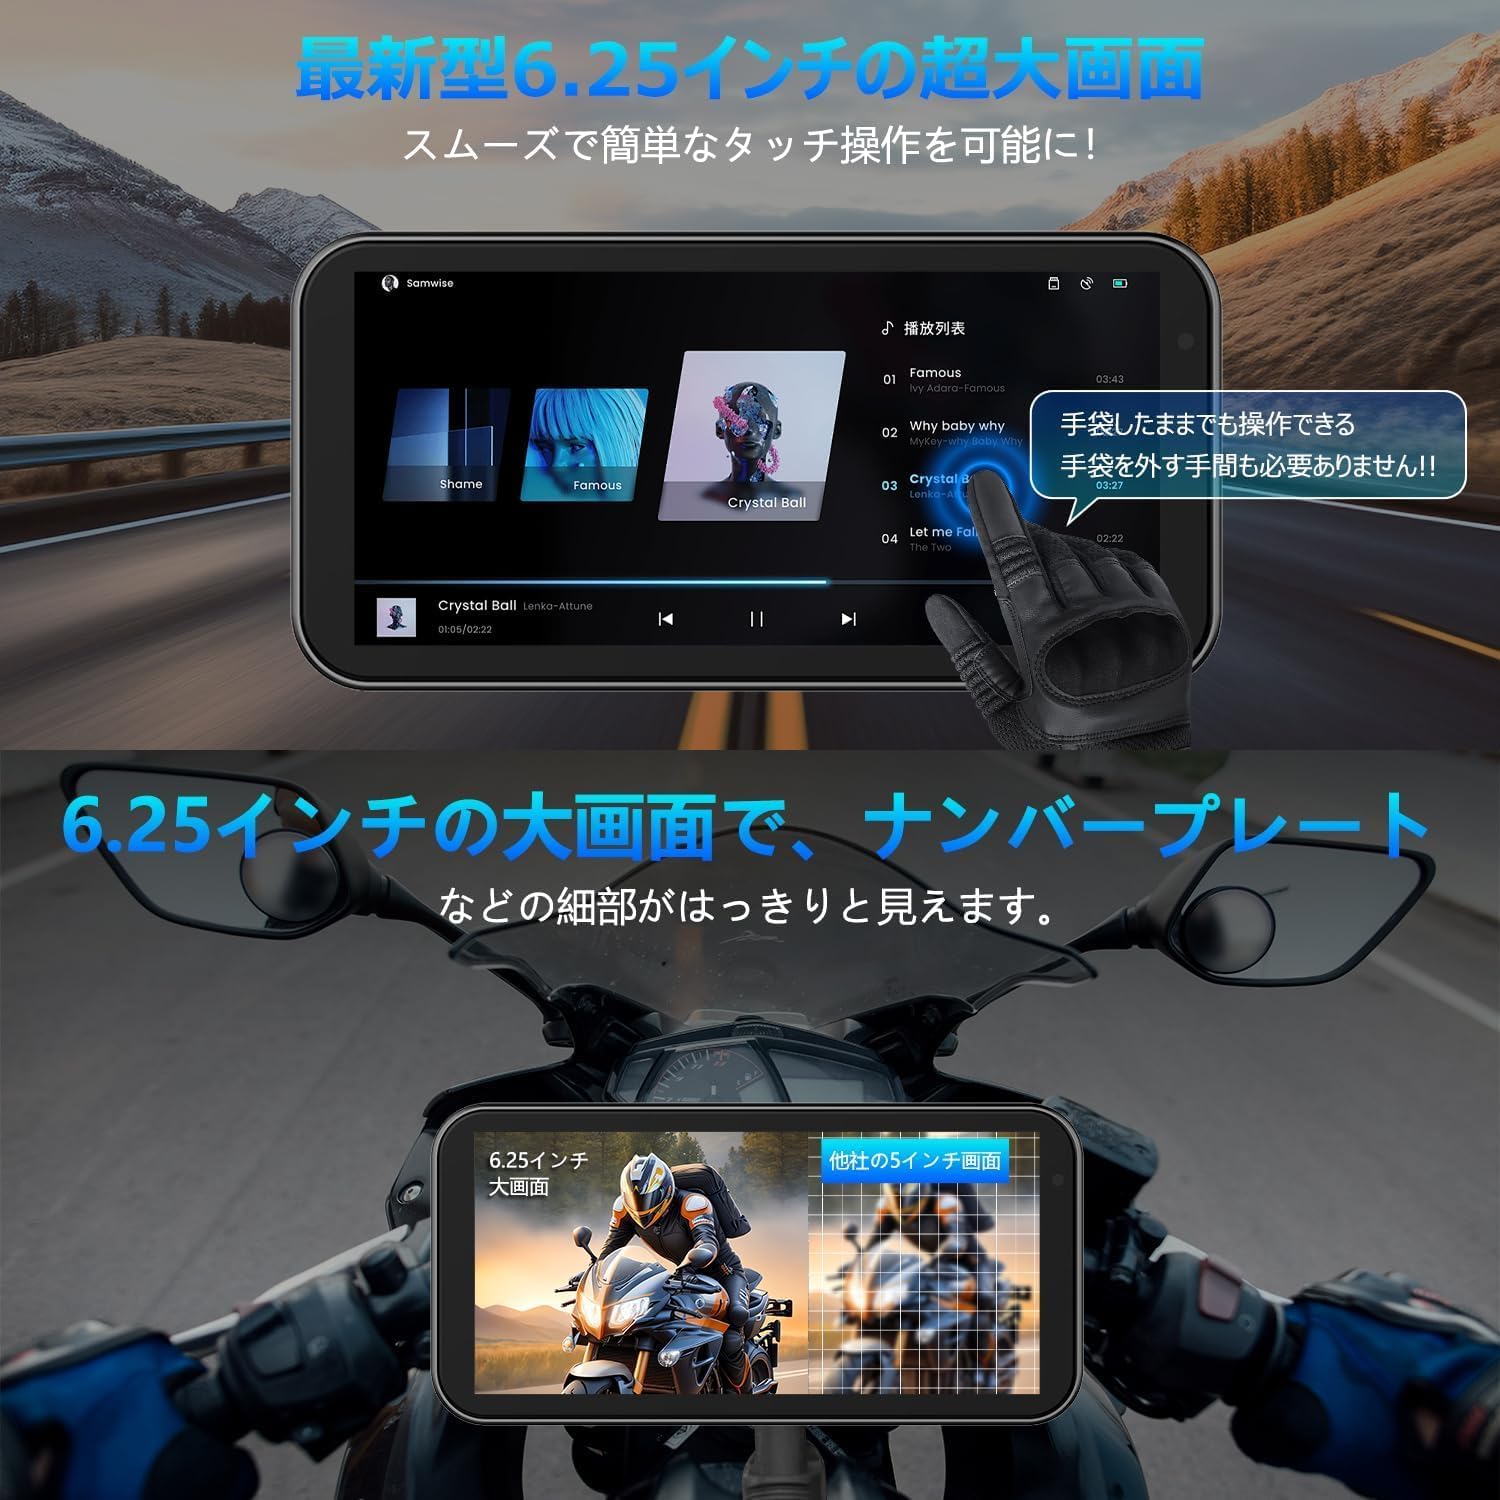
Image: The large 6.25-inch touch screen, demonstrating its clarity and responsiveness even when operated with gloves.

Image: The integrated TPMS (Tire Pressure Monitoring System) sensors, providing real-time tire pressure and temperature data.
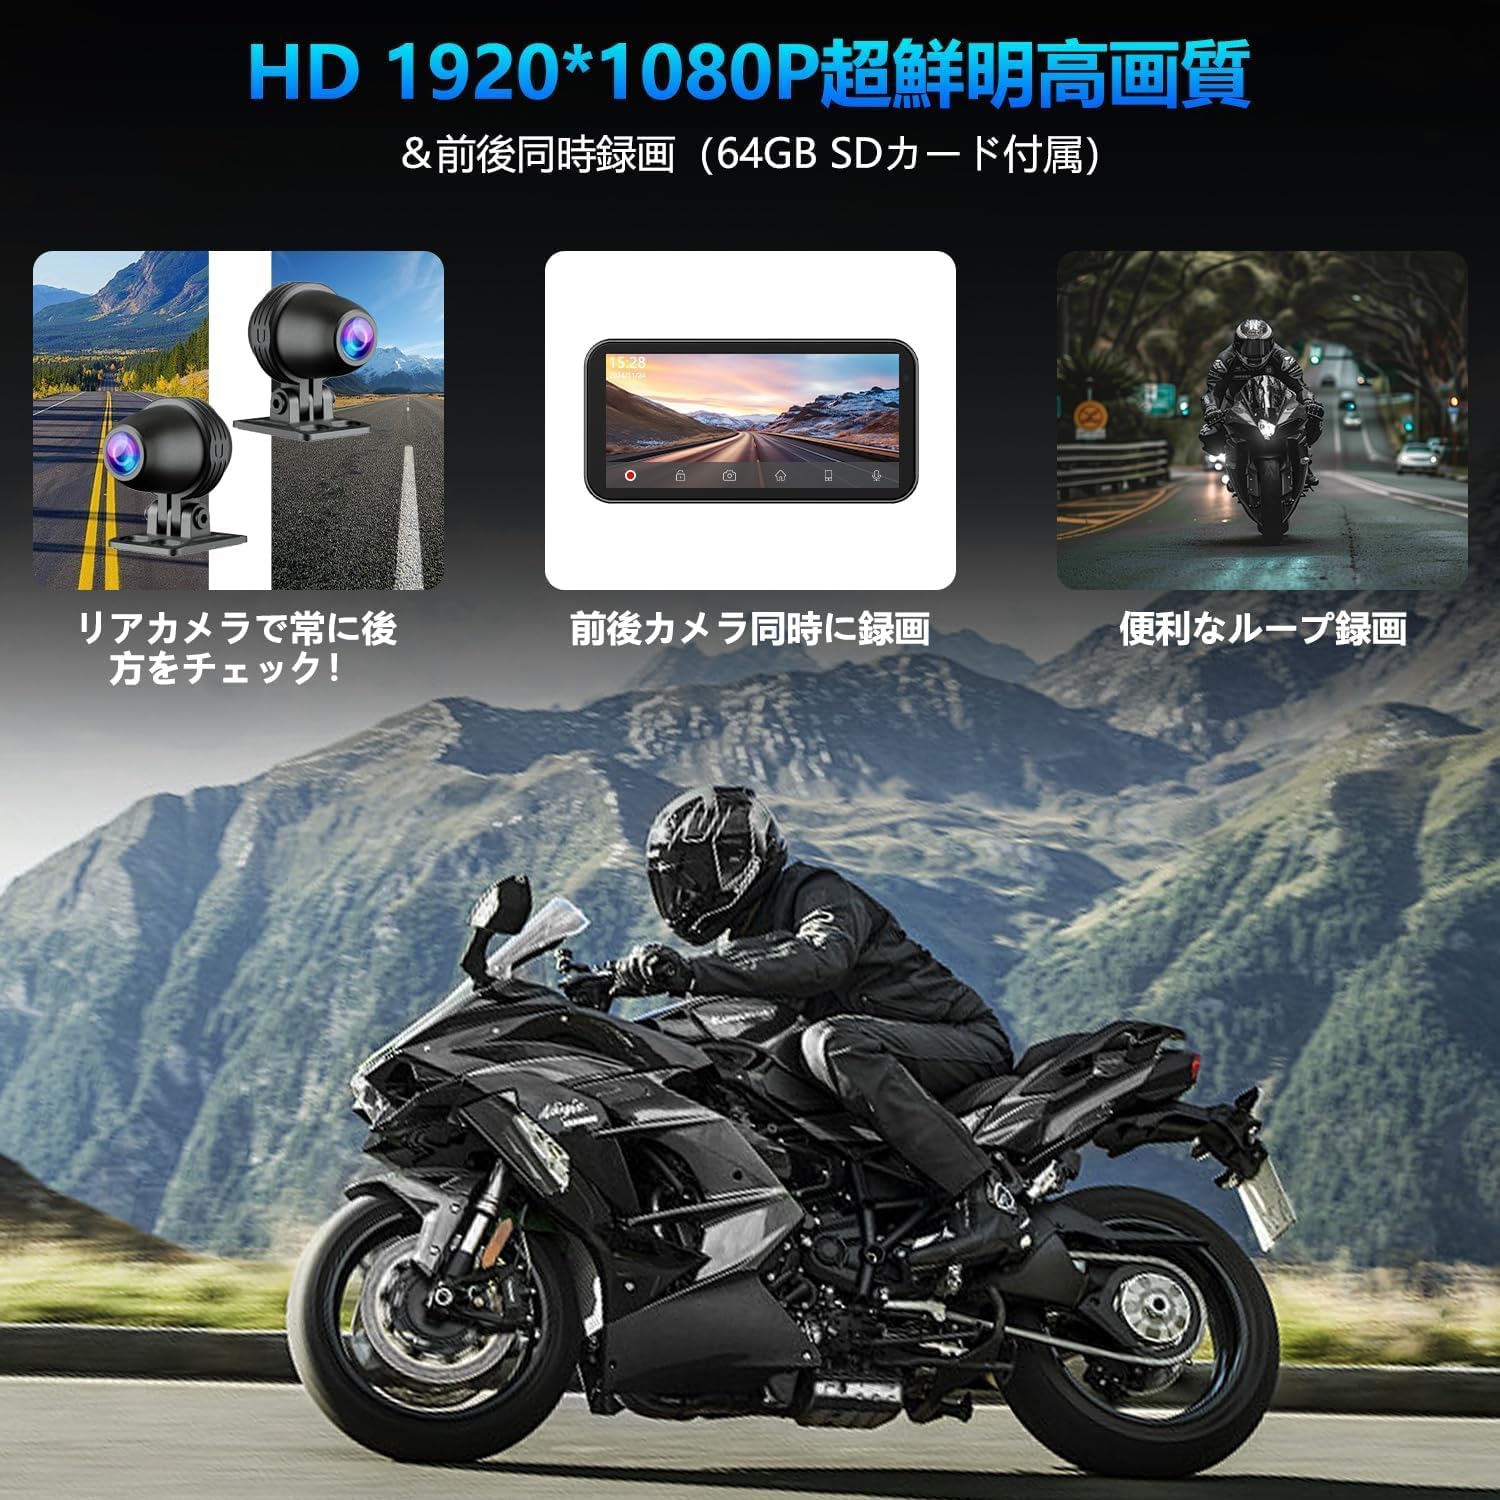
Image: Illustration of the front and rear 1080P cameras recording simultaneously, ensuring comprehensive coverage.

Image: The voice control feature, demonstrating how to use Siri for hands-free operation of navigation and music.

Image: Close-up of the device highlighting its IPX7 waterproof and dustproof construction, including sealed ports and connections.

Image: The device demonstrating its WiFi connectivity, allowing remote operation and file management via a smartphone app. For app download, visit: https://www.6zhentan.com/app/d0001/index.html

Image: The device illustrating its Bluetooth capabilities, allowing connection to earphones and intercom systems for audio output.
3. Package Contents
Please check the package contents upon unboxing to ensure all items are present and undamaged.
- Main Display Unit (Drive Recorder)
- Front Camera
- Rear Camera
- Main Unit Bracket
- Bracket Inner Diameter Rings (28mm, 25.4mm, 22mm)
- TPMS Sensors (2 units)
- Wired Remote Control
- Tool Set
- 64GB Memory Card
- Mounting Bands
- Camera Cleaning Cloth
- User Manual
- Step-down Power Cable

Image: A visual representation of all components included in the VANBAR BR01 package.
4. Setup and Installation
Proper installation is crucial for the performance and longevity of your device. It is recommended to have installation performed by a qualified professional if you are unsure.
Wiring Diagram

Image: Detailed wiring diagram showing connections for the main unit, cameras, remote control, and power supply (ACC, GND, BAT).
Installation Steps
- Mount the Main Unit: Attach the main display unit to your motorcycle's handlebar using the provided bracket and appropriate inner diameter rings. Ensure it is securely fastened and positioned for optimal viewing without obstructing your ride.
- Install Cameras: Mount the front and rear cameras in suitable locations, ensuring a clear, unobstructed view of the road. Secure them firmly to prevent vibration.
- Connect Cameras: Connect the front and rear camera cables to their respective ports on the main unit.
- Connect Wired Remote Control: Connect the wired remote control to the designated port on the main unit. Mount the remote control in an easily accessible location on your handlebar.
- Power Connection: Connect the step-down power cable to your motorcycle's electrical system. Important: The red wire (BAT) connects to a constant 12V power source, the yellow wire (ACC) connects to a switched 12V power source (ignition-controlled), and the black wire (GND) connects to the vehicle's ground. Do not use a standard USB cable for power.
- Install TPMS Sensors: Replace your tire valve caps with the provided TPMS sensors. Ensure they are tightened securely.
- Route Cables: Carefully route all cables to avoid interference with moving parts and to protect them from damage. Use the included mounting bands to secure cables.
- Initial Power On: After installation, turn on your motorcycle's ignition to power on the device.
CarPlay / Android Auto Connection
To connect your smartphone to the device via CarPlay or Android Auto, follow these steps:
- Step 1: On the device's home screen, tap the CarPlay or Android Auto icon to enter the connection screen.
- Step 2: On your smartphone, turn on Wi-Fi and Bluetooth.
- Step 3: The drive recorder's Bluetooth will automatically turn on. Its name will appear as MT02-XXXX.
- Step 4: Connect to the device's Bluetooth from your smartphone.
- Step 5: Once the connection is successful, Apple CarPlay or Android Auto will function normally on the device screen.

Image: Step-by-step guide for connecting an iPhone to the device using Apple CarPlay.

Image: Step-by-step guide for connecting an Android phone to the device using Android Auto.
5. Operating Instructions
Basic Operation
- Power On/Off: The device will automatically power on when the motorcycle ignition is turned on and power off when the ignition is turned off.
- Touch Screen: Navigate menus and control functions by tapping or swiping the capacitive touch screen. The screen is designed to be responsive even with riding gloves.
- Wired Remote Control: Use the buttons on the wired remote control for quick access to common functions such as switching display modes, locking video files, or taking snapshots.
- Voice Control: Activate Siri or Google Assistant (when connected via CarPlay/Android Auto) by pressing the voice command button on the remote or screen, then speak your commands (e.g., "Navigate to X," "Play music," "Call Y").

Image: The various methods of controlling the device, including touch screen, wired remote, smartphone app, and voice commands.
Recording Functions
- Automatic Recording: The device begins recording automatically when powered on.
- Loop Recording: Videos are recorded in continuous loops. When the memory card is full, the oldest files are overwritten automatically.
- G-Sensor (Emergency Recording): In case of a sudden impact or collision, the built-in G-sensor will automatically lock the current video file to prevent it from being overwritten.
- Manual Lock: Press the designated button on the remote control to manually lock the current recording, protecting it from loop overwriting.
Smartphone App (WiFi)
Download the dedicated app (refer to the link in Section 2) to your smartphone to access advanced features:
- Live View: View real-time footage from both cameras on your smartphone.
- Video Playback: Playback recorded videos directly on your phone.
- File Management: Download, delete, or share video and photo files.
- Settings: Adjust device settings, camera resolution, and other preferences.
6. Maintenance
- Cleaning: Regularly wipe the display screen and camera lenses with the provided cleaning cloth or a soft, lint-free cloth. Do not use abrasive cleaners or solvents.
- Firmware Updates: Check the official VANBAR website or app periodically for firmware updates. Keeping your device updated ensures optimal performance and new features.
- Memory Card: Format the memory card regularly (e.g., once a month) using the device's settings to maintain optimal recording performance and prevent data corruption. Use a high-quality microSD card (Class 10 or higher).
- Cable Inspection: Periodically inspect all cables and connections for signs of wear, damage, or loose connections. Ensure all waterproof seals are intact.
- Storage: When not in use for extended periods, store the device in a cool, dry place away from direct sunlight and extreme temperatures.
7. Troubleshooting
| Problem | Possible Cause | Solution |
|---|---|---|
| Device does not power on. | Incorrect power connection; loose cable; no ignition power. | Check power cable connections (BAT, ACC, GND). Ensure ignition is on. Verify the step-down cable is used. |
| Cameras not recording or showing image. | Loose camera cable; faulty camera; memory card issue. | Check camera cable connections. Reformat or replace memory card. |
| CarPlay/Android Auto not connecting. | Bluetooth/Wi-Fi off on phone; incorrect pairing; app issues. | Ensure phone's Bluetooth/Wi-Fi is on. Follow connection steps carefully. Restart both devices. |
| Screen is too dim/bright. | Automatic brightness sensor obstructed or malfunctioning. | Ensure the light sensor (usually near the screen) is not covered. Check settings for manual brightness adjustment if available. |
| TPMS not displaying data. | Sensors not installed correctly; battery low in sensor. | Ensure TPMS sensors are securely tightened on valve stems. Check sensor batteries if replaceable (refer to TPMS specific instructions). |
| Device freezes or crashes. | Software glitch; memory card issue. | Perform a soft reset (power cycle). Reformat memory card. Update firmware. |
8. Specifications
| Feature | Detail |
|---|---|
| Model Number | BR01-200528 |
| Brand | VANBAR |
| Screen Size | 6.25 inches |
| Display Type | Capacitive Touch Screen |
| Camera Resolution | Front & Rear FHD 1080P |
| Waterproof Rating | IP67 |
| Connectivity | Wireless CarPlay, Android Auto, WiFi, Bluetooth |
| Storage | Supports MicroSD card (64GB included) |
| Power Input | 12V (via included step-down cable) |
| Product Dimensions | 27.3 x 4.5 x 7.1 cm (10.75 x 1.77 x 2.8 inches) |
| Weight | 1.05 kg (2.31 lbs) |
| Technical Qualification No. | 214-240535 |
9. Warranty and Support
VANBAR offers a three-year extended warranty for this product. Please retain your purchase receipt as proof of purchase for warranty claims.
Customer Support
For technical assistance, troubleshooting, or warranty inquiries, please contact VANBAR customer support through the following channels:
- Refer to the contact information provided on the product packaging or the official VANBAR website.
- For common issues, please refer to the Troubleshooting section of this manual or the FAQ section on the VANBAR website.
We are committed to providing the best possible shopping experience and support for our customers.
10. Important Safety Information
- Always ensure the device is securely mounted and cables are properly routed to avoid interference with motorcycle operation.
- Do not attempt to disassemble or repair the device yourself. This may void the warranty and cause damage.
- Avoid exposing the device to extreme temperatures, direct sunlight for prolonged periods, or corrosive substances.
- While the device is waterproof, avoid submerging it in water or exposing it to high-pressure water jets.
- Always prioritize safe riding. Do not operate the device in a way that distracts you from the road.


