1. Introduction
This manual provides essential information for the safe and efficient operation of your Creality K2 Pro Combo 3D Printer. Please read it thoroughly before initial use and retain it for future reference. The Creality K2 Pro Combo is an advanced FDM 3D printer designed for high-speed, multi-color printing with intelligent features.

Image 1.1: The Creality K2 Pro Combo 3D Printer, featuring its integrated multi-color filament system (CFS) and a printed model.
2. Setup
2.1 What's in the Box
- Creality K2 Pro Combo 3D Printer Unit
- Creality Filament System (CFS)
- Power Cable
- Tool Kit
- Sample Filament
- User Manual (this document)
2.2 Assembly and Structural Overview
The K2 Pro Combo features a robust design for stability and precision. The printer's frame is constructed from aerospace-grade aluminum alloy, ensuring minimal vibration during high-speed operations. The X-axis utilizes a precise steel rail, and the Z-axis is supported by four linear rods for consistent print bed movement.
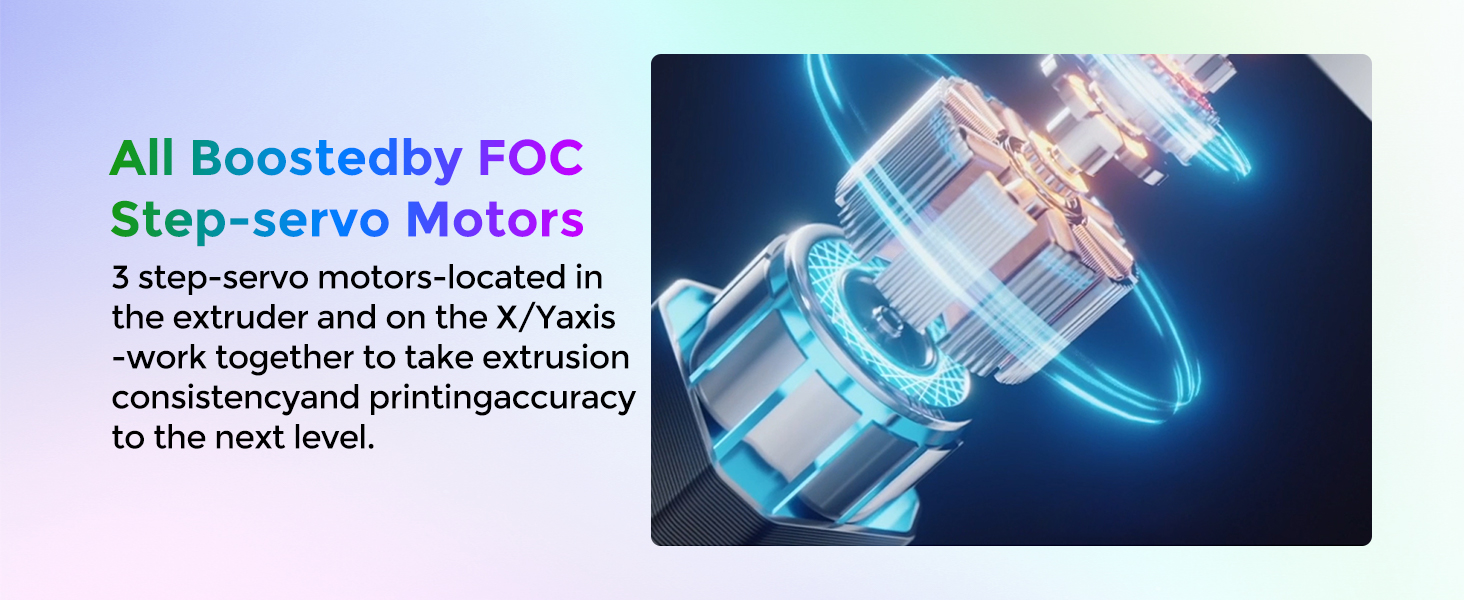
Image 2.1: Structural diagram of the printer's rigid exoskeleton.
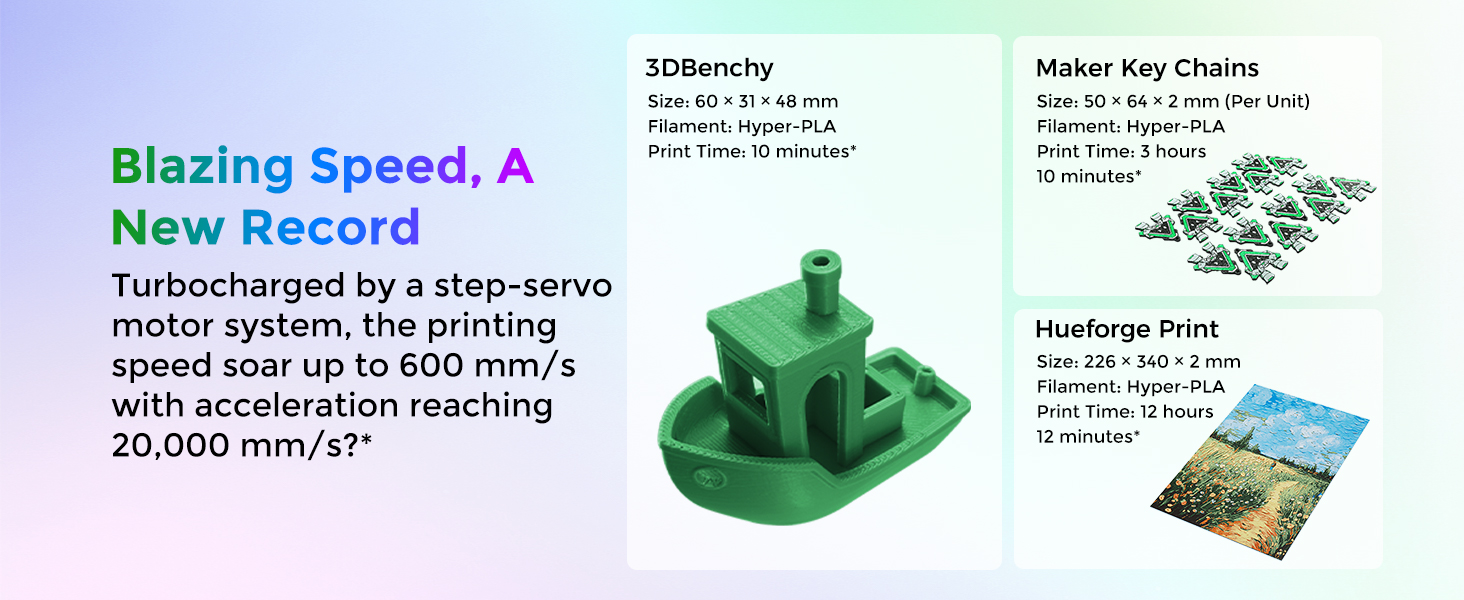
Image 2.2: Illustration of the precise steel X-axis rail.
Image 2.3: Diagram of the dual Z-axis system with four linear rods.
2.3 Initial Calibration: Smart Auto Leveling
The printer features smart auto-leveling to simplify the setup process. This system probes only the areas where your model will be printed, significantly speeding up bed leveling and ensuring a perfect first layer.

Image 2.4: Smart auto-leveling in progress.
3. Operating Instructions
3.1 Filament Loading and Multi-Color Printing
The K2 Pro Combo includes a Creality Filament System (CFS) for multi-color printing, supporting up to 16 colors. The system features a sensorized filament path with a built-in run-out sensor and an automated magnetic cutter for accurate filament management.

Image 3.1: Sensorized filament path and direct drive extrusion system.
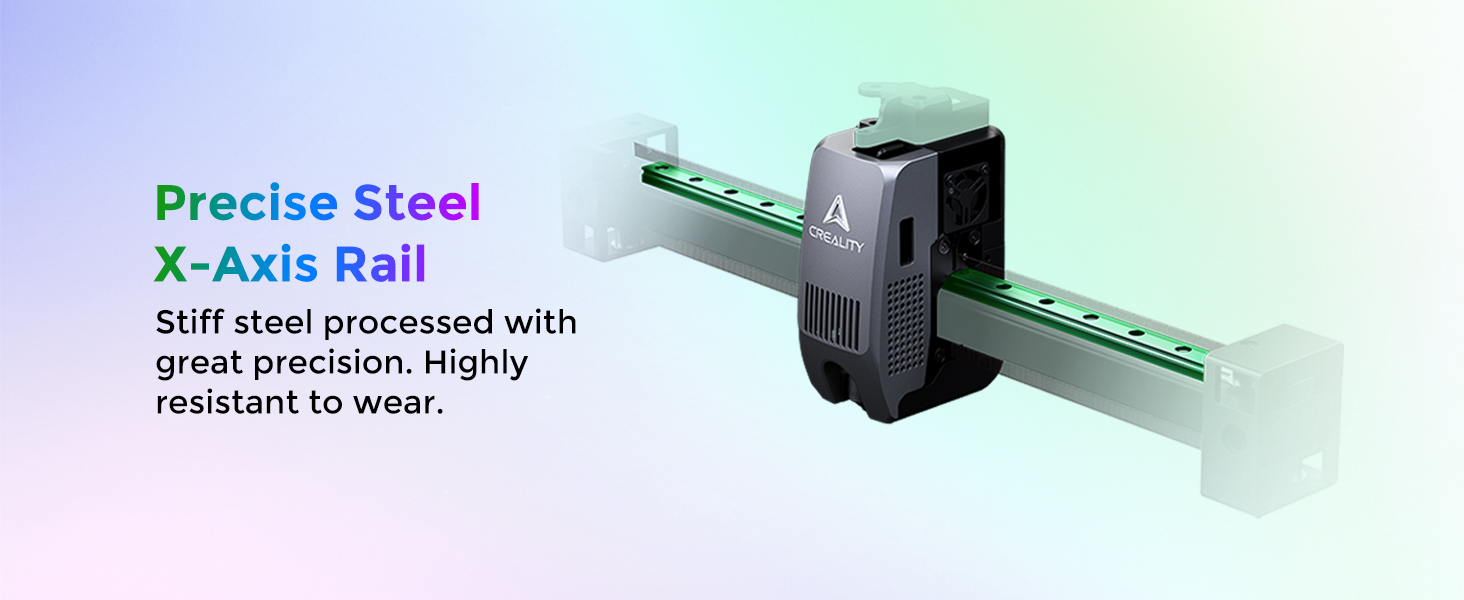
Image 3.2: Multi-color printing setup with multiple CFS units.
3.2 High-Speed Printing
The printer achieves speeds up to 600 mm/s with acceleration reaching 20,000 mm/s², enabled by industry-grade step-servo motors located in the extruder and on the X/Y axes. This system ensures consistent extrusion and high printing accuracy.

Image 3.3: Example of a 3DBenchy printed at high speed.
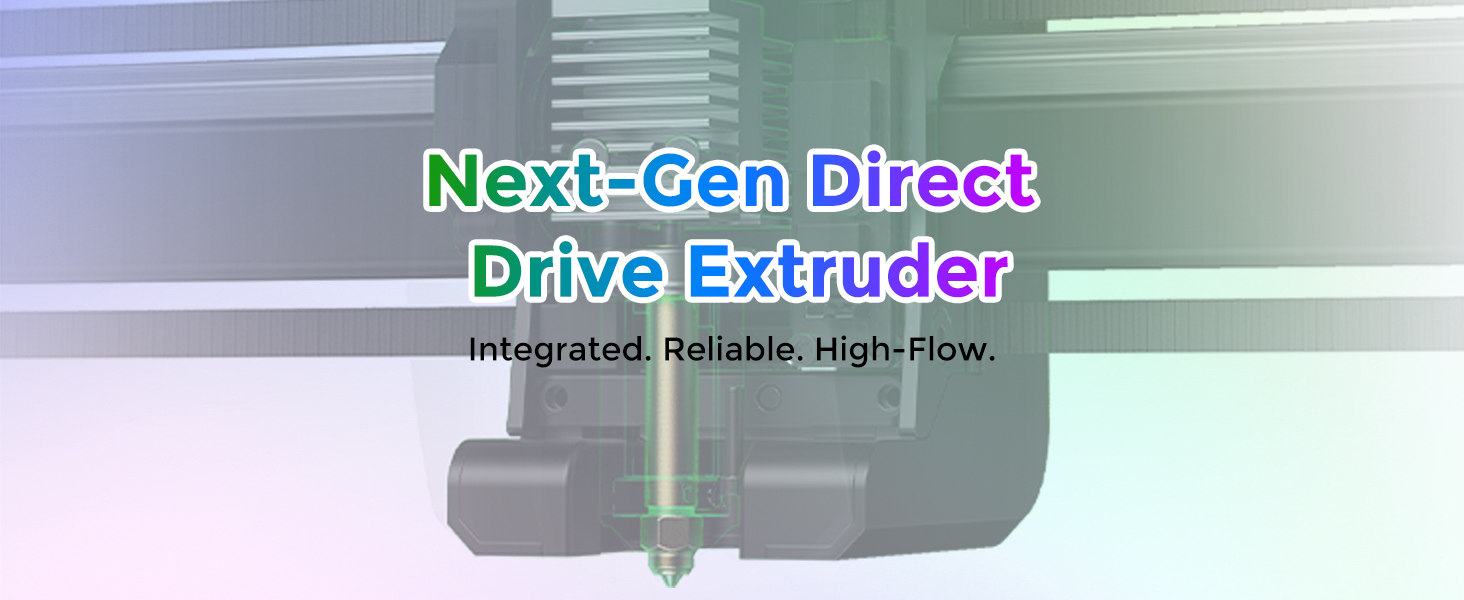
Image 3.4: FOC Step-servo motors for enhanced motion control.
3.3 Printing with Advanced Materials (Heated Chamber)
The active heated chamber maintains a stable temperature up to 60°C, which is crucial for printing with engineering filaments like ASA and PPA, preventing warping. The steel-tipped nozzle can reach up to 300°C, allowing compatibility with high-temperature and abrasive materials such as PA-CF.

Image 3.5: Active chamber heating system.
3.4 AI Camera Monitoring
The printer integrates dual AI cameras for enhanced print monitoring and optimization:
- Chamber AI Camera: Monitors for printing failures like spaghetti detection, foreign objects, or idling. It also checks if the heatbed is empty and can capture time-lapse videos.
- Nozzle AI Camera: Adjusts nozzle flow rate in real-time to prevent under- or over-extrusion, performs pressure advance tuning, and detects waste chute blockages.

Image 3.6: Chamber AI camera detecting print failure.

Image 3.7: Nozzle AI camera features.
3.5 Auxiliary Cooling
An auxiliary cooling fan on the side of the chamber directs airflow onto the extruded filament, improving interlayer adhesion and overall print quality.

Image 3.8: Auxiliary cooling fan in operation.
4. Maintenance
4.1 Extruder and Hotend Care
The K2 Pro Combo features a durable direct drive extrusion system with hardened steel gears, designed to handle various filament types, including carbon fiber-filled materials. The 40mm³/s high-flow hotend is powered by an 80W heater.

Image 4.1: Durable direct drive extrusion system.
The hotend is modularly designed for quick-swapping, simplifying maintenance and replacement. The nozzle cover is magnetic for easy removal and access.
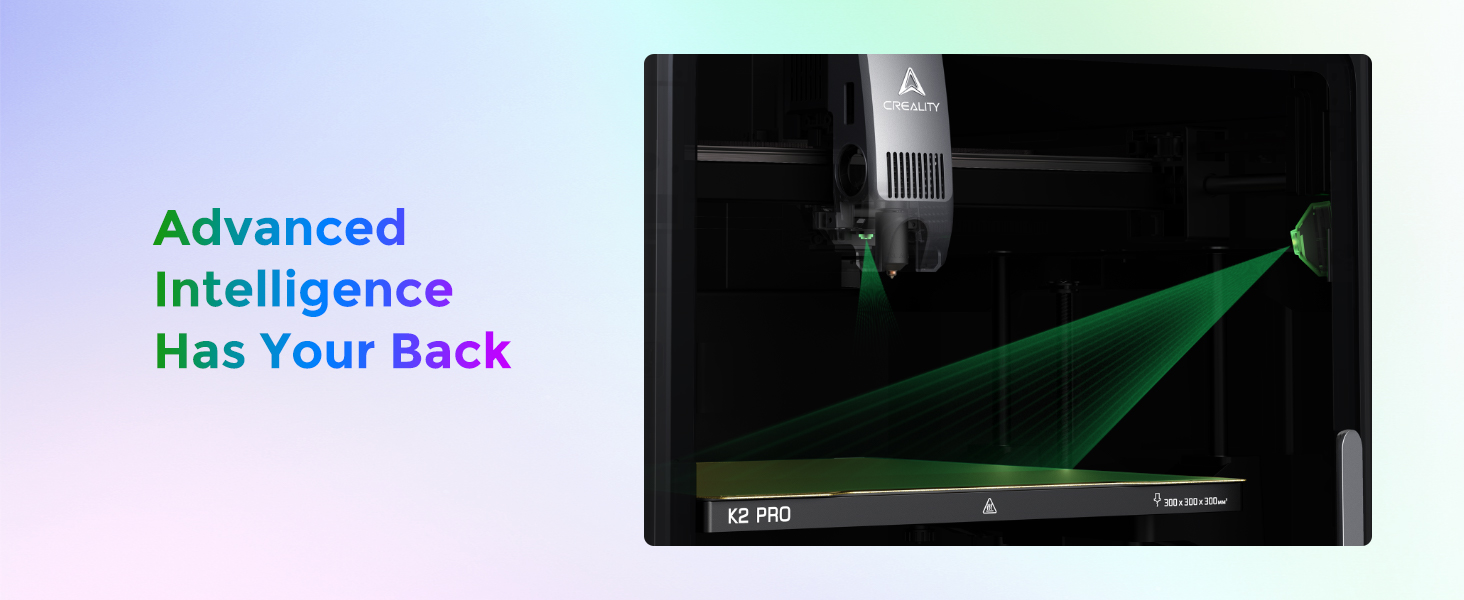
Image 4.2: Quick-swap hotend design.
4.2 General Cleaning
- Regularly clean the print bed with isopropyl alcohol to ensure optimal adhesion.
- Keep the interior of the printer free from dust and filament debris.
- Inspect the X-axis rail and Z-axis rods for any obstructions or wear.
5. Troubleshooting
The integrated AI cameras assist in identifying and preventing common printing issues. Refer to the printer's touchscreen interface for specific error messages and guidance.
5.1 Common Printing Issues
- Poor First Layer Adhesion: Ensure the print bed is clean and properly leveled. Adjust Z-offset if necessary.
- Under/Over-Extrusion: The Nozzle AI camera automatically optimizes flow rate. If issues persist, check filament diameter settings in your slicer and ensure the hotend is not clogged.
- Warping: For materials prone to warping (e.g., ABS, ASA), ensure the active heated chamber is set to the appropriate temperature (up to 60°C).
- Filament Run-Out: The sensorized filament path will detect run-out and pause the print. Replace the filament and resume.
- Spaghetti Detection: The Chamber AI camera can detect severe print failures. If detected, the printer may pause or alert you to intervene.
5.2 Firmware Updates
Regularly check for firmware updates from the official Creality website to ensure optimal performance and access to new features. Follow the provided instructions carefully during the update process.
6. Specifications

Image 6.1: Technical specifications overview.
| Parameter | Value |
| Build Volume | 300 x 300 x 300 mm (11.81 x 11.81 x 11.81 inches) |
| Product Dimensions | 445 x 477 x 573 mm (23 x 23 x 24 inches) |
| Net Weight | 23.7 kg (52.2 pounds) |
| Max Print Speed | 600 mm/s |
| Max Acceleration | 20,000 mm/s² |
| Max Nozzle Temperature | 300°C |
| Max Heatbed Temperature | 110°C |
| Max Chamber Temperature | 60°C |
| Extruder Type | Direct Drive with Hardened Steel Gears |
| Hotend Flow Rate | 40 mm³/s |
| Motors | FOC Step-servo Motors (X/Y Axes and Extruder) |
| Leveling Mode | Smart Auto Leveling |
| AI Cameras | Dual (Chamber AI Camera, Nozzle AI Camera) |
| Display | 4-inch Touchscreen |
| Connectivity | Wi-Fi (2.4G & 5G), RJ45, USB Drive, Creality 485 Port |
| Storage | 32GB EMMC |
| Material | Aluminum |
7. Warranty and Support
For warranty information, technical support, or service inquiries, please refer to the official Creality website or contact Comgrow customer service. Keep your purchase receipt for warranty validation.
Comgrow Store Link: Visit the Comgrow Store on Amazon


