1. Introduction
This manual provides comprehensive instructions for the installation, operation, and maintenance of your NB ERGONOMIC F5 Gaming Monitor Arm. Designed for optimal ergonomic comfort and gaming aesthetics, this heavy-duty monitor arm supports a wide range of displays and offers versatile adjustments.
Key Features:
- Monitor Compatibility: Supports most curved, ultrawide, or flat monitors from 32 to 60 inches, weighing between 2 kg (4.4 lbs) and 20 kg (44 lbs). Compatible with VESA patterns 75x75mm and 100x100mm.
- Easy Installation: Features a quick-release head design for single-person installation and offers two mounting options: C-Clamp or Grommet Hole.
- Integrated RGB Lighting: Built-in RGB lights with one-click color mode switching to enhance your gaming environment.
- Ergonomic Adjustments: Provides 360° rotation, -50° to +50° tilt, -90° to +90° swivel, and up to 25 inches (63 cm) of arm extension for personalized viewing angles.
- Enhanced Durability: Constructed from premium-grade aluminum with Mechanical ProSpring Technology for easier tension adjustment and an advanced gear locking system tested for over 50,000 performance cycles.
- Cable Management: Integrated cable management system helps maintain a clean and organized workspace.
2. Setup and Installation
Follow these steps carefully to ensure proper and secure installation of your monitor arm.
2.1 Unpacking and Component Check
Carefully remove all components from the packaging. Verify that all parts are present according to the included parts list (refer to your product packaging for the complete list).
2.2 VESA Compatibility Check
Before installation, confirm your monitor's VESA compatibility. The monitor arm supports 75x75mm and 100x100mm VESA patterns. Locate the square pattern of four screw holes on the back of your monitor. If your monitor has an embedded VESA area or a back cover, you may need to remove the cover to access the VESA holes.
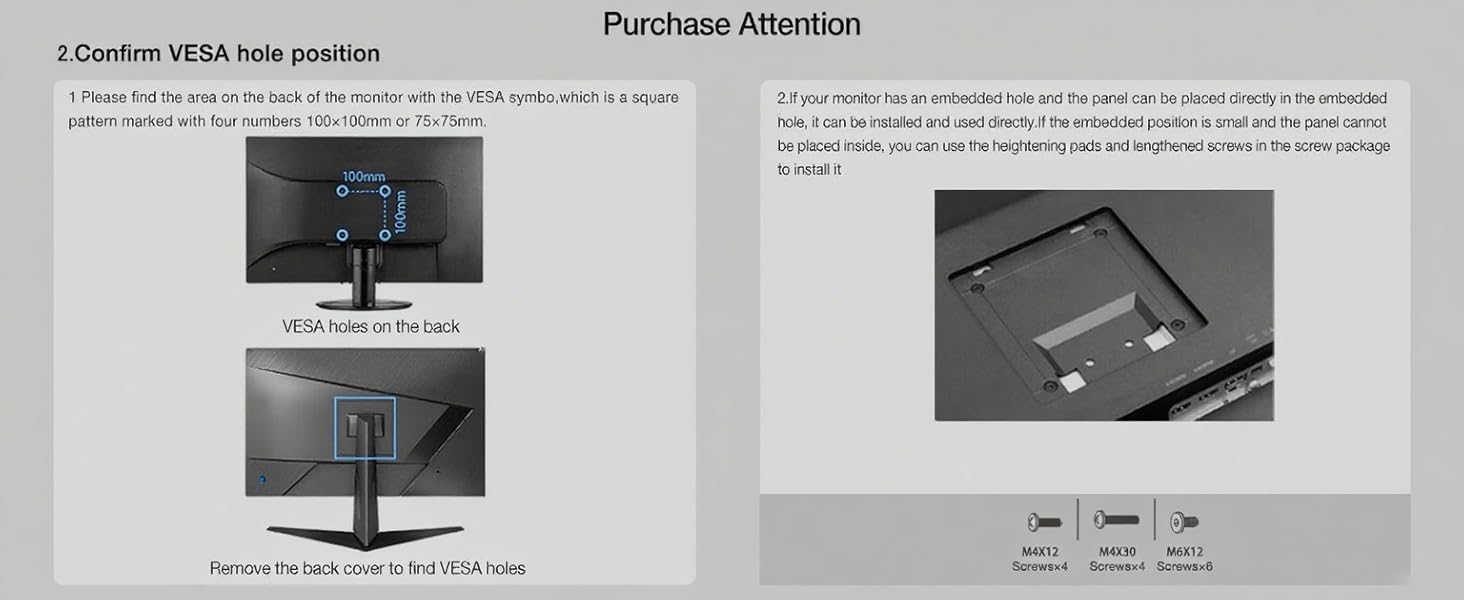
Image: Confirming VESA hole position and screw types (M4x12, M4x30).
2.3 Mounting Options
The monitor arm offers two installation methods: C-Clamp or Grommet Hole. Choose the method best suited for your desk.
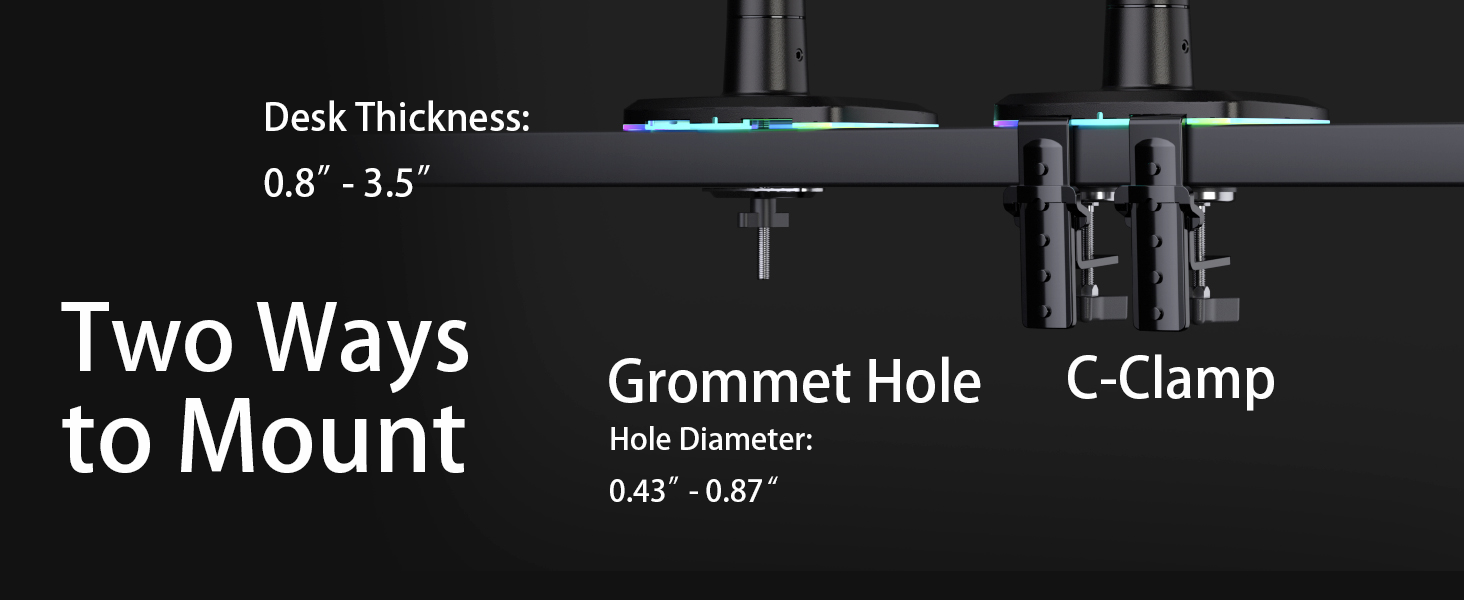
Image: Two ways to mount the monitor arm: Grommet Hole and C-Clamp.
- C-Clamp Installation: Attach the C-clamp base to the edge of your desk. Ensure your desk thickness is between 0.8" and 3.5" (20mm - 89mm). Tighten the clamp securely.
- Grommet Hole Installation: If your desk has a grommet hole, use the grommet base. Ensure the hole diameter is between 0.43" and 0.87" (11mm - 22mm). Secure the base through the grommet hole.
2.4 Attaching the Monitor Arm
- Assemble the arm components as per the diagrams in your product packaging.
- Attach the VESA plate to the back of your monitor using the appropriate M4x12 or M4x30 screws. If your monitor has an embedded VESA hole that is too small, use the provided heightening pads and longer screws.
- Utilize the quick-release head design to easily slide and lock the monitor (with the attached VESA plate) onto the arm. This design allows for single-person installation.

Image: NB ERGONOMIC F5 Gaming Monitor Arm with both C-clamp and grommet mounting options.
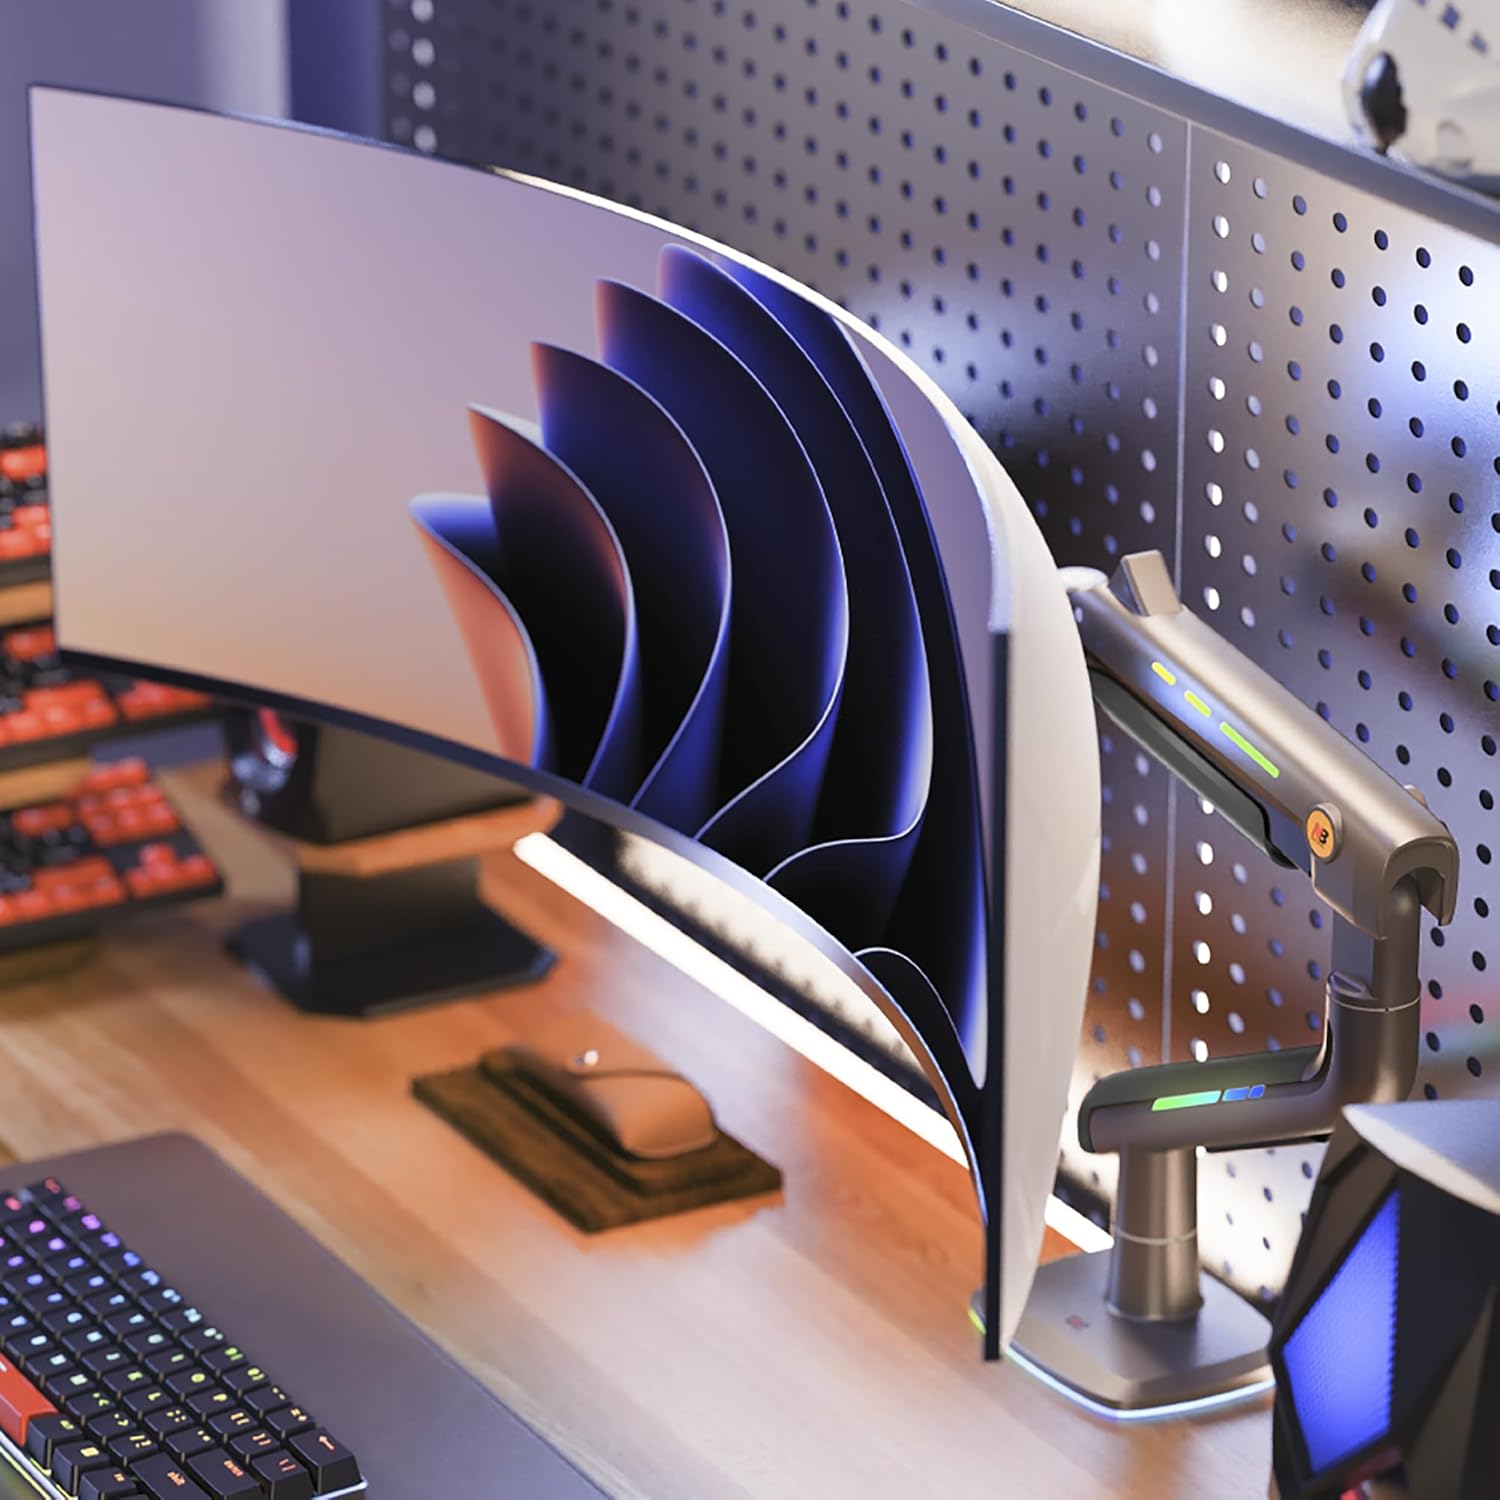
Image: Monitor arm supporting a curved ultrawide monitor.
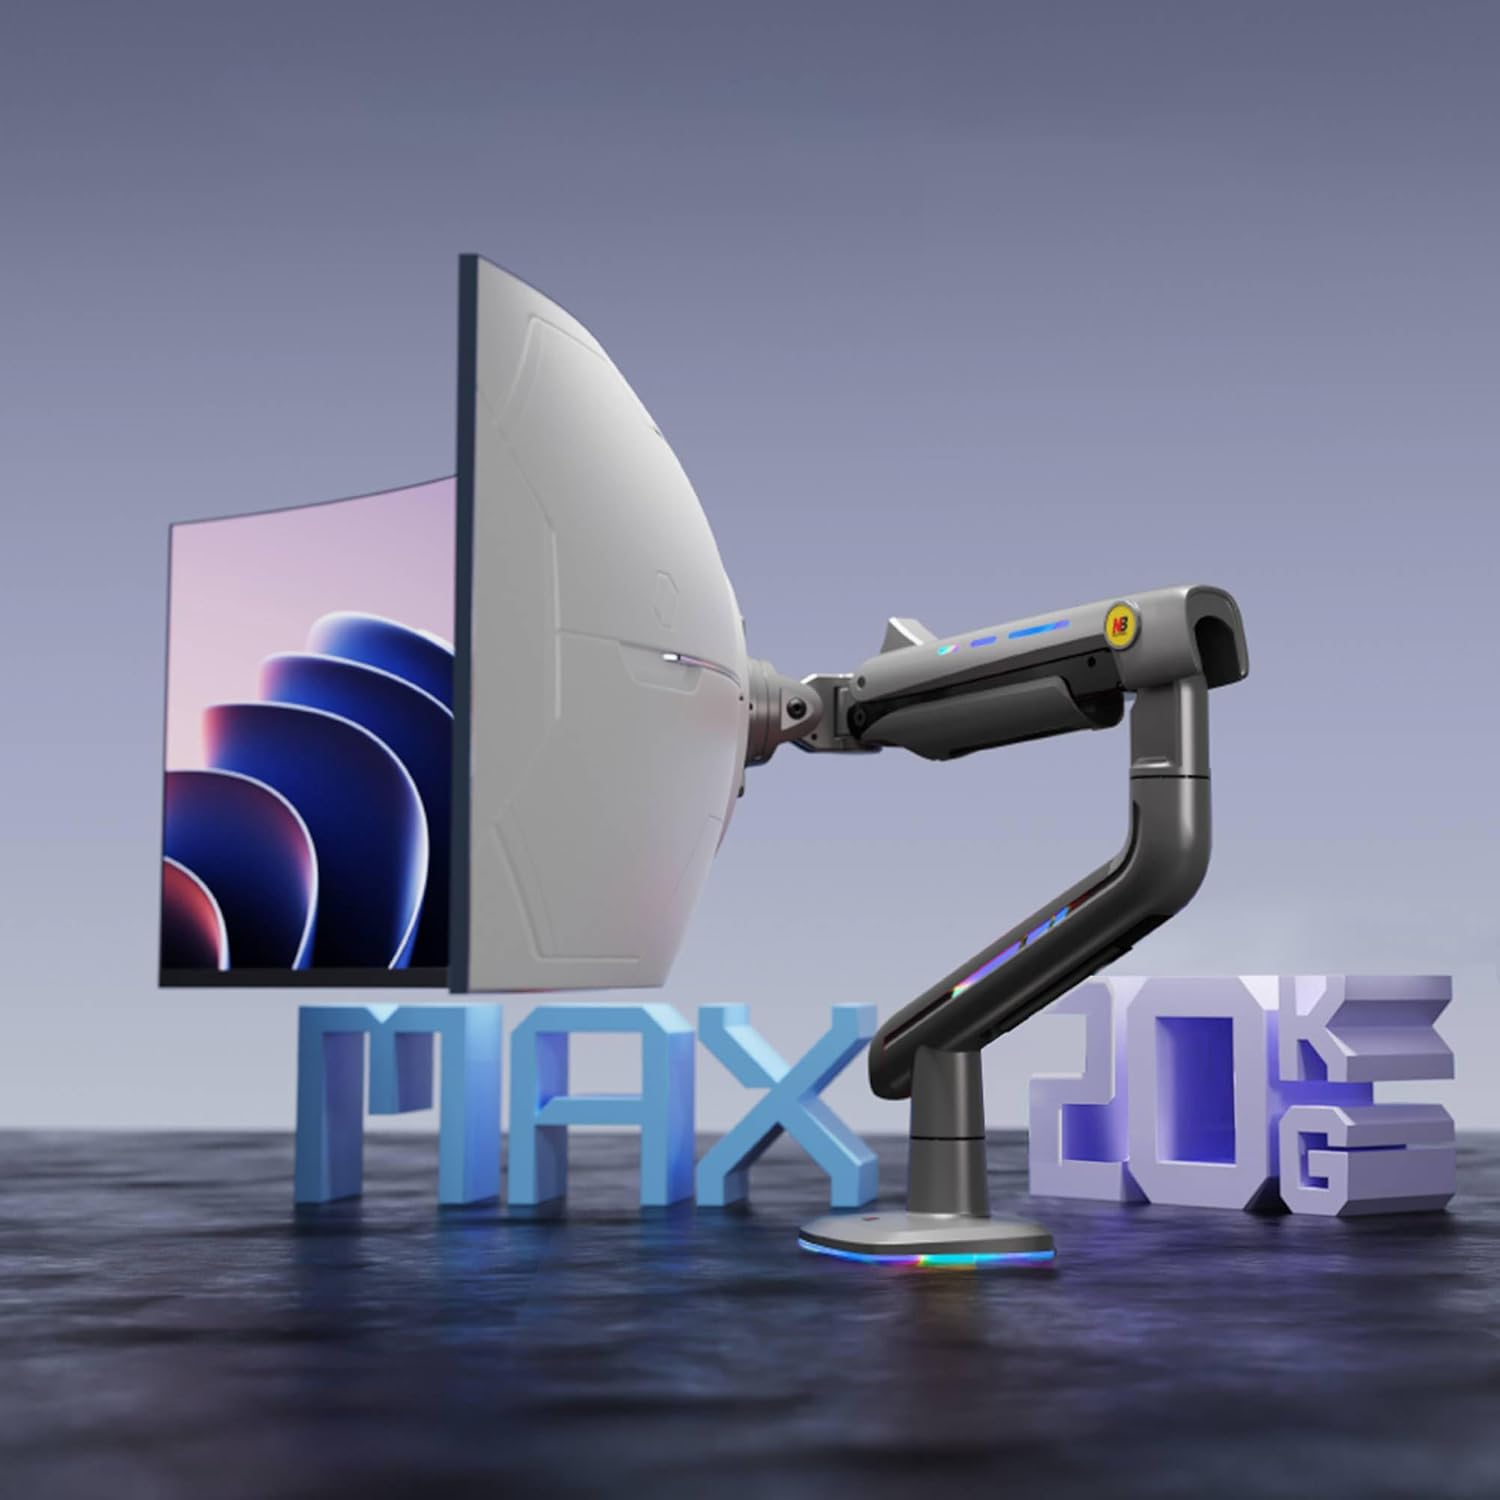
Image: Monitor arm illustrating its 20 kg (44 lbs) weight capacity.
3. Operating the Monitor Arm
The NB ERGONOMIC F5 Monitor Arm offers extensive adjustability to customize your viewing experience.
3.1 Adjusting Monitor Position
The arm allows for fluid movement to achieve your desired monitor position:
- Height Adjustment: The arm can be adjusted vertically up to 19.6 inches (500mm) with a 9.8 inch (250mm) height adjustment range.
- Extension: The arm extends up to 24.8 inches (630mm) from the base.
- Tilt: Adjust the monitor tilt from -50° to +50°.
- Swivel: Swivel the monitor -90° to +90° horizontally.
- Rotation: Rotate the monitor 360° for landscape or portrait orientation. The arm itself also offers 360° rotation at the base.

Image: Diagram showing tilt, rotation, and swivel adjustments.
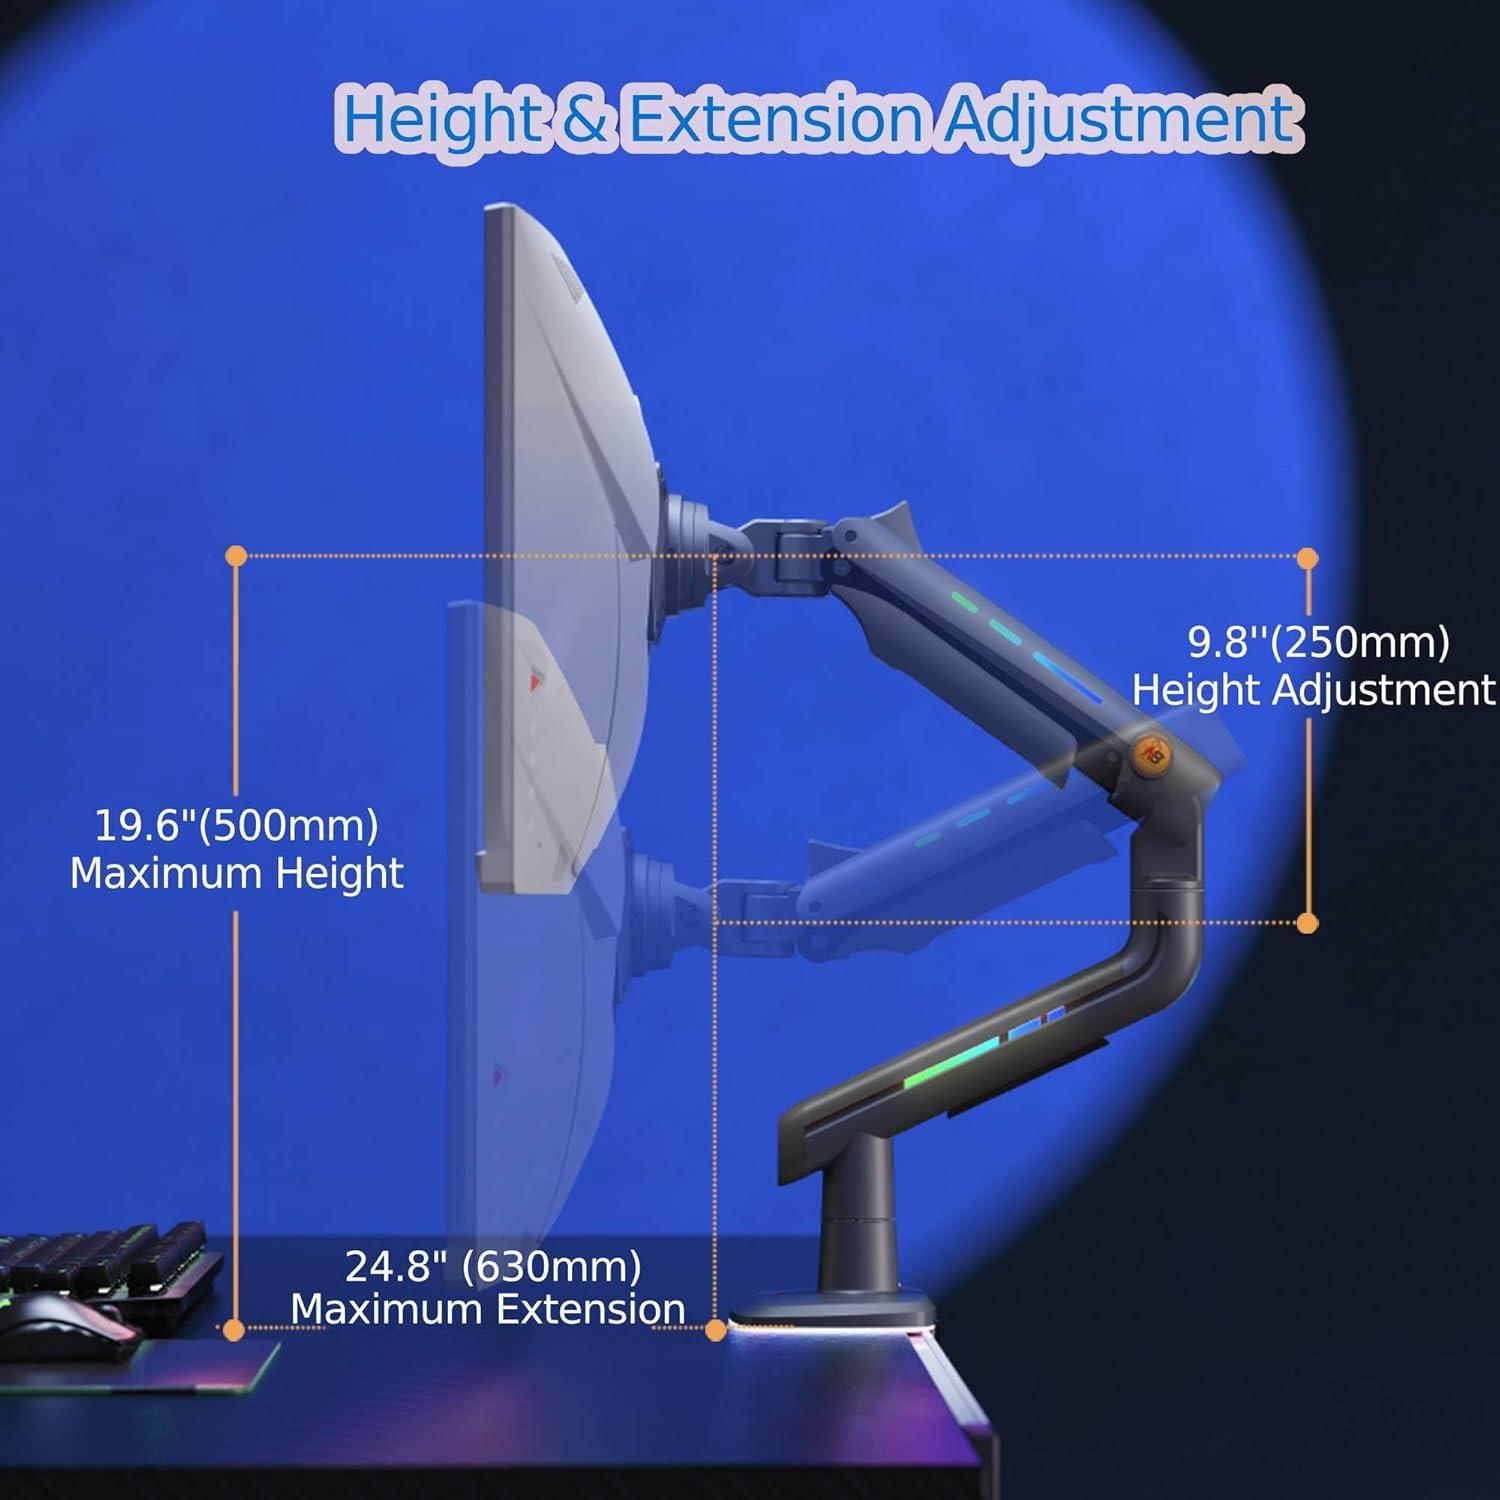
Image: Diagram detailing height and extension adjustments.
3.2 Tension Adjustment
The arm features Mechanical ProSpring Technology for easy tension adjustment. Use the provided Allen wrench to adjust the tension at the arm joints to match your monitor's weight and desired movement resistance. This ensures the monitor stays in place once positioned.
3.3 RGB Lighting Control
The integrated RGB lighting can be controlled with a single click. Locate the control button on the arm base to cycle through various color modes and effects.

Image: Monitor arm highlighting its integrated RGB lighting.
3.4 Cable Management
Route your monitor and power cables through the integrated cable management channels along the arm. This helps keep your desk tidy and prevents cable clutter.

Image: Rear view of the monitor arm showing cable management.
3.5 Product Video Overview
Watch this video for a visual demonstration of the NB ERGONOMIC F5 Monitor Arm's features and operation.
Video: An overview of the NB ERGONOMIC F5 Monitor Arm, demonstrating its features and ease of use.
4. Maintenance
Regular maintenance ensures the longevity and optimal performance of your monitor arm.
- Cleaning: Wipe the arm surfaces with a soft, damp cloth. Avoid abrasive cleaners or solvents that could damage the finish.
- Check Connections: Periodically check all screws and mounting points to ensure they remain tight and secure.
- Tension Adjustment: If the monitor feels too loose or too stiff, re-adjust the tension using the Allen wrench as described in Section 3.2.
5. Troubleshooting
If you encounter any issues with your monitor arm, refer to the following common solutions:
- Monitor is not stable or sags: The tension may be too low for your monitor's weight. Increase the tension at the arm joints using the provided Allen wrench until the monitor holds its position securely.
- Arm is difficult to move: The tension may be too high. Decrease the tension at the arm joints using the Allen wrench.
- Monitor is not centered on the desk: If the mounting point is in the center of your desk, but your ultrawide monitor appears off-center, consider mounting the arm base slightly to the left or right of the desk's center to achieve a balanced viewing position for the monitor itself.
- VESA plate does not fit flush with the monitor: Ensure you are using the correct screw length (M4x12 or M4x30). If your monitor has raised areas around the VESA holes or an embedded VESA area, use the provided heightening pads (spacers) to create a flush mounting surface.
- Cables are not staying in cable management: Ensure cables are properly routed and secured within the channels. Use cable ties if necessary to keep them neat.
6. Specifications
| Feature | Detail |
|---|---|
| Brand Name | NB ERGONOMIC |
| Item Model Number | F5 |
| Item Weight | 13.55 pounds (6.15 kg) |
| Package Dimensions | 18.5 x 16.25 x 6.75 inches |
| Color | Grey Black |
| Mounting Type | Tabletop Mount (C-Clamp or Grommet) |
| Movement Type | Articulating |
| Material | Aluminum |
| Compatible Devices | Monitor (32-60 inches, 2-20 kg) |
| VESA Compatibility | 75x75mm, 100x100mm |
| Maximum Tilt Angle | ±50 Degrees |
| Maximum Swivel Angle | ±90 Degrees |
| Rotation | 360 Degrees |
| Maximum Arm Extension | 25 inches (630mm) |
7. Warranty and Support
For warranty information, please refer to the documentation included with your product or contact NB ERGONOMIC customer support directly. Additional protection plans may be available for purchase.
Customer Support:
If you require further assistance, please contact NB ERGONOMIC customer support through their official website or the retailer where you purchased the product. Please have your model number (F5) and purchase details ready.


