
1. Introduction
This manual provides detailed instructions for the safe and efficient operation of your Retevis RT95 Mini Professional Mobile Radio and Ailunce HA1UV IP67 Waterproof Dual-Band Handheld Transceiver. Please read this manual thoroughly before using the devices to ensure proper function and to prevent damage.
2. Package Contents
Please check the contents of your package against the list below. If any items are missing or damaged, contact your retailer.
- 1 x Retevis RT95 Mobile Radio Transceiver
- 1 x Speaker Microphone for RT95
- 1 x Power Cable for RT95
- 1 x Set of Screws and Mounting Accessories for RT95
- 1 x Ailunce HA1UV Handheld Walkie Talkie
- 1 x HA1UV Battery
- 1 x HA1UV Belt Clip
- 1 x HA1UV Wrist Strap
- 1 x USB Type-C Charging Cable for HA1UV
- 1 x Charging Dock for HA1UV
- 2 x User Manuals (one for RT95, one for HA1UV)
3. Product Overview - Retevis RT95 Mobile Radio
Familiarize yourself with the main components and controls of the RT95 mobile radio.

Image 1: Retevis RT95 Front Panel and Speaker Microphone. This image displays the front panel of the RT95 mobile radio, highlighting the Power Switch, Microphone/Program Jack, Self Define Keys (P1-P6), TX/RX indicator, Function Menu Key (FUNC), and Channel Switch/Push button/Key Lock. Below the radio, the speaker microphone is shown with its UP/Down buttons, PTT (Push-To-Talk) button, A/B Band switch, Number keys, Band indicator, and Speaker.
RT95 Front Panel Controls:
- Power Switch: Turns the radio on or off.
- Microphone/Program Jack: Connects the speaker microphone or programming cable.
- P1-P6 (Self Define Keys): Programmable function keys.
- TX/RX Indicator: Lights up to indicate transmission (TX) or reception (RX).
- FUNC (Function Menu Key): Accesses the radio's menu system.
- Channel Switch/Push button/Key Lock: Rotary knob for channel selection, push to confirm or activate functions, press and hold for key lock.
Speaker Microphone Controls:
- UP/Down Buttons: Navigate menus or adjust frequencies/channels.
- PTT (Push-To-Talk): Press and hold to transmit, release to receive.
- A/B Band: Switches between main and sub-bands.
- Number Keys: For direct frequency input or DTMF tones.
4. Product Overview - Ailunce HA1UV Handheld Transceiver
Familiarize yourself with the main components and controls of the HA1UV handheld radio.

Image 2: Ailunce HA1UV IP67 Waterproof Feature. This image shows the HA1UV handheld transceiver partially submerged in water, demonstrating its IP67 waterproof capability. The screen is visible, displaying frequency information. This highlights the device's durability in wet environments.
HA1UV Key Features:
- Dual-Band Operation: Supports 2m (VHF) and 70cm (UHF) bands.
- IP67 Waterproof: Withstands immersion in 1 meter of water for 30 minutes.
- 1.77-inch Color Screen: Displays battery status, channel, and function information clearly.
- 2800mAh Battery: Provides up to 20 hours of operation.
- USB-C Charging: Convenient charging via USB-C port or charging dock.
5. Setup
5.1. Retevis RT95 Mobile Radio Setup
- Mounting: Securely mount the RT95 in your vehicle or desired location using the provided mounting bracket and screws. Ensure adequate ventilation around the unit.
- Power Connection: Connect the supplied power cable to the radio's power input port. Connect the red wire to the positive terminal of your vehicle's 12V DC power source and the black wire to the negative terminal. Ensure a secure connection and proper fusing.
- Antenna Connection: Connect a suitable dual-band antenna (not included) to the antenna connector on the rear of the RT95. Ensure the connection is tight.
- Microphone Connection: Plug the speaker microphone into the Microphone/Program Jack on the front panel.
5.2. Ailunce HA1UV Handheld Transceiver Setup
- Battery Installation: Align the battery pack with the battery compartment on the back of the HA1UV and slide it into place until it clicks securely.
- Antenna Attachment: Screw the provided antenna onto the antenna connector on top of the HA1UV until it is finger-tight. Do not overtighten.
- Charging the Battery:
- Using USB-C: Connect the USB Type-C cable to the charging port on the side of the HA1UV and to a USB power adapter (not included).
- Using Charging Dock: Place the HA1UV into the charging dock. Connect the USB Type-C cable to the charging dock and to a USB power adapter. The indicator light on the dock will show charging status.
Charge the battery fully before first use. A full charge typically takes several hours.
- Belt Clip/Wrist Strap: Attach the belt clip to the back of the radio if desired. The wrist strap can be attached to the designated loop for secure carrying.

Image 3: Ailunce HA1UV Battery and Charging. This image illustrates the HA1UV's built-in 2800mAh battery, indicating a work time of 20 hours. It also highlights the convenient Type-C charging port, showing how the device can be recharged.
6. Operating Instructions
6.1. Power On/Off
- RT95: Press the Power Switch button on the front panel.
- HA1UV: Rotate the ON/OFF/Volume knob clockwise until you hear a click. Rotate counter-clockwise to turn off.
6.2. Volume Adjustment
- RT95: Use the volume controls on the speaker microphone or through the menu.
- HA1UV: Rotate the ON/OFF/Volume knob to adjust the audio level.
6.3. Channel Selection / Frequency Adjustment
- RT95: Rotate the Channel Switch knob to select a channel. In VFO (Variable Frequency Oscillator) mode, use the UP/DOWN buttons on the microphone to adjust frequency steps.
- HA1UV: Use the UP/DOWN arrow keys or the rotary encoder (if present) to change channels or frequencies. Direct frequency input is possible using the keypad.
6.4. Transmitting and Receiving
- Ensure you are on the desired frequency or channel.
- To transmit, press and hold the PTT (Push-To-Talk) button on the microphone (RT95) or side of the radio (HA1UV). Speak clearly into the microphone.
- Release the PTT button to stop transmitting and return to receive mode.
6.5. CTCSS/DCS (Tone Squelch)
CTCSS (Continuous Tone-Coded Squelch System) and DCS (Digital Coded Squelch) are used to filter out unwanted signals. Only signals with the matching tone/code will be heard.
- Access the menu (FUNC key on RT95, MENU key on HA1UV) and navigate to the CTCSS/DCS settings.
- Select the desired tone or code for transmission and reception.
6.6. Power Level Adjustment (RT95)
The RT95 offers three power levels: High (25W), Medium (15W), and Low (5W).
- Access the menu and find the TX Power setting.
- Select the appropriate power level based on your communication needs and local regulations.
6.7. Dual-Band Operation (HA1UV)
The HA1UV supports simultaneous monitoring of two different frequencies (VHF and UHF).
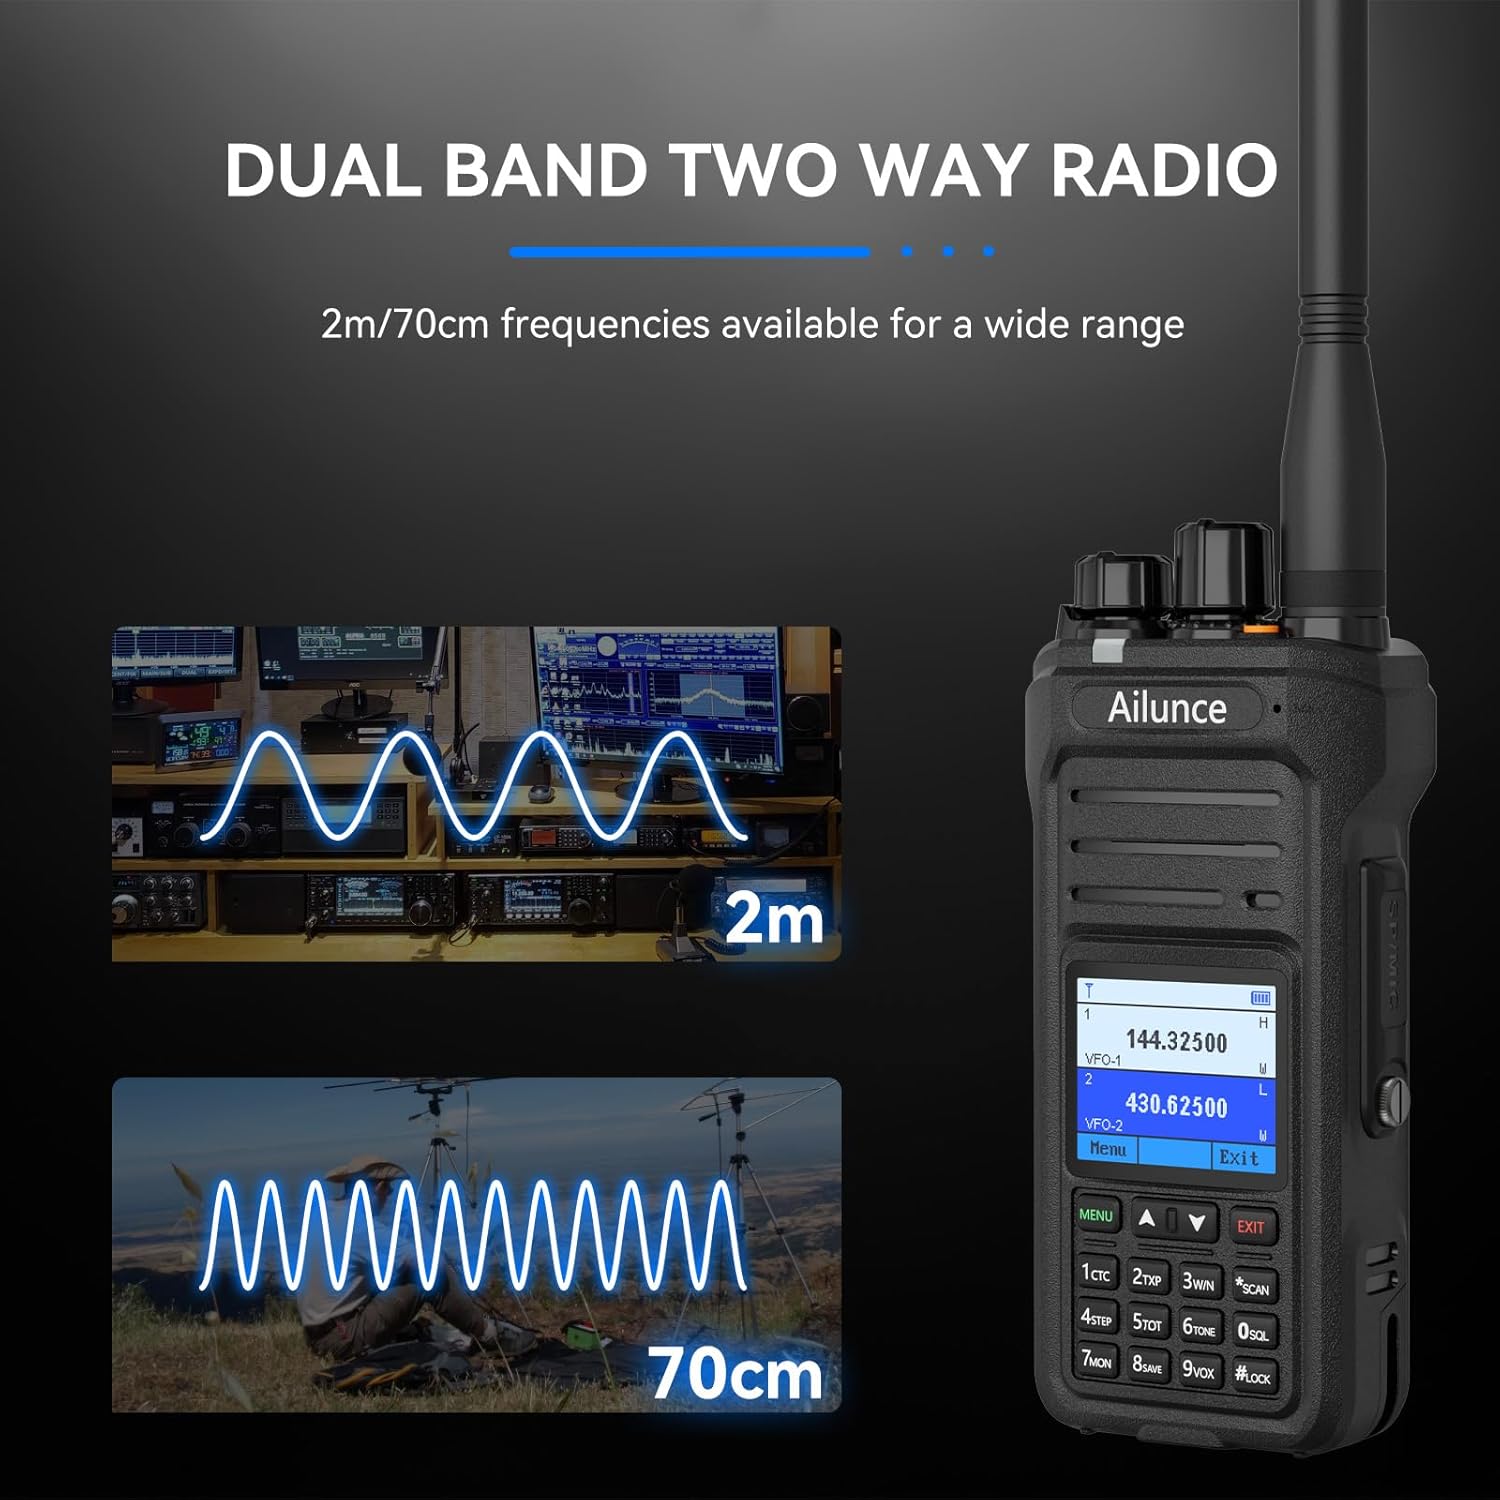
Image 4: Ailunce HA1UV Dual Band Capability. This image illustrates the HA1UV's dual-band functionality, showing it can operate on both 2-meter (VHF) and 70-centimeter (UHF) frequencies. Visual representations of radio waves for both bands are included, indicating a wide range of available frequencies.
- Use the A/B button (if available) or menu option to switch between the main and sub-bands, or to set the active transmit band.
6.8. Display Rotation (RT95)
The RT95 features a 180-degree rotatable TFT display for flexible mounting options.

Image 5: Retevis RT95 180-Degree Rotatable Screen. This image demonstrates the RT95's screen rotation feature. It shows the radio's display in two orientations, illustrating how it can be flipped 180 degrees to accommodate different mounting positions or viewing angles.
- Access the display settings in the menu to rotate the screen orientation as needed.
6.9. Key Lock
To prevent accidental operation, both radios feature a key lock function.
- RT95: Press and hold the Channel Switch knob to activate/deactivate key lock.
- HA1UV: Typically, press and hold the '#' key or a designated lock key. Refer to the HA1UV specific manual for exact instructions.
7. Maintenance
7.1. Cleaning
- Wipe the radio surfaces with a soft, damp cloth. Do not use harsh chemicals or abrasive cleaners.
- Ensure the microphone and speaker grilles are free from dust and debris.
7.2. Battery Care (HA1UV)
- Avoid overcharging or completely discharging the battery frequently to prolong its lifespan.
- Store the battery in a cool, dry place when not in use.
- If the radio will not be used for an extended period, remove the battery.
7.3. Cooling System (RT95)
The RT95 features an aluminum alloy body and a cooling fan for heat dissipation, ensuring stable long-term operation.

Image 6: Retevis RT95 Cooling Fan. This image highlights the RT95's cooling fan system, depicted with arrows indicating airflow over the radio unit in a cold, icy environment. This illustrates the radio's ideal refrigeration system designed for long-term work without overheating.
- Ensure the cooling fins and fan vents are not obstructed to allow for proper airflow.
8. Troubleshooting
| Problem | Possible Cause | Solution |
|---|---|---|
| Radio does not power on | Low battery (HA1UV); Loose power connection (RT95); Blown fuse (RT95) | Charge battery; Check power cable connections; Replace fuse if blown |
| Cannot transmit or receive | Incorrect frequency/channel; Squelch level too high; Antenna not connected; CTCSS/DCS mismatch | Verify frequency/channel; Adjust squelch; Check antenna connection; Ensure CTCSS/DCS match |
| Poor audio quality | Low signal strength; Antenna issue; Volume too low/high | Check antenna; Move to better location; Adjust volume |
| Keypad/buttons unresponsive | Key lock activated | Deactivate key lock |
9. Specifications
Retevis RT95 Mobile Radio
- Brand: Retevis
- Model: RT95
- Number of Channels: 200
- Power Output: 5W/15W/25W (Selectable)
- Bandwidth: Wide (25K), Medium (20K), Narrow (12.5K)
- Special Feature: Automatic Squelch, 180° Rotatable TFT Display
- Body Material: Aluminum Alloy
- Voltage: 13.8V DC (Nominal)
Ailunce HA1UV Handheld Transceiver
- Brand: Retevis (Ailunce)
- Model: HA1UV
- Frequency Bands: Dual-Band (2m/VHF, 70cm/UHF)
- Water Resistance: IP67 Waterproof
- Battery Capacity: 2800 mAh
- Battery Life: Up to 20 hours
- Charging: USB-C and Charging Dock
- Display: 1.77-inch Color Screen
- Max Talk Range: 5 Kilometers (under optimal conditions)
- Voltage: 7.4 Volts (DC)
10. Warranty and Support
Retevis provides the following warranty for this product:
- Radio Body: 2 years warranty.
- Accessories: 1 year warranty.
- Return Policy: 30 days no-reason return.
For warranty claims or technical support, please contact Retevis customer service through Amazon. We aim to respond within 12 hours. Even beyond the warranty period, maintenance services are offered, with buyers responsible for associated costs.


