
SIAGO 48x24-Inch Electric Standing Desk
SIAGO Electric Standing Desk User Manual
Model: 48x24-Inch Electric Standing Desk
Introduction
This manual provides detailed instructions for the assembly, operation, and maintenance of your SIAGO Electric Standing Desk. Please read this manual thoroughly before assembly and use to ensure proper function and safety. Keep this manual for future reference.
Safety Instructions
- Ensure all components are present and undamaged before assembly.
- Do not exceed the maximum weight capacity of 200 lbs (90.7 kg).
- Keep children and pets away from the desk during operation.
- Ensure there are no obstructions in the desk's path during height adjustment.
- Do not sit or stand on the desk.
- Only use the provided power adapter.
- Disconnect power before cleaning or maintenance.
Package Contents
Verify that all parts are included in your package. If any parts are missing or damaged, please contact customer support.
| Part | Description | Quantity |
|---|---|---|
| Desktop | 48" x 24" Eco-friendly desktop | 1 |
| Leg Frames | Electric lifting columns with T-shaped legs | 2 |
| Control Panel | Digital display with memory presets | 1 |
| Power Adapter | Power supply for the motor | 1 |
| Cable Management Tray | Under-desk cable organizer | 1 |
| Desk Hooks | Hooks for headphones or bags | 2 |
| Assembly Hardware | Screws, Allen wrenches, etc. | 1 set |
Setup and Assembly
The SIAGO Electric Standing Desk is designed for quick and easy assembly, typically within 30 minutes. All holes are pre-drilled, and accessories are clearly labeled.
Unpack and Organize
Carefully unpack all components and lay them out on a clean, flat surface. Identify each part using the package contents list.
Attach Leg Frames to Desktop
Position the desktop upside down. Attach the electric lifting leg frames to the pre-drilled holes on the underside of the desktop using the provided screws. Ensure the frames are securely fastened.

Image: A person assembling the desk, showing the leg frames being attached to the desktop. This illustrates the quick installation process.
Install Control Panel and Cable Management
Mount the control panel to the designated area on the front edge of the desktop. Install the cable management tray and desk hooks underneath the desktop. Connect all necessary cables from the leg frames to the control panel and power adapter.
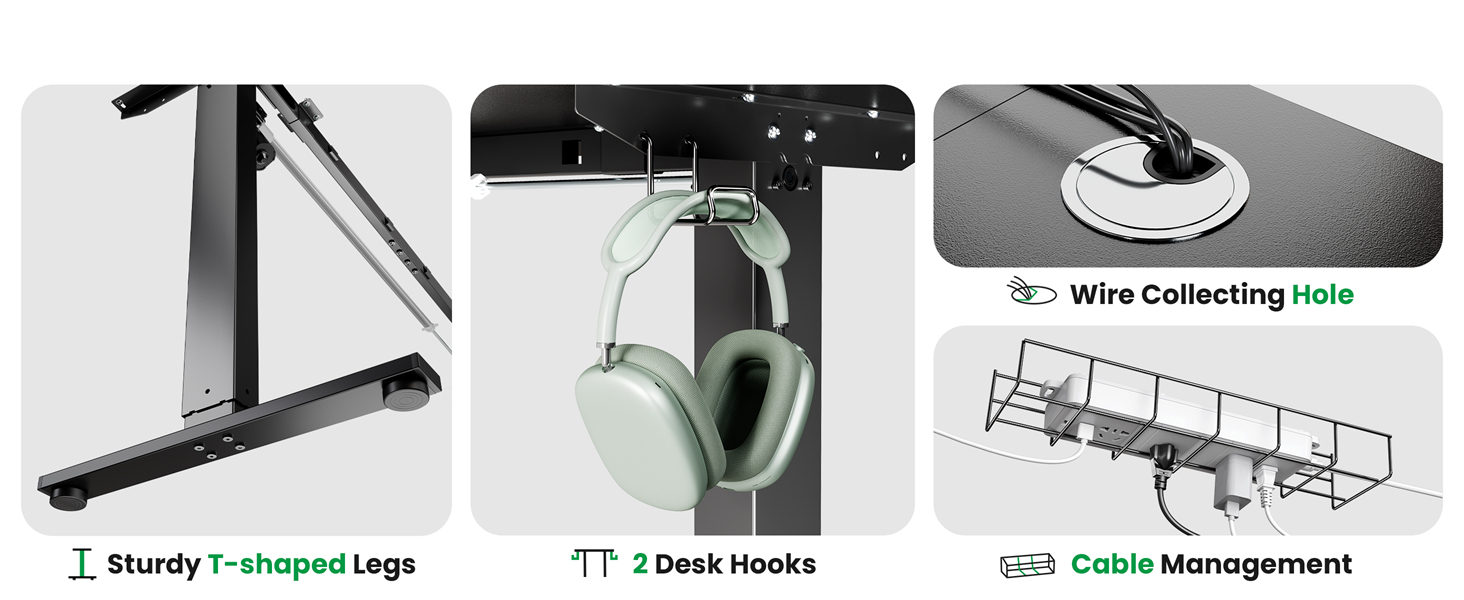
Image: Close-up view of the control panel, cable management tray, and desk hooks, highlighting the organized workspace features.
Connect Power and Test
Plug the power adapter into a wall outlet and connect it to the desk's control system. Perform an initial test by pressing the up and down buttons on the control panel to ensure smooth operation.
Operating Instructions
Control Panel Functions

Image: A detailed view of the desk's control panel, showing the digital display, up/down buttons, memory presets (1, 2, 3), and child lock button.
- Up/Down Buttons (+/-): Press and hold to adjust the desk height continuously. Release to stop at the desired height. The current height is displayed on the LED screen.
- Memory Presets (1, 2, 3):
- To save a height: Adjust the desk to your desired height, then press the 'M' button followed by the desired preset number (1, 2, or 3). The display will show 'S-' and then the number to confirm.
- To recall a height: Simply press the corresponding preset number (1, 2, or 3). The desk will automatically move to the saved height.
- Child Lock (M button): Press and hold the 'M' button for 3 seconds to activate or deactivate the child lock. When activated, the control panel will be locked to prevent accidental adjustments.
Height Adjustment Range
The desk can be adjusted from a minimum height of 27.95 inches (71 cm) to a maximum height of 45.67 inches (116 cm).

Image: Visual representation of the desk's adjustable height range, showing a person comfortably using the desk in both sitting and standing positions.
Maintenance
- Cleaning: Wipe the desktop and frame with a soft, damp cloth. Avoid harsh chemicals or abrasive cleaners. Ensure the desk is unplugged before cleaning.
- Cable Management: Regularly check and organize cables in the cable management tray to prevent tangles and damage.
- Motor Longevity: The motor is designed for 50,000 lift tests. Avoid continuous, rapid up-and-down movements to prolong its lifespan.
- Screw Tightness: Periodically check all screws and connections to ensure they remain tight, especially after initial assembly and heavy use.
Troubleshooting
| Problem | Possible Cause | Solution |
|---|---|---|
| Desk does not move. | Power cable disconnected; Child lock activated; Overload protection. | Check power connections. Deactivate child lock by holding 'M' button. Reduce weight on desk. |
| Desk moves unevenly or makes unusual noise. | Loose screws; Obstruction; Motor issue. | Check and tighten all assembly screws. Remove any obstructions. If problem persists, contact support. |
| Height display shows error code. | System malfunction. | Unplug the desk for 10 minutes, then plug it back in to reset the system. If the error persists, contact customer support. |
| Memory presets not working. | Presets not saved correctly. | Re-save the desired heights following the operating instructions. |
Specifications
- Model: SIAGO Electric Standing Desk
- Desktop Dimensions: 48 inches (W) x 24 inches (D)
- Height Adjustment Range: 27.95 inches to 45.67 inches
- Weight Capacity: Up to 200 lbs (90.7 kg)
- Noise Level: Under 45 dB during operation
- Frame Material: 1.5mm Commercial-grade Alloy Steel
- Desktop Material: Eco-friendly Wood
- Memory Presets: 3 programmable heights
- Special Features: Child lock, Cable management tray, Desk hooks
Warranty and Support
SIAGO provides a 1-Year Warranty for this electric standing desk. This warranty covers manufacturing defects and material flaws under normal use.
For technical support, warranty claims, or any questions regarding your SIAGO Electric Standing Desk, please contact SIAGO customer service via Amazon or through the contact information provided on the official SIAGO website.
Please have your purchase receipt and product model information ready when contacting support.
For more information, visit the official SIAGO Store: SIAGO Store on Amazon
Related documents48x24-Inch Electric Standing Desk


Ask a question about this manual
Ask about setup, troubleshooting, compatibility, parts, safety, or missing instructions. Manuals+ will review the question and use this page’s manual context to help answer it.