
1. Important Safety Information
Please read this manual carefully before installing, operating, or performing maintenance on your appliance. Keep this manual for future reference.
- Ensure the appliance is unplugged before any cleaning or maintenance.
- Do not damage the refrigerant circuit.
- This appliance is intended for household use only.
- Keep ventilation openings clear of obstruction.
- Do not store explosive substances such as aerosol cans with a flammable propellant in this appliance.
- Children should be supervised to ensure they do not play with the appliance.
2. Product Overview
The Indesit I55T0 412W is a free-standing refrigerator designed for efficient food storage. It features a top freezer compartment and a spacious refrigerator section below.
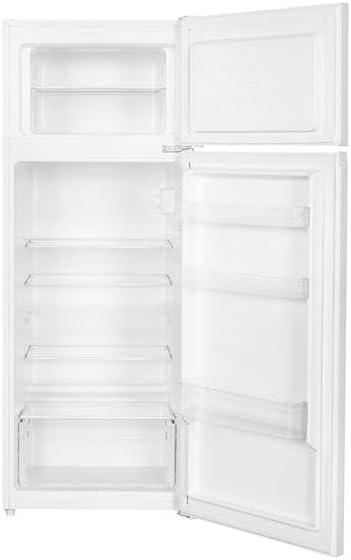
Figure 2.1: Interior view of the Indesit I55T0 412W refrigerator with doors open, showing the freezer compartment at the top and the main refrigerator section with multiple shelves and a crisper drawer at the bottom. The door shelves are also visible.

Figure 2.2: Exterior angled view of the Indesit I55T0 412W free-standing refrigerator in white, with both doors closed. The Indesit logo is visible on the top freezer door.

Figure 2.3: Energy efficiency label for the Indesit I55T0 412W refrigerator, indicating an energy class E and an annual energy consumption of 172 kWh. It also shows the noise level at 40 dB and capacities for the freezer (37 L) and refrigerator (169 L).
Key Components:
- Freezer Compartment: For long-term storage of frozen foods.
- Refrigerator Compartment: For fresh food storage, equipped with adjustable shelves and a crisper drawer.
- Temperature Control Dial: Located inside the refrigerator for adjusting cooling levels.
- Door Shelves: Provide additional storage for bottles and smaller items.
3. Setup and Installation
3.1 Unpacking
Carefully remove all packaging materials. Inspect the appliance for any damage during transit. Report any damage to your retailer immediately.
3.2 Placement
- Place the refrigerator on a firm, level surface.
- Ensure adequate ventilation around the appliance. Leave at least 10 cm (4 inches) of space at the back and sides for proper air circulation.
- Avoid direct sunlight and heat sources (e.g., radiators, ovens) as they can increase energy consumption.
- Do not install in areas where the temperature is likely to fall below 10°C (50°F).
3.3 Leveling
Adjust the front leveling feet to ensure the appliance is stable and level. This prevents vibrations and ensures proper door closure.
3.4 Electrical Connection
- Before plugging in, ensure the voltage and frequency indicated on the rating plate match your household power supply.
- Connect the appliance to a properly grounded electrical outlet.
- Do not use extension cords or multiple adapters.
- Allow the refrigerator to stand upright for at least 2-4 hours before plugging it in to allow the refrigerant to settle.
4. Operating Instructions
4.1 Initial Start-up
After plugging in the appliance, set the temperature control to a medium setting. Allow the refrigerator to cool for several hours (at least 4-6 hours) before placing food inside.
4.2 Temperature Control
The temperature control dial is located inside the refrigerator compartment. Settings typically range from 1 (warmest) to 5 (coldest). A setting of 3 or 4 is usually sufficient for normal use.
- Adjust the setting based on ambient temperature and the amount of food stored.
- Higher settings (colder) are recommended for hot climates or when the door is opened frequently.
4.3 Food Storage Guidelines
- Refrigerator: Store fresh foods, dairy products, fruits, and vegetables. Use the crisper drawer for produce to maintain freshness.
- Freezer: Store pre-packaged frozen foods. Do not place hot food directly into the freezer.
- Ensure food is properly wrapped or covered to prevent drying out and odor transfer.
- Avoid overloading the compartments to allow for proper air circulation.
5. Maintenance and Cleaning
Regular cleaning and maintenance will ensure the longevity and efficiency of your refrigerator.
5.1 Cleaning the Interior
- Unplug the appliance before cleaning.
- Clean the interior with a solution of lukewarm water and a mild, non-abrasive detergent.
- Wipe dry thoroughly with a soft cloth.
- Do not use harsh chemicals, abrasive cleaners, or sharp objects.
5.2 Cleaning the Exterior
Wipe the exterior surfaces with a soft cloth dampened with water and a mild detergent. Dry thoroughly.
5.3 Defrosting the Freezer
The freezer compartment will accumulate frost over time. Defrost when the frost layer is about 5 mm (0.2 inches) thick.
- Unplug the appliance.
- Remove all food items and place them in a cool place or another freezer.
- Leave the freezer door open to allow the frost to melt naturally. Place towels at the bottom to absorb water.
- Once defrosted, clean and dry the interior before plugging the appliance back in and returning food.
- Do not use sharp objects or heating devices to speed up defrosting.
5.4 Condenser Coils
Periodically clean the condenser coils at the back of the appliance with a soft brush or vacuum cleaner to ensure efficient operation. Ensure the appliance is unplugged.
6. Troubleshooting
Before contacting service, check the following common issues and solutions:
| Problem | Possible Cause | Solution |
|---|---|---|
| Appliance does not operate. | No power supply; plug loose; fuse blown. | Check power cord, wall outlet, and circuit breaker. |
| Temperature is not cold enough. | Door not closed properly; frequent door opening; temperature setting too high; too much food inside; poor ventilation. | Ensure door is sealed; reduce door openings; adjust temperature setting lower; do not overload; ensure proper clearance. |
| Excessive frost build-up in freezer. | Door not sealed; warm food placed in freezer; high humidity. | Check door seal; allow food to cool before freezing; defrost as needed. |
| Unusual noises. | Appliance not level; objects touching the back wall; compressor noise (normal). | Level the appliance; move objects away from the back; normal operating noises are expected. |
7. Specifications
| Feature | Detail |
|---|---|
| Model | I55T0 412W |
| Brand | Indesit |
| Type | Free-standing Refrigerator |
| Dimensions (H x W x D) | 148 cm x 58 cm x 58 cm (approx. 58.3 in x 22.8 in x 22.8 in) |
| Weight | 35 kg (approx. 77 lbs) |
| Total Net Capacity | 206 L (approx. 7.3 cu ft) |
| Refrigerator Net Capacity | 169 L (approx. 6.0 cu ft) |
| Freezer Net Capacity | 37 L (approx. 1.3 cu ft) |
| Energy Class | E (New European Energy Label) |
| Annual Energy Consumption | 172 kWh/annum |
| Noise Level | 40 dB |
Note: Specifications are subject to change without notice. Refer to the product's rating label for the most accurate information.
8. Warranty and Support
This appliance comes with a manufacturer's warranty. Please refer to the warranty card included with your purchase or visit the official Indesit website for detailed warranty terms and conditions specific to your region.
For technical assistance, spare parts, or to schedule a service appointment, please contact Indesit customer support. Contact details can typically be found on the manufacturer's website or in the documentation provided with the appliance.
When contacting support, please have your appliance model number (I55T0 412W) and serial number ready. The serial number is usually located on a label inside the refrigerator compartment.
For general return policies related to your purchase, please consult the retailer's return policy where the product was bought. The Amazon.it return policy allows for returns within 30 days for change of mind, and assistance for defective or damaged products. Specific marketplace purchases may have different terms.


