
1. Introduction
This manual provides essential information for the safe and efficient operation, maintenance, and troubleshooting of your cozytrikes RoadMaster X-1000 Enclosed Two-Seater Electric Mobility Scooter. Please read this manual thoroughly before operating the scooter to ensure proper usage and to maximize its lifespan.
The RoadMaster X-1000 is an enclosed electric mobility scooter designed for two passengers, featuring a powerful 2200W motor, a 550 lb load capacity, and year-round climate control. It offers a comfortable and secure travel experience.

Figure 1: Overview of the cozytrikes RoadMaster X-1000 Enclosed Electric Mobility Scooter.
2. Safety Information
Your safety and the safety of others are paramount. Adhere to all local traffic laws and regulations. While a driver's license may not be required in some areas, responsible and cautious operation is always necessary.
- Pre-Operation Check: Always inspect the scooter before each use. Check tire pressure, brake function, lights, and battery charge level.
- Load Capacity: Do not exceed the maximum load capacity of 550 lbs (250 kg). Overloading can affect stability and performance.
- Speed Limits: Operate within safe speed limits for the conditions. The maximum speed is 28 mph (45 km/h).
- Braking: Familiarize yourself with the disc and electromagnetic braking system. Allow sufficient braking distance, especially at higher speeds or on inclines. The braking distance is 8.5 feet.
- Weather Conditions: The enclosed design provides protection, but exercise caution in severe weather. Use windshield wipers and defroster as needed.
- Visibility: Ensure all lights (headlights, taillights, turn signals) are functional, especially when operating in low light conditions.
- Passenger Safety: Ensure passengers are seated properly and aware of safety procedures.
- Charging: Only use the provided charger. Charge in a well-ventilated area away from flammable materials.
- Modifications: Do not modify the scooter. Unauthorized modifications can compromise safety and void the warranty.
3. Setup
3.1 Initial Charging
Before the first use, fully charge the scooter's battery.
- Locate the charging port on the scooter.
- Connect the charger to the scooter's charging port.
- Plug the charger into a standard electrical outlet.
- Allow approximately 8 hours for a full charge. The charging indicator on the charger will change color or turn off when charging is complete.
- Once fully charged, disconnect the charger from the outlet, then from the scooter.
3.2 Pre-Operation Checks
- Tires: Ensure tires are properly inflated. Tire size is 125/65-12.
- Brakes: Test both disc and electromagnetic brakes for proper function.
- Lights: Verify headlights (high/low beam), taillights, and turn signals are working.
- Controls: Check that the joystick controller and other dashboard controls respond correctly.
- Doors and Windows: Ensure doors close securely and windows operate smoothly.
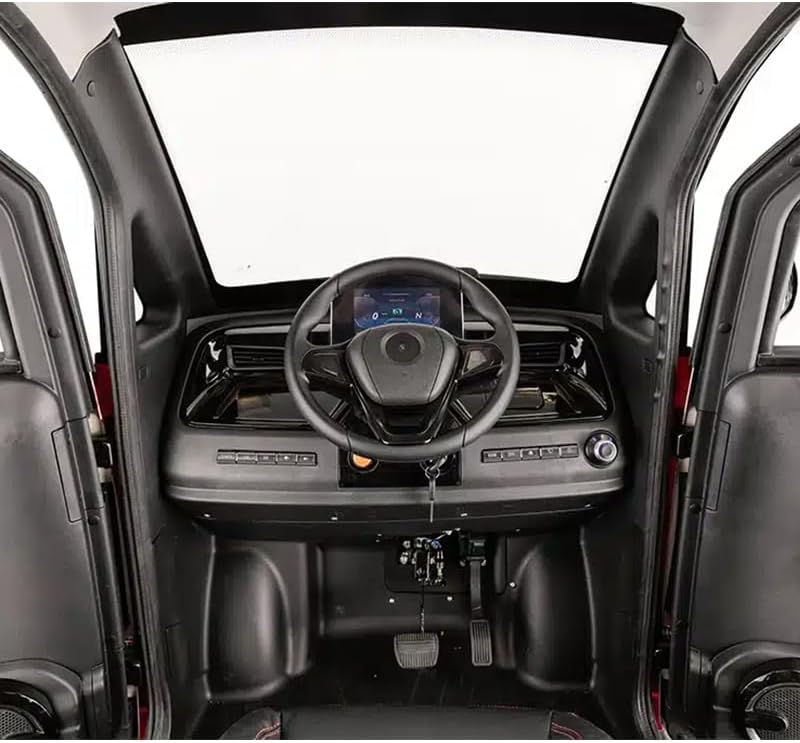
Figure 2: Interior dashboard layout of the RoadMaster X-1000, showing the steering wheel, digital display, and foot pedals.
4. Operating Instructions
4.1 Starting and Driving
- Ensure the scooter is unlocked. Use the remote control if equipped.
- Insert the key into the ignition and turn it to the "ON" position. The dashboard display will illuminate.
- Select the desired drive mode (e.g., Forward, Reverse) using the appropriate control.
- Gently press the accelerator pedal or use the joystick controller to begin moving.
- Steer using the steering wheel. The turn radius is 36 inches.
- To stop, release the accelerator and apply the brake pedal.
4.2 Climate Control and Lighting
- Heating System: Activate the built-in heating system using the control panel for comfort in cold weather.
- Windshield Wipers: Use the wiper control to clear the windshield during rain or snow.
- Defroster: Engage the defroster to clear fog or ice from the windshield.
- Headlights: Turn on the dual LED headlights (high and low beams) for visibility.
- Turn Signals: Use turn signals to indicate your intended direction.
- Taillights: Taillights illuminate automatically with headlights and when braking.
4.3 Parking and Locking
- Bring the scooter to a complete stop.
- Turn the ignition key to the "OFF" position and remove it.
- Engage the parking brake if available or necessary.
- Use the remote control to lock the scooter for added security.

Figure 3: Side profile of the RoadMaster X-1000, highlighting its enclosed design and wheel configuration.
5. Maintenance
Regular maintenance ensures the longevity and optimal performance of your RoadMaster X-1000.
5.1 Battery Care
- The scooter uses a SAFE, maintenance-free sealed 60V lead acid battery.
- Charge the battery regularly, even if the scooter is not used daily, to maintain battery health.
- Avoid completely draining the battery before recharging.
- Store the scooter in a cool, dry place when not in use, and ensure the battery is charged.
5.2 Tire Maintenance
- Check tire pressure weekly. Refer to the tire sidewall for recommended pressure. Tire size: 125/65-12.
- Inspect tires for wear, cuts, or punctures. Replace worn tires promptly.
5.3 Cleaning
- Clean the exterior with a damp cloth and mild detergent. Avoid harsh chemicals.
- Keep the windshield and windows clean for clear visibility.
- Do not use high-pressure washers directly on electrical components.
5.4 General Inspection
- Periodically check all bolts and fasteners for tightness.
- Ensure all lights and indicators are functioning correctly.
- Test the brakes regularly.
6. Troubleshooting
This section addresses common issues you might encounter. For problems not listed here or if solutions do not resolve the issue, please contact customer support.
| Problem | Possible Cause | Solution |
|---|---|---|
| Scooter does not power on. | Battery is discharged or disconnected. Ignition key not fully turned. | Charge the battery. Ensure the key is fully in the "ON" position. Check battery connections. |
| Reduced range or power. | Battery not fully charged. Battery degradation. Overload. | Ensure battery is fully charged before use. Reduce load. If battery is old, consider replacement. |
| Brakes feel weak or unresponsive. | Brake pads worn. Brake system issue. | Have brakes inspected by a qualified technician. |
| Lights not working. | Bulb failure. Electrical connection issue. | Check bulbs and replace if necessary. Inspect wiring for loose connections. |
7. Specifications
| Model Name | RoadMaster X-1000 |
| Motor Power | 2200W |
| Battery Type | Sealed 60V Lead Acid (Maintenance-Free) |
| Max Speed | Up to 28 mph (45 km/h) |
| Range per Charge | Up to 50 miles (80 km) |
| Dimensions (L x W x H) | 102" x 51" x 64" (259 cm x 130 cm x 163 cm) |
| Weight | 748 lbs (339 kg) |
| Load Capacity | 550 lbs (250 kg) |
| Ground Clearance | 5.2" (13.2 cm) |
| Charging Time | 8 hours |
| Rated Climbing Angle | 20 degrees |
| Braking Distance | 8.5 feet (2.6 meters) |
| Front Tire Size | 125/65-12 |
| Rear Tire Size | 125/65-12 |
| Turn Radius | 36 inches (91 cm) |
| Brake Style | Disc, Electromagnetic |
| Handle Type | Joystick Controller |
8. Warranty Information
Specific warranty details for the cozytrikes RoadMaster X-1000 are typically provided at the time of purchase or can be obtained directly from the manufacturer or authorized dealer. Please retain your proof of purchase for warranty claims.
Generally, warranties cover manufacturing defects under normal use. Damage resulting from misuse, neglect, accidents, or unauthorized modifications is usually not covered.
9. Customer Support
For technical assistance, parts, or service inquiries regarding your cozytrikes RoadMaster X-1000, please contact your authorized dealer or the manufacturer directly.
When contacting support, please have your model name (RoadMaster X-1000) and purchase information readily available.
Manufacturer: Cozytrikes.com