
Introduction
Thank you for choosing the PUTORSEN Triple Monitor Stand Desk Mount. This manual provides detailed instructions for the safe and proper installation, operation, and maintenance of your new monitor stand. Please read this manual thoroughly before assembly and retain it for future reference.
Safety Information
- Weight Capacity: Do not exceed the maximum weight capacity for each arm. The central arm supports up to 20 kg (44 lbs) for monitors between 17-49 inches. Each side arm supports up to 12 kg (26.4 lbs) for monitors between 17-35 inches. Exceeding these limits may result in instability and potential damage or injury.
- VESA Compatibility: Ensure your monitors are VESA compatible (75x75mm or 100x100mm).
- Desk Thickness: Verify your desk thickness is within the specified range for the chosen mounting method (C-clamp: 10-45mm; Grommet: 10-40mm).
- Assembly: Follow all assembly instructions carefully. Improper installation can lead to product failure or personal injury.
- Moving Parts: Be aware of pinch points when adjusting the arms.
- Gas Spring Adjustment: Adjust the gas spring tension only after the monitor is mounted to prevent the arm from springing up unexpectedly.
Package Contents
Please check that all components are present and undamaged before proceeding with assembly. If any parts are missing or damaged, contact PUTORSEN customer support.
- Main Pole Assembly
- Central Fixed Monitor Arm
- Two Pneumatic Gas Spring Monitor Arms
- C-Clamp Mounting Base
- Grommet Mounting Base
- VESA Plates (3x)
- Hardware Kit (screws, washers, spacers)
- Tools (Allen keys)
- Cable Management Clips
Specifications
| Feature | Specification |
|---|---|
| Model Number | IMAUWTDS-10-T03V |
| Material | Aluminium |
| Color | Black |
| Mounting Type | Tabletop Mount (C-clamp or Grommet) |
| Movement Type | Articulating (Pneumatic Arms) |
| VESA Compatibility | 75x75mm, 100x100mm |
| Central Arm Screen Size | 17-49 inches |
| Central Arm Weight Capacity | 20 kg (44 lbs) |
| Side Arms Screen Size (each) | 17-35 inches |
| Side Arms Weight Capacity (each) | 12 kg (26.4 lbs) |
| Desk Thickness (C-clamp) | 10mm - 45mm (0.39" - 1.77") |
| Desk Thickness (Grommet) | 10mm - 40mm (0.39" - 1.57") |
| Pole Height | 800mm (31.5") |
| Max Arm Extension | 543mm (21.37") |
Setup
1. Pre-Installation Check
- Ensure your desk can support the combined weight of the stand and all monitors.
- Confirm your monitors meet the VESA compatibility and weight/size requirements.
2. Choose Mounting Method
The stand offers two installation methods: C-clamp or Grommet mount. Select the method suitable for your desk.
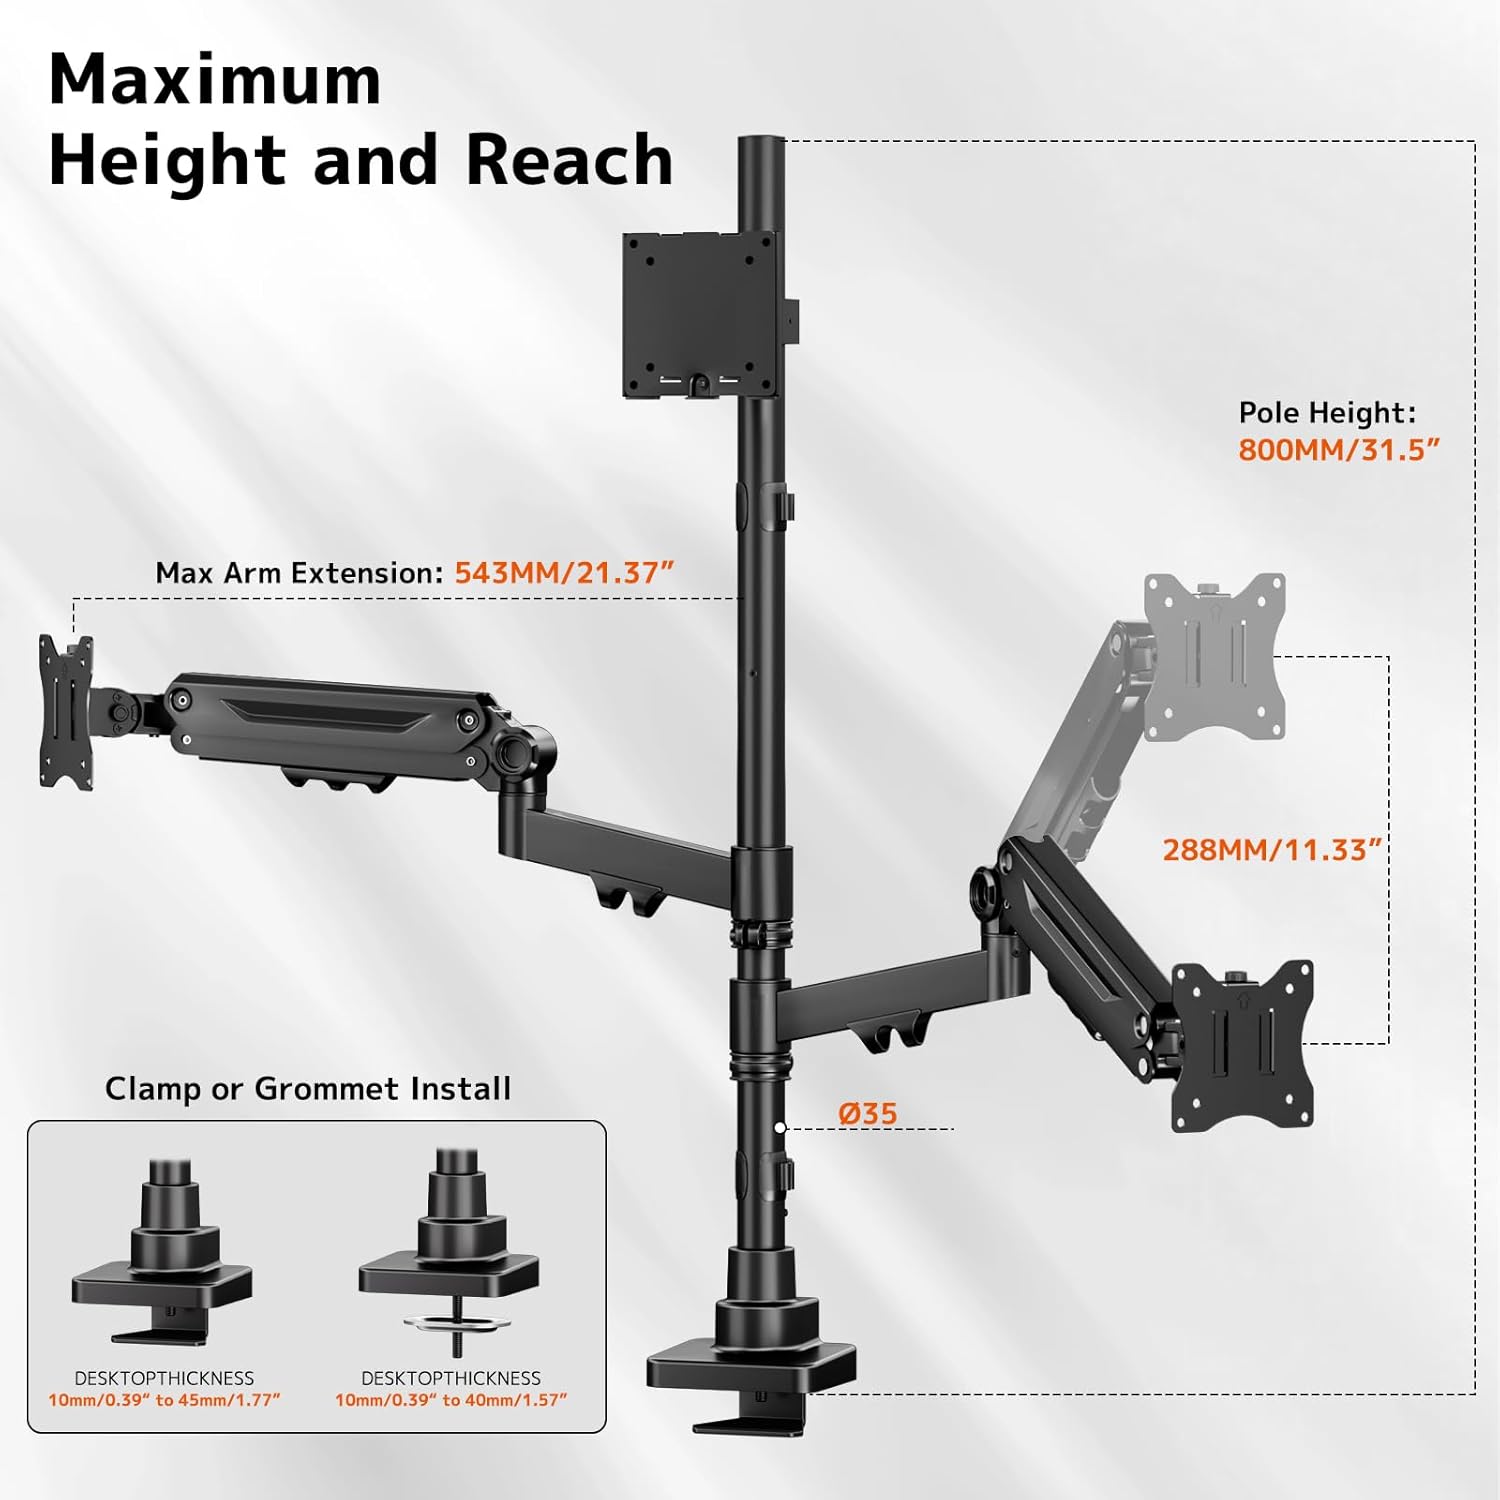
Technical diagram showing the maximum arm extension (543mm/21.37 inches) and pole height (800mm/31.5 inches). It also details the C-clamp and grommet installation options, compatible with desktop thicknesses from 10mm/0.39 inches to 45mm/1.77 inches (C-clamp) or 40mm/1.57 inches (grommet).
C-Clamp Installation:
- Attach the C-clamp base to the bottom of the main pole.
- Position the stand on the edge of your desk and tighten the C-clamp screw until secure.
Grommet Installation:
- If your desk has a grommet hole, attach the grommet base to the bottom of the main pole.
- Insert the pole through the grommet hole and secure it from underneath the desk using the provided plate and nut.

Illustration of the C-clamp and grommet mounting options for the monitor stand, along with the extended 31.5-inch pole, suitable for various desk setups and vertical screen arrangements.
3. Attach VESA Plates to Monitors
- Carefully place your monitor face down on a soft, clean surface.
- Attach a VESA plate to the back of each monitor using the appropriate screws and spacers from the hardware kit. Ensure they are securely fastened.
4. Mount Monitors to Arms
- Slide the VESA plate with the attached monitor onto the arm's mounting head. Ensure it clicks into place or is secured with the locking screw.
- Repeat for all three monitors.

Detailed view of the gas spring arm mechanism and integrated cable management. The image also shows the quick and easy installation process with a detachable VESA plate.
5. Adjust Gas Spring Tension
- After mounting the monitors, use the provided Allen key to adjust the gas spring tension on the pneumatic arms.
- Turn clockwise to increase tension for heavier monitors (arm stays up).
- Turn counter-clockwise to decrease tension for lighter monitors (arm moves down easily).
- Adjust until the monitor arm can hold its position freely.
6. Cable Management
- Route your monitor cables through the integrated cable management clips on the arms and pole to maintain a tidy workspace.
Operating
The PUTORSEN Triple Monitor Stand offers extensive adjustability for an optimal viewing experience.
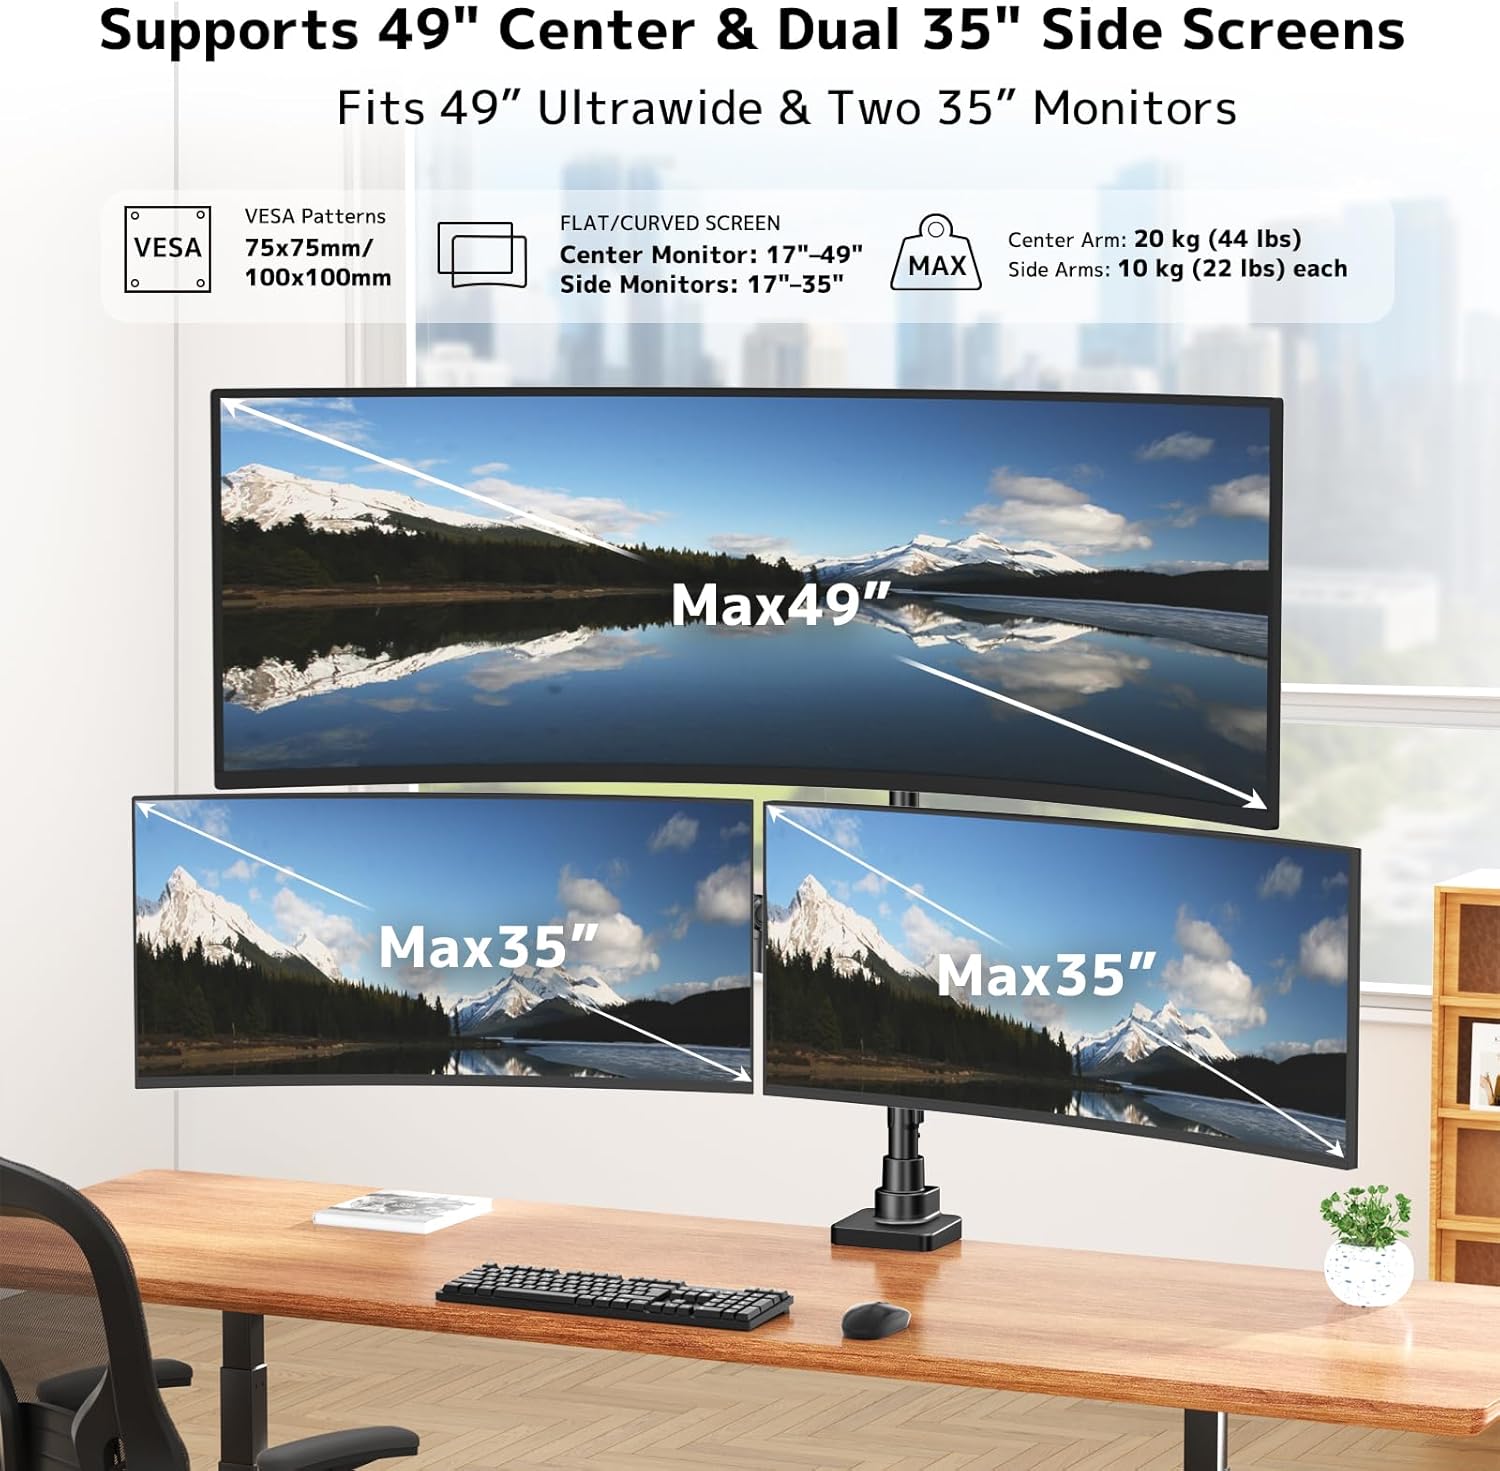
PUTORSEN Triple Monitor Stand supporting one 49-inch ultrawide monitor and two 35-inch side monitors. This image illustrates the maximum screen sizes and VESA compatibility (75x75mm, 100x100mm) for the center arm (17-49 inches, up to 20kg/44lbs) and side arms (17-35 inches, up to 10kg/22lbs each).
Monitor Adjustments:
- Height Adjustment: The central screen is height-adjustable along the pole. The gas spring arms allow smooth, dynamic height positioning for the side monitors.
- Tilt: Adjust the vertical angle of your monitors. The central arm tilts -20° to +50°, and side arms tilt -35° to +35°.
- Swivel: Rotate your monitors horizontally up to ±90° to share your screen or change viewing angles.
- Rotation: Rotate your monitors 360° (±180°) to switch between landscape and portrait orientations.

Diagram illustrating the full adjustability of the monitor arms. The center monitor tilts -20° to +50°, side monitors tilt -35° to +35°, all arms swivel ±90°, and rotate ±180°.
Multiple Layout Options:
The flexible design allows for various monitor configurations to suit your workflow.

Examples of multiple monitor layout options using the PUTORSEN Triple Monitor Stand, including horizontal arrangements with a 49-inch center and two 35-inch side monitors, and a vertical arrangement with a 49-inch center and two 35-inch side monitors.
Maintenance
- Cleaning: Wipe the stand with a soft, damp cloth. Avoid abrasive cleaners or solvents.
- Periodic Checks: Regularly check all screws and connections to ensure they remain tight and secure. Re-tighten if necessary.
- Gas Spring: If the gas spring tension changes over time, re-adjust it according to the 'Setup' section.
Troubleshooting
Monitor is sagging or not holding position:
- Solution: The gas spring tension may be too low for the monitor's weight. Increase the gas spring tension by turning the adjustment screw clockwise.
- Solution: Ensure the monitor's weight does not exceed the arm's maximum capacity.
Monitor is difficult to move or springs up too quickly:
- Solution: The gas spring tension may be too high. Decrease the gas spring tension by turning the adjustment screw counter-clockwise.
Stand feels unstable or wobbles:
- Solution: Ensure the C-clamp or grommet mount is securely tightened to the desk.
- Solution: Check all connections on the pole and arms to ensure they are fastened correctly.
- Solution: Verify that the desk surface is stable and level.
Monitors are not level:
- Solution: Adjust the tilt and height of individual monitor arms to align them. Some VESA plates may also have a small leveling adjustment.
Warranty and Support
For warranty information, technical support, or any questions regarding your PUTORSEN Triple Monitor Stand Desk Mount, please contact PUTORSEN customer service through the retailer where you purchased the product or visit the official PUTORSEN website for support resources.
