
QHITTY B0F99J1K1M
QHITTY Fluted Oval Lift-Top Coffee Table User Manual
Model: B0F99J1K1M
Introduction
This manual provides essential information for the assembly, operation, and maintenance of your QHITTY Fluted Oval Lift-Top Coffee Table. Please read these instructions carefully before assembly and use to ensure safe and proper functionality. Keep this manual for future reference.
Safety Information
WARNING: Failure to follow these safety guidelines may result in injury or damage to the product.
- Always lift the table top using both hands to ensure even distribution of force and prevent misalignment or damage to the lifting mechanism.
- Avoid placing heavy objects on the lifted table top to prevent tipping. The lifted top has a lower weight capacity than the closed top.
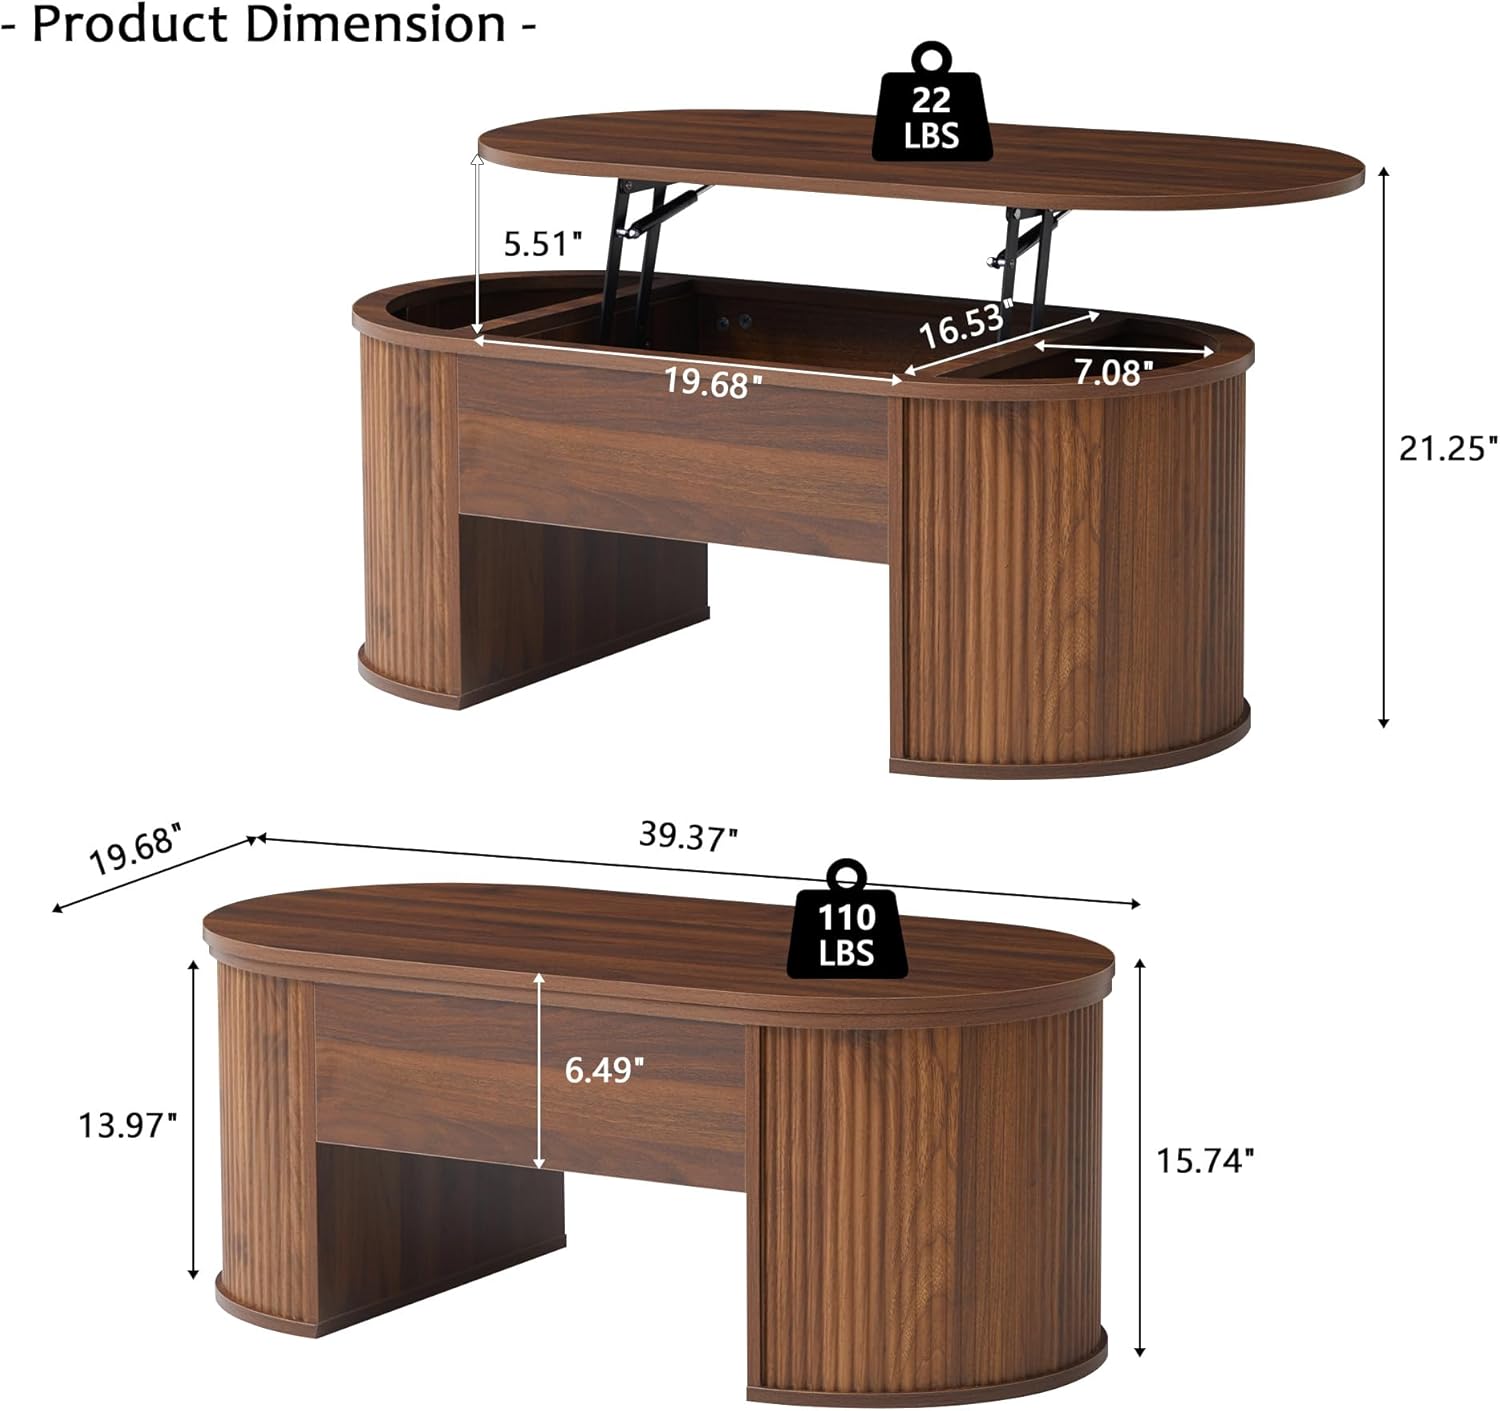
- Do not exceed the table's maximum weight limit of 50 lbs (22.7 kg) for the lifted top and 110 lbs (50 kg) for the closed top to ensure stability and prevent structural damage.
- Consider anchoring the table to a wall or floor, especially if children or pets are present, to prevent accidental tipping.
- Keep fingers and hands clear of the lifting mechanism when raising or lowering the table top to avoid pinching.
Package Contents
Before beginning assembly, verify that all parts listed below are present and undamaged. If any parts are missing or damaged, do not proceed with assembly. Contact customer support for assistance.
- Table Top (Oval)
- Base Panels (Fluted, 2 pieces)
- Center Support Panel
- Lift Mechanism (2 sets)
- Hidden Storage Dividers
- Hardware Pack (screws, bolts, cam locks, dowels, etc.)
- Assembly Tools (e.g., Allen wrench, screwdriver - may not be included, prepare your own)
Assembly Instructions
Assembly typically requires two people. Lay out all components on a soft, clean surface to prevent scratches.
- Prepare Base Panels: Attach any necessary connectors or dowels to the fluted base panels as indicated in the diagram.
- Assemble Base Structure: Connect the two fluted base panels with the center support panel using the provided hardware. Ensure all connections are secure.
- Install Lift Mechanism: Secure the two lift mechanisms to the inside of the assembled base structure. Pay close attention to the orientation of the mechanisms.
- Attach Table Top: Carefully align the table top with the lift mechanisms. With assistance, attach the table top to the lift mechanisms using the designated screws. Ensure the top is securely fastened and operates smoothly.
- Insert Storage Dividers: Place the hidden storage dividers into their designated slots within the base compartment.
- Final Check: Gently raise and lower the table top several times to ensure the lift mechanism functions correctly and all parts are stable.

Operating Instructions
Your coffee table features a versatile lift-top mechanism and integrated storage.
Using the Lift-Top Function:
- To Lift: Grasp the edge of the table top with both hands. Gently pull upwards. The spring-loaded mechanism will assist in raising the top smoothly. Continue lifting until the top locks into its elevated position.
- To Lower: Grasp the edge of the table top with both hands. Gently push downwards. The mechanism will retract, allowing the top to descend smoothly back to its original position. Ensure no objects are obstructing the closing path.
Accessing Hidden Storage:
When the table top is in the lifted position, the hidden compartments are accessible. These compartments are ideal for storing blankets, magazines, remote controls, or other small items.

Maintenance
Proper care will extend the life and appearance of your coffee table.
- Cleaning: Wipe surfaces with a soft, damp cloth. Avoid harsh chemicals or abrasive cleaners, which can damage the finish.
- Spills: Immediately wipe up any spills to prevent staining or water damage.
- Heat and Moisture: Use coasters under hot or wet items to protect the table surface.
- Inspection: Periodically check all hardware and connections to ensure they remain tight. Retighten as necessary.
- Movement: When moving the table, lift it rather than dragging it to prevent damage to the legs and floor.
Troubleshooting
If you encounter issues with your coffee table, refer to the following common problems and solutions:
| Problem | Possible Cause | Solution |
|---|---|---|
| Table top does not lift smoothly or gets stuck. | Misalignment of lift mechanism or obstruction. | Ensure no items are blocking the mechanism. Check that the lift mechanisms are properly installed and all screws are tight. Apply a small amount of silicone lubricant to moving parts if necessary. |
| Table feels wobbly or unstable. | Loose hardware or uneven floor. | Check and tighten all assembly screws and bolts. Ensure the table is placed on a level surface. Use furniture pads if the floor is uneven. |
| Small gaps visible on the table top. | Normal product characteristic. | As noted by the manufacturer, small gaps on the two rings of this coffee table are an inherent characteristic and do not affect normal use. No action is required. |

Specifications
| Feature | Detail |
|---|---|
| Brand | QHITTY |
| Model | B0F99J1K1M |
| Product Dimensions (Closed) | 39.37"W x 19.69"D x 15.75"H (100cm W x 50cm D x 40cm H) |
| Product Dimensions (Lifted) | Approx. 39.37"W x 19.69"D x 21.25"H (100cm W x 50cm D x 54cm H) |
| Shape | Oval |
| Color | Walnut |
| Frame Material | Rubber Wood |
| Top Material | Engineered Wood |
| Weight Capacity (Lifted Top) | 22 lbs (10 kg) |
| Weight Capacity (Closed Top) | 110 lbs (50 kg) |
| Indoor/Outdoor Usage | Indoor |
Warranty and Support
QHITTY provides pre-sales, after-sales, and logistics services. For any questions or concerns regarding your product, please contact QHITTY customer support via email. They aim to respond within 24 hours to address your inquiries and resolve any issues.
Please refer to your purchase documentation or the seller's platform for specific warranty terms and contact information.
Ask a question about this manual
Ask about setup, troubleshooting, compatibility, parts, safety, or missing instructions. Manuals+ will review the question and use this page’s manual context to help answer it.