
1. Introduction
This manual provides detailed instructions for the setup, operation, and maintenance of your ANYSECU 4G-W2 Pro Android 11 POC Network Radio. This device is designed for reliable Push-to-Talk (PTT) communication over 4G LTE networks, supporting applications like Zello and Real PTT, and offering global connectivity without distance limitations. It features an Android 11 operating system, a 3.5-inch touch screen, and integrated GPS for real-time positioning.

Image 1.1: The ANYSECU 4G-W2 Pro Network Radio, showing the main unit, attached microphone, antenna, and included wall charger.
2. Package Contents
Verify that all items listed below are present in your product package:
- ANYSECU 4G-W2 Pro Mobile Radio Unit
- Microphone with Aviation Connector
- 4G Antenna
- GPS Antenna
- Mounting Bracket
- Microphone Holder
- Power Cable
- Wall Charger
- Belt Clip

Image 2.1: All components included in the standard package, laid out for inspection.
3. Product Overview
3.1 Key Features
- Operating System: Android 11
- Memory: 2GB RAM + 16GB ROM
- Network Connectivity: 4G LTE (US bands: B1/2/4/5/7/12/13/17/28a/28b), WCDMA (Band 1/2/4/5), GSM/GPRS/EDGE (Band 2/5)
- Wireless: Wi-Fi, Bluetooth 5.0
- Positioning: AGPS/GPS for real-time location tracking
- Display: 3.5-inch Touch Screen (480x320px resolution)
- Audio: Clear and loud audio output
- PTT Support: Compatible with Zello and Real PTT applications
- Emergency Function: Dedicated SOS button
- Microphone: Humanized design with aviation connector for secure attachment
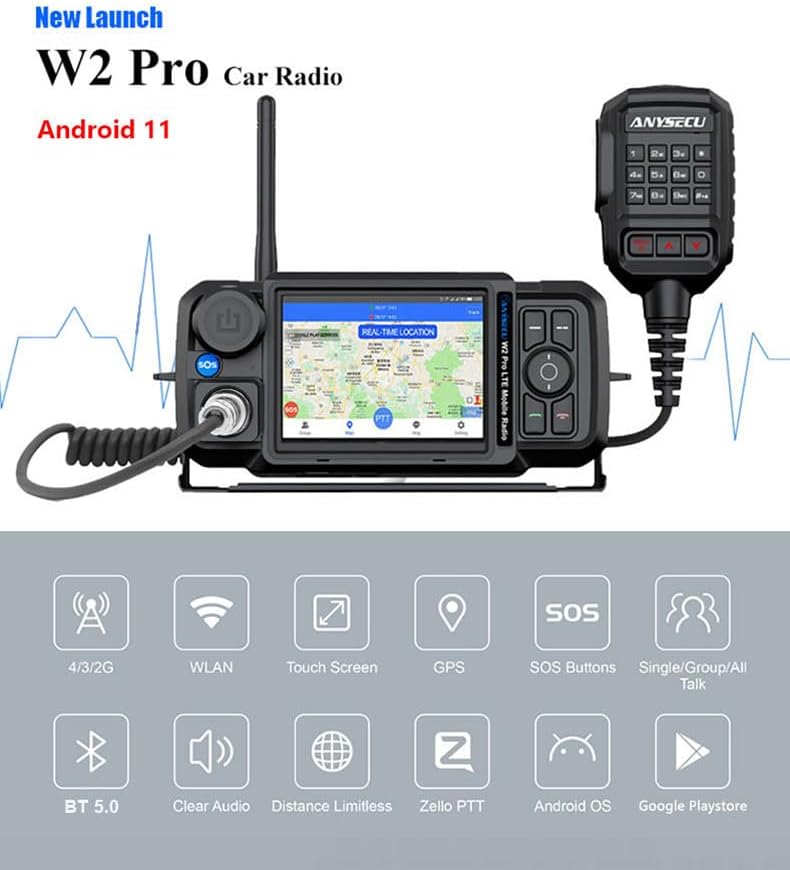
Image 3.1: Visual representation of the radio's core features and capabilities.

Image 3.2: Key specifications and supported platforms for the device.
4. Setup
4.1 Physical Connections
- Attach Antennas: Screw the 4G antenna and GPS antenna onto their respective ports on the radio unit. Ensure they are finger-tight.
- Connect Microphone: Plug the microphone's aviation connector into the corresponding port on the radio. Twist the connector to secure it firmly.
- Mounting (Optional): If using the mounting bracket, attach it to a suitable surface in your vehicle or desired location, then secure the radio unit to the bracket.
4.2 Power Connection
The radio can be powered via the included wall charger or by connecting the power cable to a 12V DC source (e.g., vehicle battery).
- Wall Charger: Connect the wall charger to the radio's power input and then to a standard electrical outlet.
- Vehicle Power: Use the provided power cable. Refer to the wiring schematic below:

Image 4.1: Wiring schematic for connecting the radio to a vehicle's power supply.
- Red Wire: Connect to the positive (+) terminal of your 12V DC power source.
- Black Wire: Connect to the negative (-) or ground terminal of your 12V DC power source.
- Blue Wire (ACC): Connect to an Accessory (ACC) power source in your vehicle. This allows the radio to power on/off with your vehicle's ignition. If not using ACC, ensure the radio is manually powered off to prevent battery drain.
4.3 Initial Setup
- Insert SIM Card (Optional): If using cellular data, insert a compatible 4G SIM card into the designated slot (refer to the device diagram for location).
- Power On: Press and hold the power button until the screen illuminates.
- Network Configuration: Follow the on-screen prompts to connect to a Wi-Fi network or configure cellular data settings.
- Install Applications: Access the Google Play Store to download and install Zello, Real PTT, or other desired communication applications.
5. Operating Instructions
5.1 Power On/Off
- Power On: Press and hold the power button (typically located on the top or side of the unit) for a few seconds until the screen turns on.
- Power Off: Press and hold the power button until a power menu appears. Select "Power Off" and confirm.
5.2 Using the Touch Screen
The 3.5-inch touch screen allows for intuitive navigation of the Android 11 interface and installed applications.

Image 5.1: The radio's touch screen interface with common applications.
- Tap: To select an item or open an application.
- Swipe: To scroll through menus or home screens.
- Pinch-to-Zoom: In supported applications like maps.
5.3 Push-to-Talk (PTT) Communication
Once Zello or Real PTT is installed and configured, use the dedicated PTT button on the microphone for instant communication.
- Open your preferred PTT application (Zello or Real PTT).
- Ensure you are connected to a channel or contact.
- Press and hold the PTT button on the microphone to transmit your voice. Release to listen.
5.4 GPS Positioning
The integrated GPS allows for accurate real-time positioning and trajectory playback within compatible platforms (e.g., Real PTT platform, which may require a yearly fee).

Image 5.2: The radio's GPS functionality for position tracking.
5.5 SOS Function
Press the dedicated SOS button (typically blue and labeled 'SOS') in an emergency to activate a pre-configured alert or call function within your PTT application.
6. Maintenance
- Cleaning: Use a soft, dry cloth to clean the radio's exterior. For the screen, use a screen-specific cleaner and a microfiber cloth. Avoid abrasive materials or harsh chemicals.
- Water Resistance: This device is Not Water Resistant. Avoid exposure to water, rain, or high humidity to prevent damage.
- Storage: Store the radio in a cool, dry place away from direct sunlight and extreme temperatures when not in use.
- Battery Care: For optimal battery life, avoid fully discharging the battery frequently. Charge the device regularly.
7. Troubleshooting
7.1 No Power
- Ensure the power cable is securely connected to both the radio and the power source.
- Verify the power source is active (e.g., vehicle ignition is on for ACC, wall outlet is functional).
- Check the battery level if operating on internal battery.
7.2 No Network Connectivity
- Check if the SIM card is correctly inserted and activated.
- Verify Wi-Fi connection settings and ensure the network is active.
- Ensure you are within range of a 4G LTE or Wi-Fi signal.
- Restart the radio to refresh network connections.
7.3 PTT Application Issues
- Ensure the PTT application (Zello/Real PTT) is installed, updated, and logged in.
- Verify microphone connection and functionality.
- Check application settings for correct channel or contact selection.
- Ensure sufficient network bandwidth for voice transmission.
7.4 GPS Not Functioning
- Ensure the GPS antenna is securely connected.
- Verify that location services are enabled in the Android settings.
- Ensure a clear line of sight to the sky for optimal satellite reception.
8. Specifications
| Feature | Specification |
|---|---|
| Model | 4G-W2 Pro |
| Operating System | Android 11 |
| RAM | 2GB |
| ROM | 16GB |
| Network Bands (US) | LTE: B1/2/4/5/7/12/13/17/28a/28b; WCDMA: B1/2/4/5; GSM/GPRS/EDGE: B2/5 |
| Display | 3.5 inch Touch Screen |
| Connectivity | Wi-Fi, Bluetooth 5.0 |
| Positioning | AGPS/GPS |
| Compatible Devices | Zello, Real PTT |
| Item Weight | 3.12 pounds |
| Package Dimensions | 12.99 x 8.19 x 3.78 inches |
| Water Resistance Level | Not Water Resistant |
| Manufacturer | kjdeyt |
| UPC | 785582408887 |
9. Warranty and Support
9.1 Warranty Information
This product comes with a 1-year limited warranty from the date of purchase. The warranty covers manufacturing defects under normal use. It does not cover damage caused by misuse, accidents, unauthorized modifications, or exposure to water.
9.2 Customer Support
For technical assistance, troubleshooting, or warranty claims, please contact your retailer or the manufacturer's customer support. Refer to your purchase documentation for specific contact details.