1. Introduction
This manual provides detailed instructions for the installation, operation, and maintenance of your Pyniro Single Din Car Stereo, Model ZX-US-CLP4C. This unit features a 6.36-inch IPS touchscreen, wired and wireless Apple CarPlay and Android Auto compatibility, Bluetooth connectivity, FM radio, a customizable equalizer, and support for a backup camera. Please read this manual thoroughly before use to ensure proper functionality and safety.
2. Safety Information
- Ensure all wiring is correctly connected and insulated to prevent short circuits or other hazards.
- This car stereo operates on 12-14.4V DC voltage, with a maximum current of 15A. Do not use with 24V systems (e.g., large trucks).
- Always prioritize safe driving. Do not operate the device in a way that distracts you from the road.
- Seek professional assistance for installation if you are unsure about any steps.
3. Package Contents
Verify that all items are present in the package:
- 1 x Single Din Car Stereo Unit
- 1 x Screwdriver
- 1 x Power Cable
- 1 x Crowbar
- 1 x Microphone
- Screws for mounting
- 1 x Rear View Camera
- 1 x User Manual

Image: Overview of the Pyniro Single Din Car Stereo unit, its dimensions, and all included accessories such as the rear camera, power connector, installation tools, external microphone, and user manual.
4. Product Overview
The Pyniro Single Din Car Stereo features a 6.36-inch IPS touchscreen for clear visuals and intuitive control. Key components include a volume knob, USB ports (Type-C for charging, USB-A for flash drives), and an AUX input.
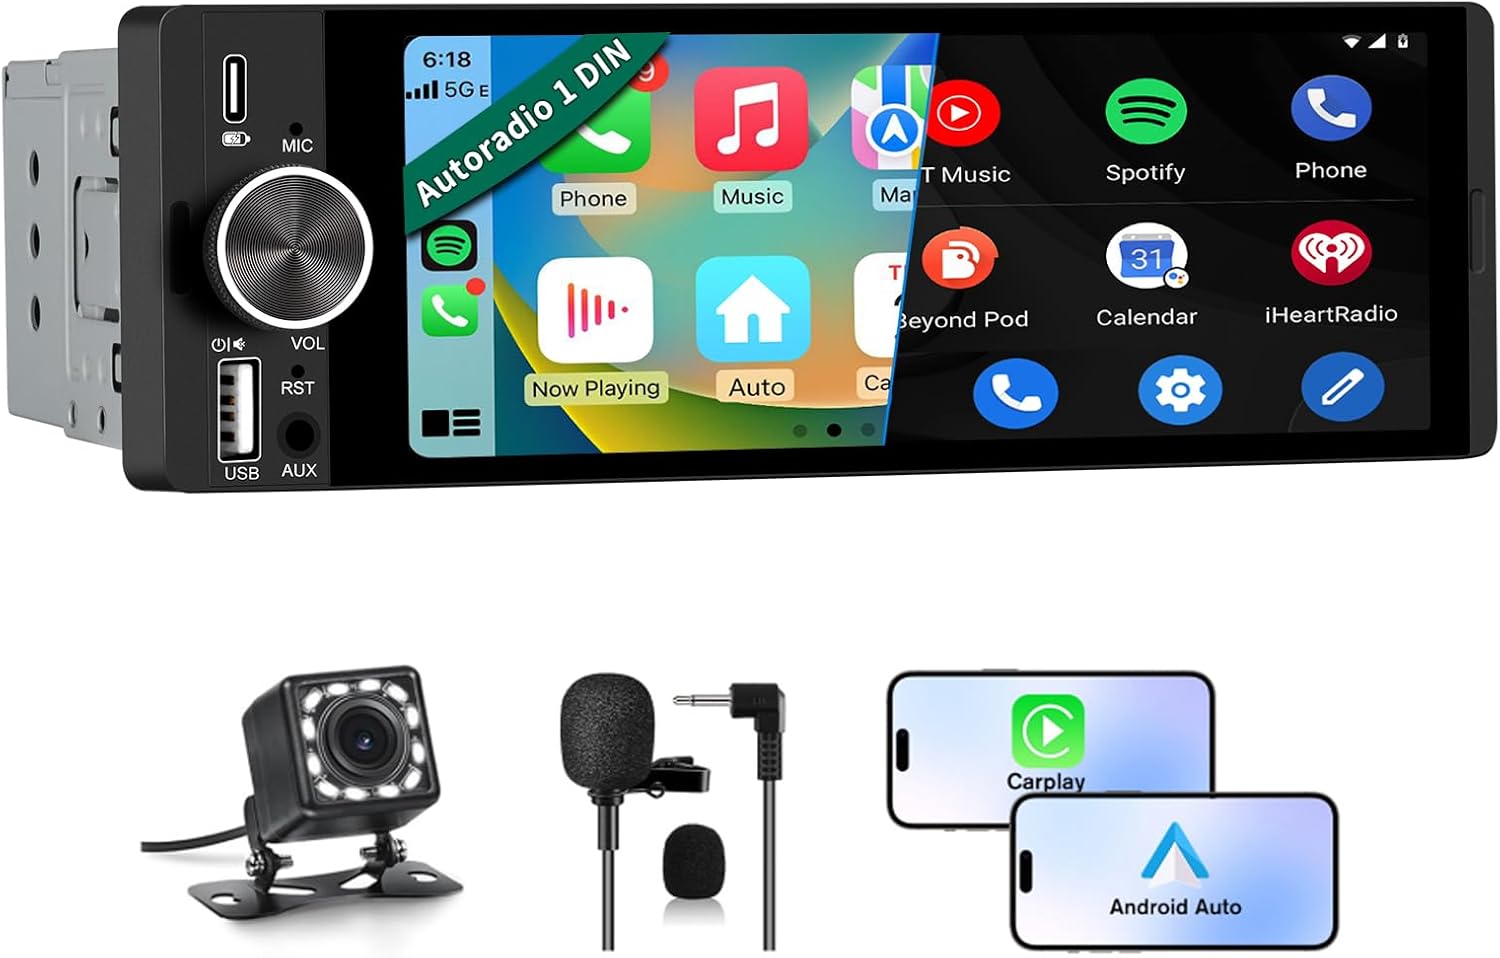
Image: Front view of the Pyniro Single Din Car Stereo, highlighting the 6.36-inch IPS touchscreen, physical volume knob, microphone, USB ports, and AUX input.

Image: The Pyniro Single Din Car Stereo integrated into a vehicle dashboard, illustrating its core features such as Apple CarPlay, Android Auto, Bluetooth, DSP, rearview camera support, FM radio, and steering wheel control compatibility.
5. Installation
5.1 Compatibility Check
This unit features a standard 1 DIN size. Before installation, refer to the provided dimensions and wiring diagrams to ensure compatibility with your vehicle's dashboard and electrical system. Professional installation is recommended if you are unfamiliar with car audio wiring.
5.2 Wiring Connections
Proper wiring is crucial for correct operation and to prevent damage. Use the provided wiring harness.
- Yellow Wire (B+): Connect to the positive terminal of the constant current battery (12V). This ensures the memory function works after the car is turned off.
- Black Wire (GND): Connect to the negative terminal of the battery.
- Red Wire (ACC): Connect to the car's ignition switch (ACC) to ensure the stereo turns on and off with the vehicle.
- Speaker Wires: Connect according to the cable definition diagram (Violet, Violet/Black, Gray, Gray/Black, White, White/Black, Green, Green/Black).
- Parking Sensor Control Wire (Pink): Connect for parking brake detection if applicable.
- Steering Wheel Key Control Wires (Orange, Brown): Connect to your vehicle's steering wheel control wires (KEY1, KEY2) if supported.
- Power Antenna Amplifier Power On (Blue): Connect to power an external antenna amplifier if used.
- Headlight Detection Wire (Green): Connect to the headlight circuit for automatic display dimming.
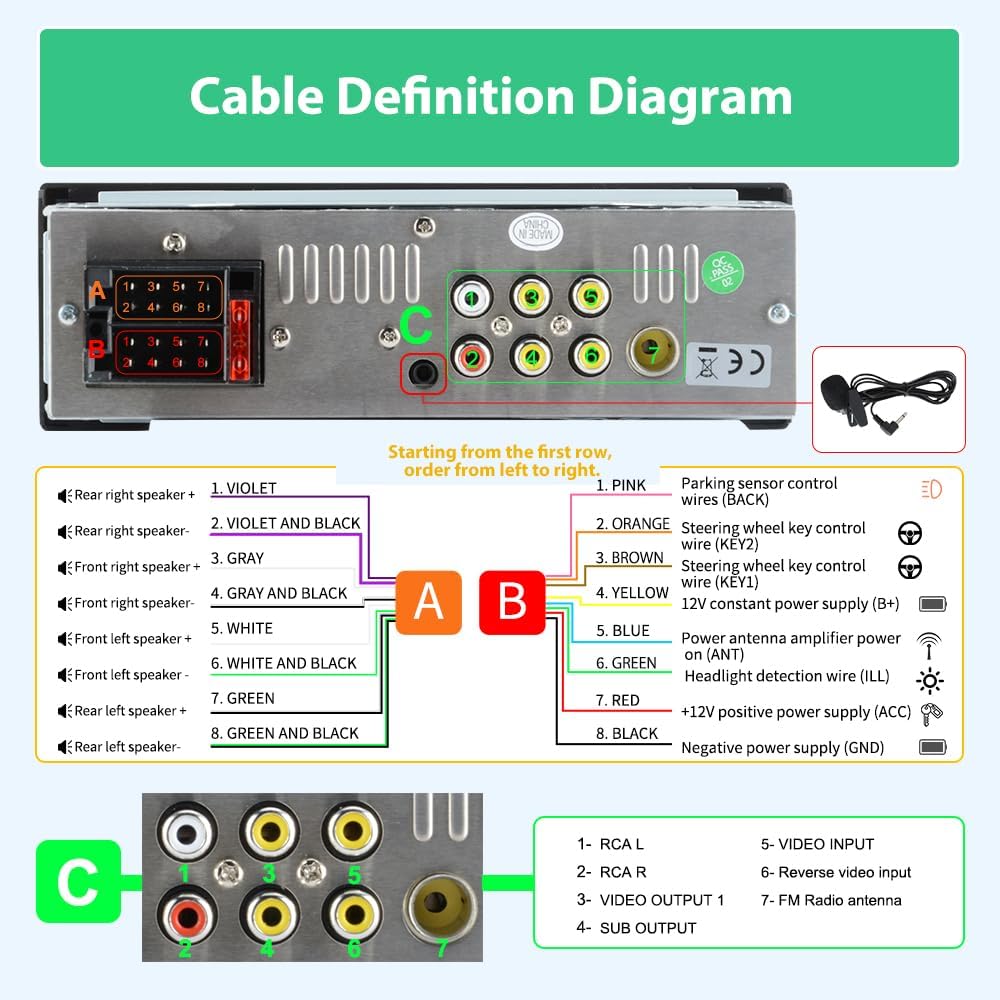
Image: Cable Definition Diagram. This diagram illustrates the wiring connections for the Pyniro car stereo, including speaker outputs, power inputs (B+, ACC, GND), and various control wires like steering wheel controls and parking sensor input.
5.3 Rear Camera Connection
The included waterproof HD backup camera enhances parking safety. Connect it as follows:
- Connect the camera's video output cable to the "Reverse Video Input" (RCA port 6) on the stereo.
- Connect the camera's red power wire to the positive wire of your car's reverse light.
- Connect the camera's black ground wire to the negative wire of your car's reverse light.
- Connect the trigger wire (usually a thin red wire extending from the RCA cable) to the "BACK" wire of the power harness. This signals the stereo to switch to the rear view when reversing.
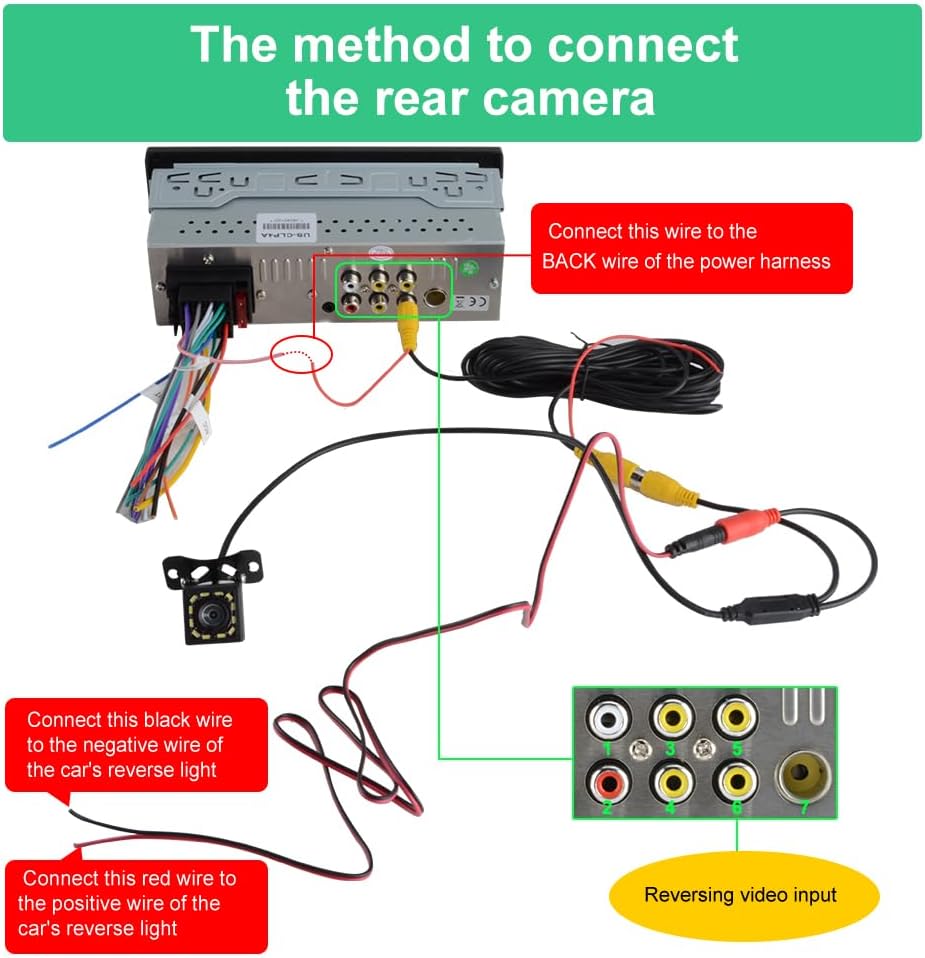
Image: Rear Camera Connection Method. This diagram details the wiring for the backup camera, showing connections to the stereo's video input and the car's reverse light circuit for automatic activation.
6. Setup
6.1 Initial Power On
After completing all wiring, turn on your vehicle's ignition. The stereo should power on. If it does not, refer to the troubleshooting section.
6.2 Language and Time Settings
Navigate through the system settings to set your preferred language, time zone, and date format.
6.3 Bluetooth Pairing
To pair your smartphone via Bluetooth:
- On the stereo, go to the Bluetooth menu.
- Enable Bluetooth on your smartphone and search for available devices.
- Select "Pyniro Car Stereo" (or similar name) from the list on your phone.
- Confirm the pairing code if prompted.
6.4 CarPlay / Android Auto Setup
The unit supports both wired and wireless CarPlay and Android Auto.
- Wireless Connection: Ensure Bluetooth is paired. The system will prompt you to enable Wi-Fi for the wireless CarPlay/Android Auto connection. Follow the on-screen instructions.
- Wired Connection: Connect your smartphone to the stereo's USB-A port using a certified USB cable. The system should automatically detect and launch CarPlay or Android Auto.

Image: CarPlay and Android Auto support. This image shows the stereo screen with both CarPlay and Android Auto interfaces, highlighting features like voice assistant, Bluetooth, rearview camera, maps, and steering wheel controls.
7. Operating Instructions
7.1 CarPlay and Android Auto
Once connected, you can access navigation, music, calls, and messages directly on the stereo's touchscreen. Use voice commands (Siri or Google Assistant) for hands-free control.
7.2 Bluetooth Functions
After pairing, you can make and receive hands-free calls and stream high-quality audio from your smartphone. The system supports phonebook synchronization.
7.3 FM Radio
Access the FM radio function to tune into your favorite stations. The frequency range is 87.5MHz-108.0MHz.
7.4 Audio Equalizer (EQ)
Customize your audio experience using the built-in EQ. Adjust various frequency bands (e.g., 30Hz, 60Hz, 125Hz, 250Hz, 500Hz, 1KHz, 2KHz, 4KHz, 8KHz, 16KHz) to fine-tune the sound to your preference. Presets like Jazz, Classic, Rock, Pop, and Soft are available.

Image: Bluetooth Music & Calls, FM Radio, and EQ Equalizer Function. This image displays the user interfaces for Bluetooth music streaming, FM radio tuning, and the detailed graphic equalizer settings, allowing for personalized audio adjustments.
7.5 Backup Camera Display
When the vehicle is shifted into reverse, the system automatically displays the rear view from the connected camera. The camera provides clear 1080P night vision and a wide-angle view.

Image: Rear View Reversing Camera Support. The image shows the car stereo displaying the live feed from the backup camera, complete with parking guidelines, and highlights the camera's high definition, night vision, wide viewing angle, and waterproof capabilities.
7.6 USB Type-C Charging and USB-A Port
The Type-C port provides 2.1A fast charging for compatible devices. The USB-A port can be used for connecting flash drives to play media or for wired CarPlay/Android Auto connections.
7.7 Volume Knob
The intuitive volume knob allows for quick and easy audio adjustments, minimizing driver distraction.
8. Maintenance
- Clean the touchscreen with a soft, lint-free cloth. Avoid abrasive cleaners.
- Keep the unit free from dust and moisture.
- Ensure all connections remain secure.
9. Troubleshooting
| Problem | Possible Cause | Solution |
|---|---|---|
| Unit does not power on. | Incorrect wiring (Yellow, Black, Red wires). | Ensure Yellow (B+) is to constant 12V, Black (GND) to negative, and Red (ACC) to ignition switch. Check fuses. |
| Memory function does not work (settings reset). | Yellow (B+) and Red (ACC) wires are reversed or incorrectly connected. | Ensure the Yellow wire is connected to the positive terminal of the constant current battery. |
| Unit stays on after car is off. | Red (ACC) wire is incorrectly connected to constant power. | Ensure the Red wire is connected to the ACC (car key fob) for proper power management. |
| No sound or poor sound quality. | Incorrect speaker wiring; EQ settings. | Verify speaker connections. Adjust EQ settings. |
| CarPlay/Android Auto not connecting. | Bluetooth/Wi-Fi issues; faulty USB cable; phone compatibility. | Ensure Bluetooth is on and paired. For wireless, check Wi-Fi. For wired, use a certified USB cable. Restart phone and stereo. |
| Backup camera not displaying. | Incorrect camera wiring; faulty camera. | Check video input and trigger wire connections. Ensure camera is receiving power. |
10. Specifications
- Model Number: ZX-US-CLP4C
- Screen Size: 6.36 inches
- Screen Type: IPS Touchscreen
- Compatibility: Apple CarPlay (Wired & Wireless), Android Auto (Wired & Wireless)
- Connectivity: Bluetooth, RCA, Wi-Fi, USB Type-C (Charging), USB-A (Data/Charging), AUX Input
- Controller Type: Touch Screen, Steering Wheel Controls (SWC), Physical Buttons
- Audio Output Mode: Stereo
- Power Supply: 12-14.4V DC, Max 15A
- Item Weight: 1.7 pounds (0.77 Kilograms)
- Package Dimensions: 8.03 x 5.16 x 4.37 inches
- Included Camera: Waterproof HD Backup Camera (1080P Night Vision)
11. Warranty and Support
Your Pyniro Single Din Car Stereo comes with a 2-Year Warranty. This warranty covers component repair or replacement for valid cases.
For technical assistance, troubleshooting, or warranty claims, please contact our dedicated support team:
- Email Support: radio-servicio@hotmail.com
- Online Platform: Refer to the official Pyniro website for additional resources and online support.
Our 24/7 support team is available to assist you with any inquiries.


