
1. Product Overview
This manual provides essential information for the installation, operation, and maintenance of your new FTYHFEFH Carburetor. This carburetor is designed as a direct replacement for Briggs & Stratton 210000, 280000, and 310000 series engines, ensuring proper fit and function.
The carburetor is a critical component of your engine's fuel system, responsible for mixing air and fuel in the correct ratio for combustion. Proper installation and maintenance are crucial for optimal engine performance and longevity.

Figure 1.1: FTYHFEFH Carburetor assembly, including the main carburetor unit, a black fuel line, and a gasket. This image shows the primary components included in the package.
2. Setup and Installation
Before beginning installation, ensure the engine is cool and disconnected from any power source (e.g., spark plug wire removed). Always wear appropriate safety gear, including gloves and eye protection.
2.1. Tools Required
- Socket wrench set
- Screwdriver set (flathead and Phillips)
- Pliers
- Fuel line clamps (optional, but recommended)
- Clean rags
- New fuel filter (recommended)
2.2. Installation Steps
- Drain Fuel: Safely drain all fuel from the engine's fuel tank into an approved container.
- Remove Air Filter Assembly: Disconnect and remove the air filter housing and any associated ducting to gain access to the carburetor.
- Disconnect Fuel Line: Using pliers or a fuel line clamp, pinch off the fuel line leading to the carburetor. Carefully disconnect the fuel line from the old carburetor. Be prepared for residual fuel to spill.
- Disconnect Linkages: Carefully note and disconnect all throttle and choke linkages connected to the old carburetor. It may be helpful to take a photo for reference.
- Remove Mounting Bolts: Locate and remove the mounting bolts that secure the carburetor to the engine manifold. These are typically two bolts.
- Remove Old Carburetor and Gaskets: Gently pull the old carburetor away from the engine. Ensure all old gasket material is completely removed from both the engine manifold and the air filter housing mounting surfaces. Clean these surfaces thoroughly.
- Install New Gaskets: Place the new gaskets (included with your FTYHFEFH Carburetor) in their correct positions. Ensure they are properly aligned with the mounting holes and passages.
- Mount New Carburetor: Carefully position the new FTYHFEFH Carburetor onto the mounting studs or align with the bolt holes. Ensure the gaskets remain in place.
- Secure Mounting Bolts: Reinstall the mounting bolts and tighten them evenly and securely. Do not overtighten, as this can damage the carburetor or manifold.
- Reconnect Linkages: Reattach all throttle and choke linkages to the new carburetor, referring to your earlier notes or photos if necessary. Ensure they move freely and without binding.
- Reconnect Fuel Line: Connect the fuel line to the new carburetor. Remove any clamps. Consider replacing the fuel filter at this stage if it's old or dirty.
- Reinstall Air Filter Assembly: Reattach the air filter housing and any other components removed earlier.
- Refill Fuel Tank: Refill the fuel tank with fresh, clean fuel appropriate for your engine.
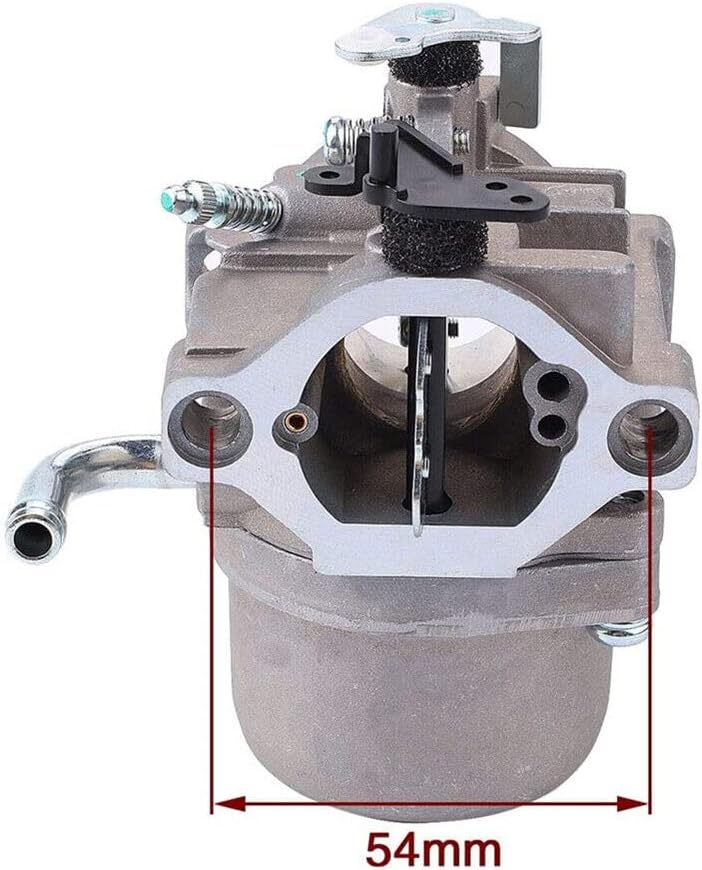
Figure 2.1: Side view of the FTYHFEFH Carburetor, highlighting the mounting points and various ports for connections. This perspective is useful during installation to identify correct attachment points.

Figure 2.2: Front view of the FTYHFEFH Carburetor with a measurement overlay indicating a width of 54mm. This dimension can be used to confirm compatibility or fitment in tight spaces.
3. Operating Instructions
After installation, perform a few checks before starting the engine.
3.1. Initial Start-up
- Check for Leaks: Inspect all fuel line connections for any signs of leaks. Address any leaks before proceeding.
- Prime Engine (if applicable): Some engines may require priming. Refer to your engine's specific manual.
- Start Engine: Follow your engine manufacturer's instructions for starting. The engine may take a few extra pulls or cranks to draw fuel into the new carburetor.
- Adjustments: Once the engine is running, allow it to warm up. If the engine runs rough or stalls, minor idle speed or mixture screw adjustments may be necessary. Refer to your engine's service manual for specific adjustment procedures.
4. Maintenance
Regular maintenance of your carburetor and fuel system will ensure long-term performance and reliability.
- Fuel Quality: Always use fresh, clean fuel. Stale or contaminated fuel is a primary cause of carburetor issues. Consider using a fuel stabilizer, especially during storage.
- Fuel Filter: Regularly inspect and replace the fuel filter according to your engine manufacturer's recommendations. A clogged fuel filter can restrict fuel flow to the carburetor.
- Air Filter: Keep the air filter clean and replace it as needed. A dirty air filter can restrict airflow, leading to a rich fuel mixture and poor engine performance.
- Storage: If storing the engine for an extended period (e.g., off-season), it is recommended to drain the fuel tank and run the engine until it runs out of fuel, or use a fuel stabilizer to prevent gum and varnish buildup in the carburetor.
5. Troubleshooting
This section addresses common issues you might encounter after installing the new carburetor.
| Problem | Possible Cause | Solution |
|---|---|---|
| Engine won't start or starts hard | No fuel reaching carburetor; incorrect choke setting; spark plug issue; old fuel. | Check fuel level and flow; ensure choke is set correctly; inspect spark plug; use fresh fuel. |
| Engine runs rough or stalls | Idle speed or mixture incorrect; air leak around carburetor; dirty air filter. | Adjust idle/mixture screws (refer to engine manual); check carburetor mounting for tightness; clean/replace air filter. |
| Fuel leaks from carburetor | Improperly seated gasket; loose mounting bolts; damaged fuel line. | Ensure gaskets are correctly installed and bolts are tightened; inspect fuel lines for cracks or damage. |
| Engine lacks power | Restricted fuel flow; dirty air filter; incorrect carburetor adjustment. | Check fuel filter; clean/replace air filter; adjust carburetor settings. |
6. Specifications
Key specifications for the FTYHFEFH Carburetor:
- Brand: FTYHFEFH
- Model Compatibility: Briggs & Stratton 210000, 280000, 310000 Series Engines
- Item Weight: Approximately 1 pound
- Product Dimensions: Approximately 1 x 1 x 1 inches (Note: These are general package dimensions, actual carburetor dimensions may vary slightly as shown in Figure 2.2)
- Manufacturer Part Number: 1
- UPC: 779824710012
7. Warranty and Support
This product is designed for direct replacement and manufactured to exact equipment standards. For specific warranty information, please refer to the seller's return policy or contact the seller directly. As per Amazon's policy, a 30-day return window is typically available for this product.
For technical assistance or further inquiries, please contact the seller through the platform where the purchase was made. Provide your order details for faster service.