
1. Introduction
This manual provides detailed instructions for the Redragon K742 Wireless Mechanical Keyboard. It covers product features, setup procedures, operational guidelines, maintenance tips, and troubleshooting information to ensure optimal use of your device. The Redragon K742 offers versatile connectivity options, customizable features, and a durable design for an enhanced typing experience.

Image 1.1: The Redragon K742 Wireless Mechanical Keyboard, showcasing its full layout with RGB backlighting.
2. Package Contents
Please verify that all items listed below are included in your package:
- Redragon K742 Mechanical Keyboard
- USB-C to USB-A Wired Cable
- 2-in-1 Keycap/Switch Puller
- 4 Spare Switches
- USB 2.4GHz Wireless Dongle (stored within the keyboard)
- Quick Start User Manual
- Brand Logo Sticker

Image 2.1: The Redragon K742 keyboard displayed with its included accessories, such as the USB cable and switch puller.
3. Product Overview
The Redragon K742 is a 98% compact layout mechanical keyboard featuring a gasket-mounted structure with 5-layer sound-absorbing paddings for a quiet and comfortable typing experience. It is equipped with Redragon pre-lubed RPC Linear Switches and durable OEM-profile double-shot PBT keycaps. Key features include:
- Tri-Mode Connectivity: Supports Bluetooth 5.0, 2.4GHz wireless, and USB-C wired connections.
- Hot-Swappable PCB: Compatible with 3-pin/5-pin switches and south-facing lights for easy customization.
- Multimedia Knob: Provides quick control over volume, media playback, and lighting effects.
- RGB Backlighting: Offers 16.8 million colors and multiple lighting effects.
- QMK/VIA Support: Allows for advanced key remapping, macro creation, and layer customization.
- Long Battery Life: Built-in 4000mAh battery for extended wireless use.
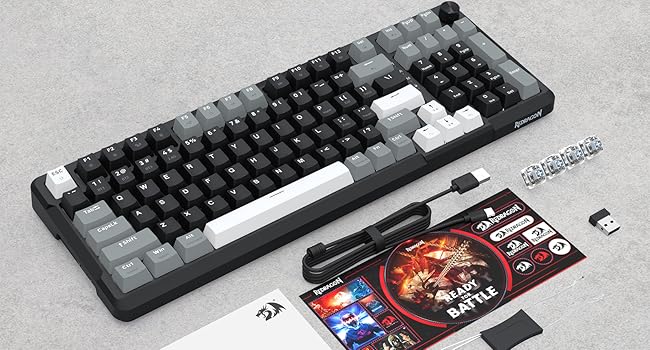
Image 3.1: An overview of the Redragon K742's key features, including its 98-key layout, gasket design, RPC linear switches, PBT keycaps, custom driver support, multimedia knob, hot-swappable design, 4000mAh battery, RGB backlights, 3-mode connection, OEM profile, and 5-layer paddings.
4. Setup
4.1 Initial Charging
Before first use, it is recommended to fully charge the keyboard. Connect the provided USB-C cable to the keyboard's USB-C port and the other end to a powered USB port on your computer or a USB wall adapter. The charging indicator will show the charging status.
4.2 Connectivity Modes
The K742 keyboard supports three connection modes: USB-C Wired, 2.4GHz Wireless, and Bluetooth 5.0. A switch located on the left side of the keyboard allows you to select the desired mode (2.4G / OFF / BT).

Image 4.1: Visual representation of the three stable connection modes: 2.4GHz wireless, USB-C wired, and Bluetooth, with compatible devices like PC, laptop, tablet, phone, Switch, Xbox, and PlayStation.
4.2.1 USB-C Wired Connection
- Ensure the mode switch on the left side of the keyboard is set to the 'OFF' position.
- Connect the USB-C cable to the keyboard and the USB-A end to your computer.
- The keyboard will be automatically recognized and ready for use.
4.2.2 2.4GHz Wireless Connection
- Locate the 2.4GHz USB dongle, typically stored in a dedicated slot on the keyboard.
- Plug the USB dongle into an available USB port on your computer.
- Set the mode switch on the keyboard to the '2.4G' position.
- The keyboard should connect automatically. If not, press Fn + 4 to initiate pairing.
4.2.3 Bluetooth 5.0 Connection
The K742 can connect to up to three Bluetooth devices.
- Set the mode switch on the keyboard to the 'BT' position.
- Press and hold Fn + 1, Fn + 2, or Fn + 3 for 3 seconds to enter pairing mode for the respective Bluetooth channel. The indicator light will flash rapidly.
- On your device (PC, laptop, tablet, phone), search for Bluetooth devices and select 'Redragon K742'.
- Once paired, the indicator light will stop flashing.
- To switch between paired Bluetooth devices, simply press Fn + 1, Fn + 2, or Fn + 3 (short press).
5. Operating Instructions
5.1 Basic Keyboard Functions
The K742 features a standard 98% layout with a dedicated number pad. All keys function as labeled in their default state.
5.2 Multimedia Knob Usage
The multifunctional knob located on the top right of the keyboard controls both volume/media and lighting effects.

Image 5.1: Diagram illustrating the dual functionality of the multimedia knob for lighting control (click to switch effects, rotate for brightness) and volume control (rotate to adjust volume, press to mute/play/pause).
- Switching Modes: Press the Fn key and hold the knob for 3 seconds to toggle between Lighting Control Mode and Volume Control Mode.
- Volume Control Mode:
- Rotate the knob clockwise to increase volume.
- Rotate the knob counter-clockwise to decrease volume.
- Press the knob to mute/unmute audio or play/pause media.
- Lighting Control Mode:
- Rotate the knob to change the backlight brightness.
- Press the knob to switch between different lighting effects.
5.3 RGB Backlighting Control
The K742 offers extensive RGB backlighting customization. Use the following Fn key combinations:

Image 5.2: Visual guide for controlling RGB lighting effects, including increasing/reducing brightness, speeding up/down effects, switching colors, and changing light effects using Fn key combinations.
- Fn + ↑ (Up Arrow): Increase brightness.
- Fn + ↓ (Down Arrow): Reduce brightness.
- Fn + ← (Left Arrow): Speed down lighting effect.
- Fn + → (Right Arrow): Speed up lighting effect.
- Fn + PgUp: Switch colors.
- Fn + Ins: Switch light effect.
5.4 QMK/VIA Programmable Features
The Redragon K742 supports QMK/VIA software for advanced customization. This allows users to remap keys, create macros, and customize layers to suit their workflow or gaming preferences.

Image 5.3: Screenshot of the QMK/VIA software interface, demonstrating options for macro recording/editing, custom shortcut keys, and 16.8 million RGB backlights.
To utilize QMK/VIA:
- Download the VIA software from the official VIA website.
- Contact Redragon customer support to obtain the specific JSON file for the K742 keyboard.
- Load the JSON file into the VIA software.
- Begin customizing your key assignments, macros, and lighting settings.
6. Maintenance
6.1 Keycap and Switch Replacement
The K742 features a hot-swappable PCB, allowing for easy replacement of switches without soldering. The included 2-in-1 keycap/switch puller facilitates this process.

Image 6.1: Detailed view of the hot-swappable PCB sockets supporting 3-pin/5-pin switches, pre-lubed RPC linear switches with specifications, and double-shot PBT keycaps.
- Removing Keycaps: Use the keycap puller to gently grip and lift the keycap vertically.
- Removing Switches: Use the switch puller to carefully grasp the clips on the top and bottom of the switch, then pull the switch vertically out of the PCB.
- Installing Switches: Align the pins of the new switch with the holes on the PCB. Gently press down until the switch clicks into place. Ensure pins are not bent.
- Installing Keycaps: Align the keycap with the switch stem and press down firmly until it is seated.
6.2 Cleaning
To maintain the keyboard's performance and appearance:
- Disconnect the keyboard from your computer before cleaning.
- Use a soft, dry cloth to wipe the surface of the keyboard.
- For dust and debris between keycaps, use compressed air or a small brush.
- Avoid using harsh chemicals or abrasive materials.
7. Troubleshooting
If you encounter issues with your Redragon K742 keyboard, please refer to the following common solutions:
- Keyboard not responding: Ensure the keyboard is charged. Check the connection mode switch (2.4G/OFF/BT) is set correctly for your chosen connection type. For wired mode, ensure the USB cable is securely connected.
- Wireless connection issues: For 2.4GHz, ensure the dongle is properly inserted and try re-pairing (Fn + 4). For Bluetooth, ensure the keyboard is in pairing mode (Fn + 1/2/3 for 3s) and your device's Bluetooth is enabled. Try removing and re-pairing the device.
- Keys not registering: If specific keys are not working, try replacing the switch using the included switch puller and spare switches. Ensure the switch is fully seated.
- RGB lighting not working: Check brightness settings (Fn + ↑/↓). Ensure the keyboard is not in a low-power state.
- QMK/VIA software not recognizing keyboard: Ensure you have the correct JSON file for the K742 model and that it is loaded into the VIA software.
8. Specifications
| Feature | Detail |
|---|---|
| Model Number | K742 |
| Product Dimensions | 15.12 x 5.67 x 1.54 inches |
| Item Weight | 0.03 ounces |
| Manufacturer | Redragon |
| Compatible Devices | Laptop, PC, Tablet |
| Connectivity Technology | Bluetooth 5.0, 2.4GHz Wireless, USB-C Wired |
| Keyboard Description | Mechanical |
| Recommended Uses | Business, Education, Everyday Use, Gaming, Multimedia, Personal, Programming |
| Special Feature | Hot-Swappable Switches |
| Keyboard Backlighting | RGB |
| Style | Classic |
| Battery | 4000mAh (1 AA battery required, included) |
9. Warranty and Support
Redragon is committed to providing reliable products and customer satisfaction. While a specific warranty period is not detailed in this manual, Redragon offers support for quality-related issues.
9.1 Customer Support
If you encounter any quality-related issues or require assistance with your Redragon K742 keyboard, please do not hesitate to contact Redragon customer support. Our support team is available 24/7 to provide a satisfactory solution.
For the most up-to-date contact information, please visit the official Redragon website or refer to the contact details provided with your product packaging.


