1. Introduction & Key Features
This manual provides essential information for the proper installation, operation, and maintenance of your COSTWAY 30k Quad 4 Zone Mini Split Air Conditioner. Please read it thoroughly before use and retain it for future reference.
Key Features:
- Multi-room Cooling Solution: Designed to cool any corner of your home, this 30000 BTU 4 zone (9000 BTU+9000 BTU+9000 BTU+9000 BTU) mini split air conditioner can dependently adjust the temperature to meet the individual needs of different rooms. The chassis heating function maintains the normal operation of the outdoor unit, enabling it to withstand any climate conditions (-13℉~125℉).
- Energy Efficiency: This Energy Star certified mini split AC features innovative inverter technology, operating at a remarkable 23 SEER2 rating and 10 HSPF2 rating. It uses R32 refrigerant for a greener lifestyle and is certified by ETL and AHRI.
- Multiple Functions & Modes: Offers 6 modes (auto/cool/heat/dry/fan/sleep) and 5 wind speeds (auto/low/mid/high/strong). Other features include auto swing, feeling, and health functions.
- Smart Control: Adjust settings, monitor performance, and control your AC from anywhere via your smartphone or the remote control. Includes a 24-hour timer.
- Low Noise & Easy Maintenance: Features a quiet sleep mode and screen off function. The filter can be easily removed and cleaned.

Image: Multi-room cooling capability, showing different temperature zones in a house.

Image: Outdoor unit designed to withstand extreme temperatures from -13°F to 125°F.

Image: Independent temperature control for each of the four zones.
2. Setup & Installation
Proper installation is crucial for the safe and efficient operation of your mini split system. A professional HVAC installer is required for this product.
General Installation Guidelines:
- The air conditioner must be installed by professional personnel.
- Pay attention to the installation position of indoor and outdoor units to ensure normal use and maintenance.
- For units with R32 or R454B refrigerant, ensure both indoor and outdoor units have good ventilation. Strictly prohibit open flames in the installation area. Refer to the unit installation manual for detailed information.
- For units with R410A, R32, or R454B, gas leakage detection must be performed after pipe connections to ensure a leak-free refrigeration system.
- For R410A, R32, or R454B units, the system must be vacuumed to ensure no air inside.
- Ensure indoor and outdoor connection wires and power supply are connected correctly and reliably.
- If the connection pipe exceeds the standard length, extra refrigerant must be added. The specific quantity depends on the refrigerant type (R410A, R32, or R454B) and model. Refer to the service manual for details.
Package Contents:

Image: Overview of included components for installation.
Detailed Installation Steps (Refer to Video):
Video: Detailed guide on how to install a split AC unit.
- Pre-Installation Check: Before installation, check the status of indoor and outdoor units. Verify no parts are broken, the indoor cross-fan operates, and the remote controller functions. If the cross-fan does not operate, check and adjust it first.
- Gas Flow Check (Indoor Unit): Check for gas flow from the connector. If no gas is coming out, inspect the evaporator for any leakage.
- Indoor Unit Wiring: Unfix the electric box cover and connect the indoor and outdoor unit connection wires. Double-check the marks on the wires (1, 2, 3, and ground) to ensure correct and reliable wiring.
- Piping Direction & Case Cutting: Based on the installation location, decide the piping direction and cut the face frame case. Clean and smooth the case gap to prevent damage to the pipes.
- Pipe Connection (Indoor Unit): Adjust the connection pipes, paying attention to the alignment of the horn. Control the wrench's strength to prevent nut rupture. Ensure no gas leakage after pipe connection.
- Drainage Pipe Connection: Connect the drainage pipe. It must be sealed with electrical tape to ensure no water leakage.
- Wrapping Pipes & Wiring: Wrap the refrigerant pipes, drainage hose, and wiring together. Retain pipe connectors for later leak detection.
- Wall Plate Installation: Install the wall plate, ensuring it is secure enough to hold the indoor unit.
- Mounting Indoor Unit: Pass pipes through the wall hole and securely fix the indoor unit onto the mounting plate.
- Outdoor Unit Mounting: Fix the outdoor unit on the mounting bracket. Use rubber feet to reduce vibration and noise.
- Refrigerant Pipes Cover: Open the refrigerant pipes cover on the outdoor unit.
- Refrigerant Pipe Connection (Outdoor Unit): Connect the refrigerant pipes similar to the indoor unit. Control wrench force to prevent nut breakage. Connect the pipe horn to the 2-way and 3-way valves straightly to prevent gas leakage.
- Electrical Control Box (Outdoor Unit): Open the electrical control box. Route the indoor/outdoor connection cable to the left hole and the power cord to the right hole. Connect the indoor and outdoor connection wires to the electric terminal, matching marks (1, 2, 3, N, L, and ground). Connect the power supply cable to the electric terminal. Ensure all wire connections are correct and reliable.
- Main Power Supply Connection: Connect the outdoor unit to the main power supply. Always switch off the main power supply before connecting. Ensure the AC unit has a separate leakage breaker.
- Vacuum & Leakage Detection: Connect the vacuum pump. First, connect one hose from the manifold low-pressure gauge to the outdoor unit service port on the three-way valve. Second, connect the manifold gauge to the vacuum pump. Then, connect the vacuum pump to the power supply. Switch on the vacuum pump and open the gauge low-pressure valve. For split AC, vacuum the unit for at least 15 minutes until the vacuum is maintained at -14.5psi. For R32 or R454B units, vacuum for 15-30 minutes with a pump capacity of 4-4.5CFM. Close the low-pressure valve on the manifold gauge, then switch off the vacuum pump. Hold pressure for 5 minutes; the compound gauge pointer should not exceed 0.73psi. If it rebounds more, check and repair the leakage point (most likely from the pipe connector). Open the outdoor unit low-pressure valve counterclockwise for 1/4 turn with a hexagonal wrench to fill the system with refrigerant, then close it after 5 seconds. Check all pipe connectors of indoor and outdoor units for leaks. If gas leakage is found, repair and tighten the pipe connection. Clean the connectors and wrap the indoor connector pipes. Seal the wall hole with sealing cement.
- Final Steps: Keep the gauge at positive pressure and quickly remove the pressure hose from the outdoor unit service valve. Fully open the outdoor unit low-pressure and high-pressure valves with a hexagonal wrench. Reinstall the protective caps of the service port, low-pressure, and high-pressure valves, then reinstall the valves cover.
3. Operating Instructions
Your COSTWAY Mini Split Air Conditioner offers various modes and smart features for optimal comfort and energy efficiency.
Modes & Speeds:
- 6 Modes: Auto, Cool, Heat, Dry, Fan, Sleep.
- 5 Wind Speeds: Auto, Low, Mid, High, Strong.
- Other Features: Auto swing, feeling, and health functions extend comfort to daily use.
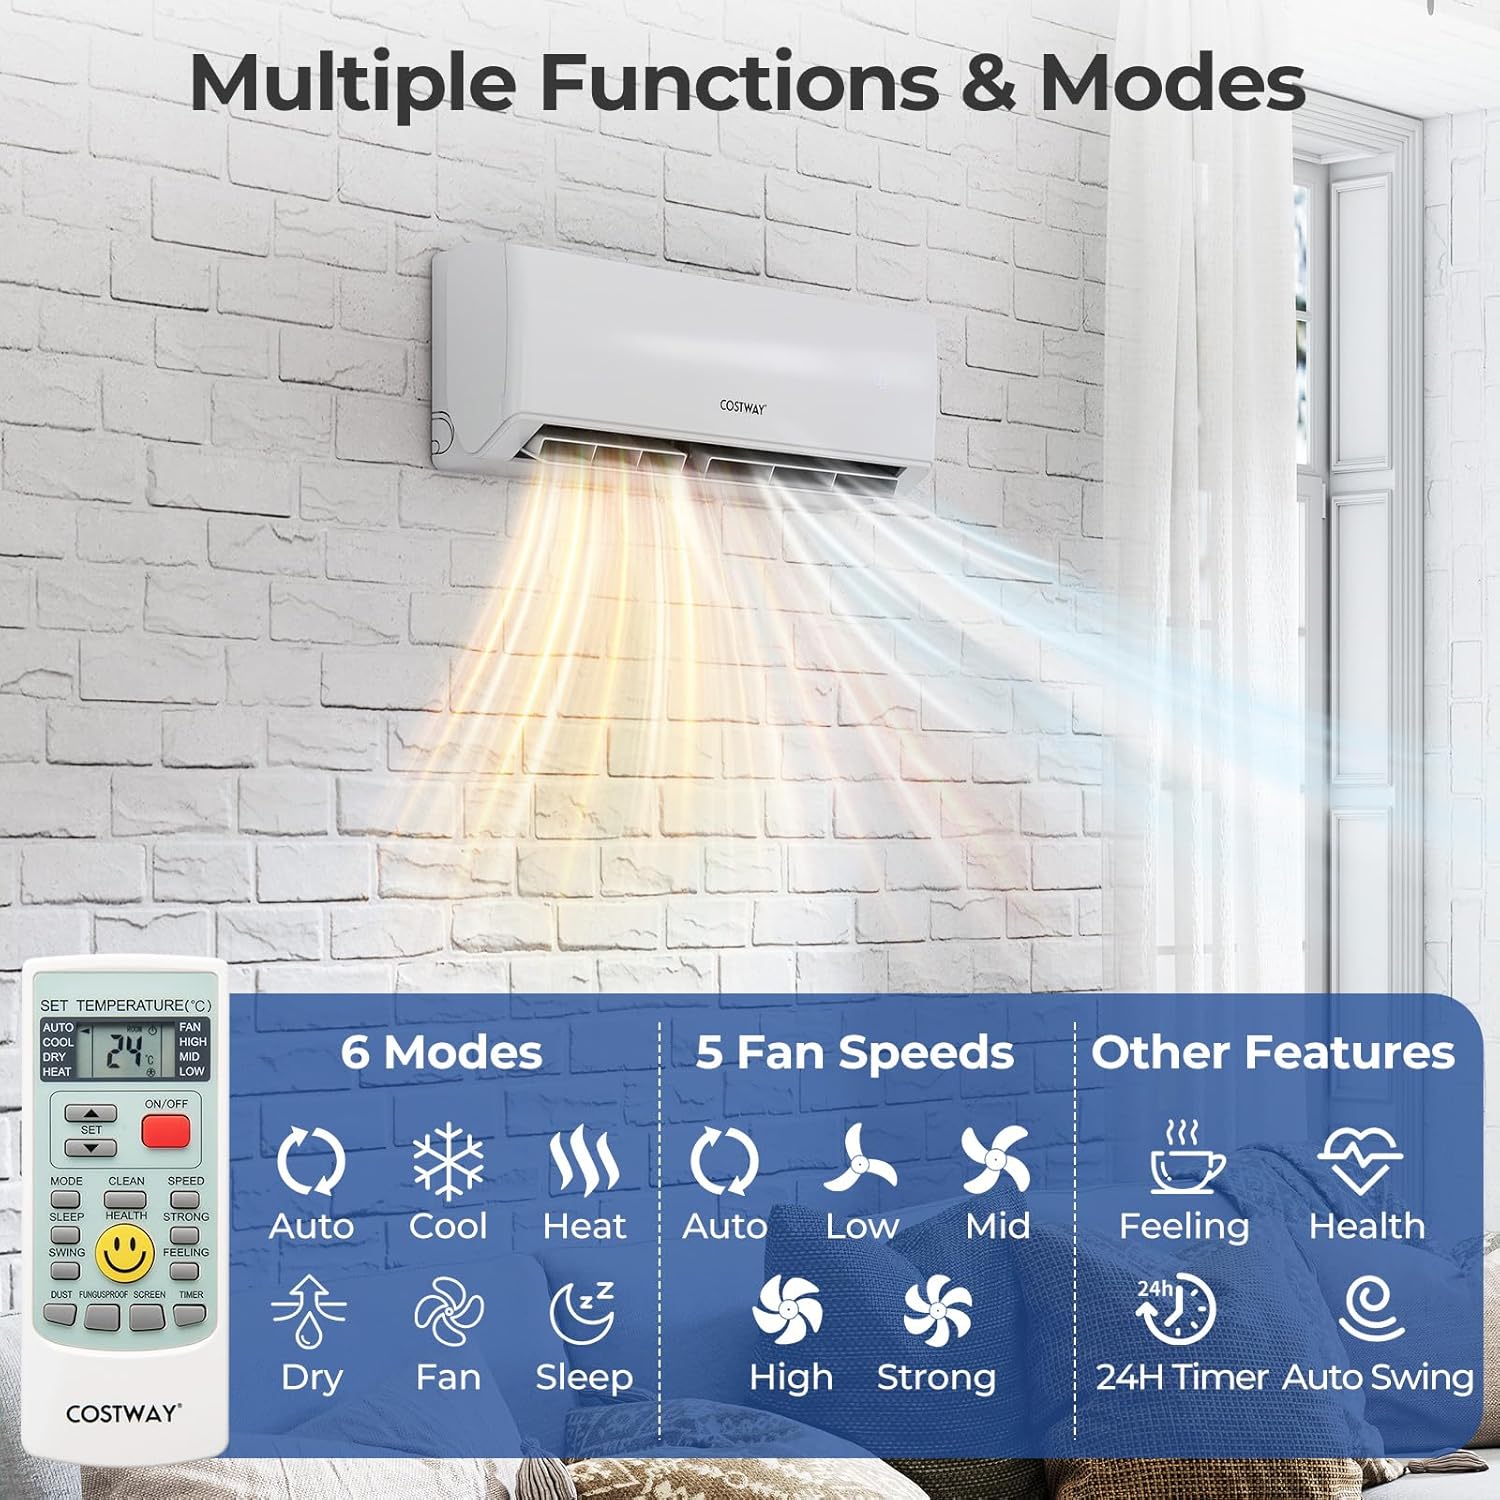
Image: Remote control showing available modes and fan speeds.

Image: Visual representation of powerful functions and customized comfort options.
Smart Control Features:
- Smartphone Control: Easily adjust settings, monitor performance, and control your AC from anywhere via your smartphone.
- Remote Control: Use the included remote control for easy and quick adjustments.
- 24-Hour Timer: Plan your climate control around your schedule conveniently.
- Quiet Sleep Mode & Screen Off: Enjoy a restful night with reduced noise and a dark display.

Image: Smart control via smartphone app.

Image: Smart APP Control for anytime, anywhere access.

Image: Voice Control for a comfortable and smart life.

Image: Remote Control for easy and quick adjustment.
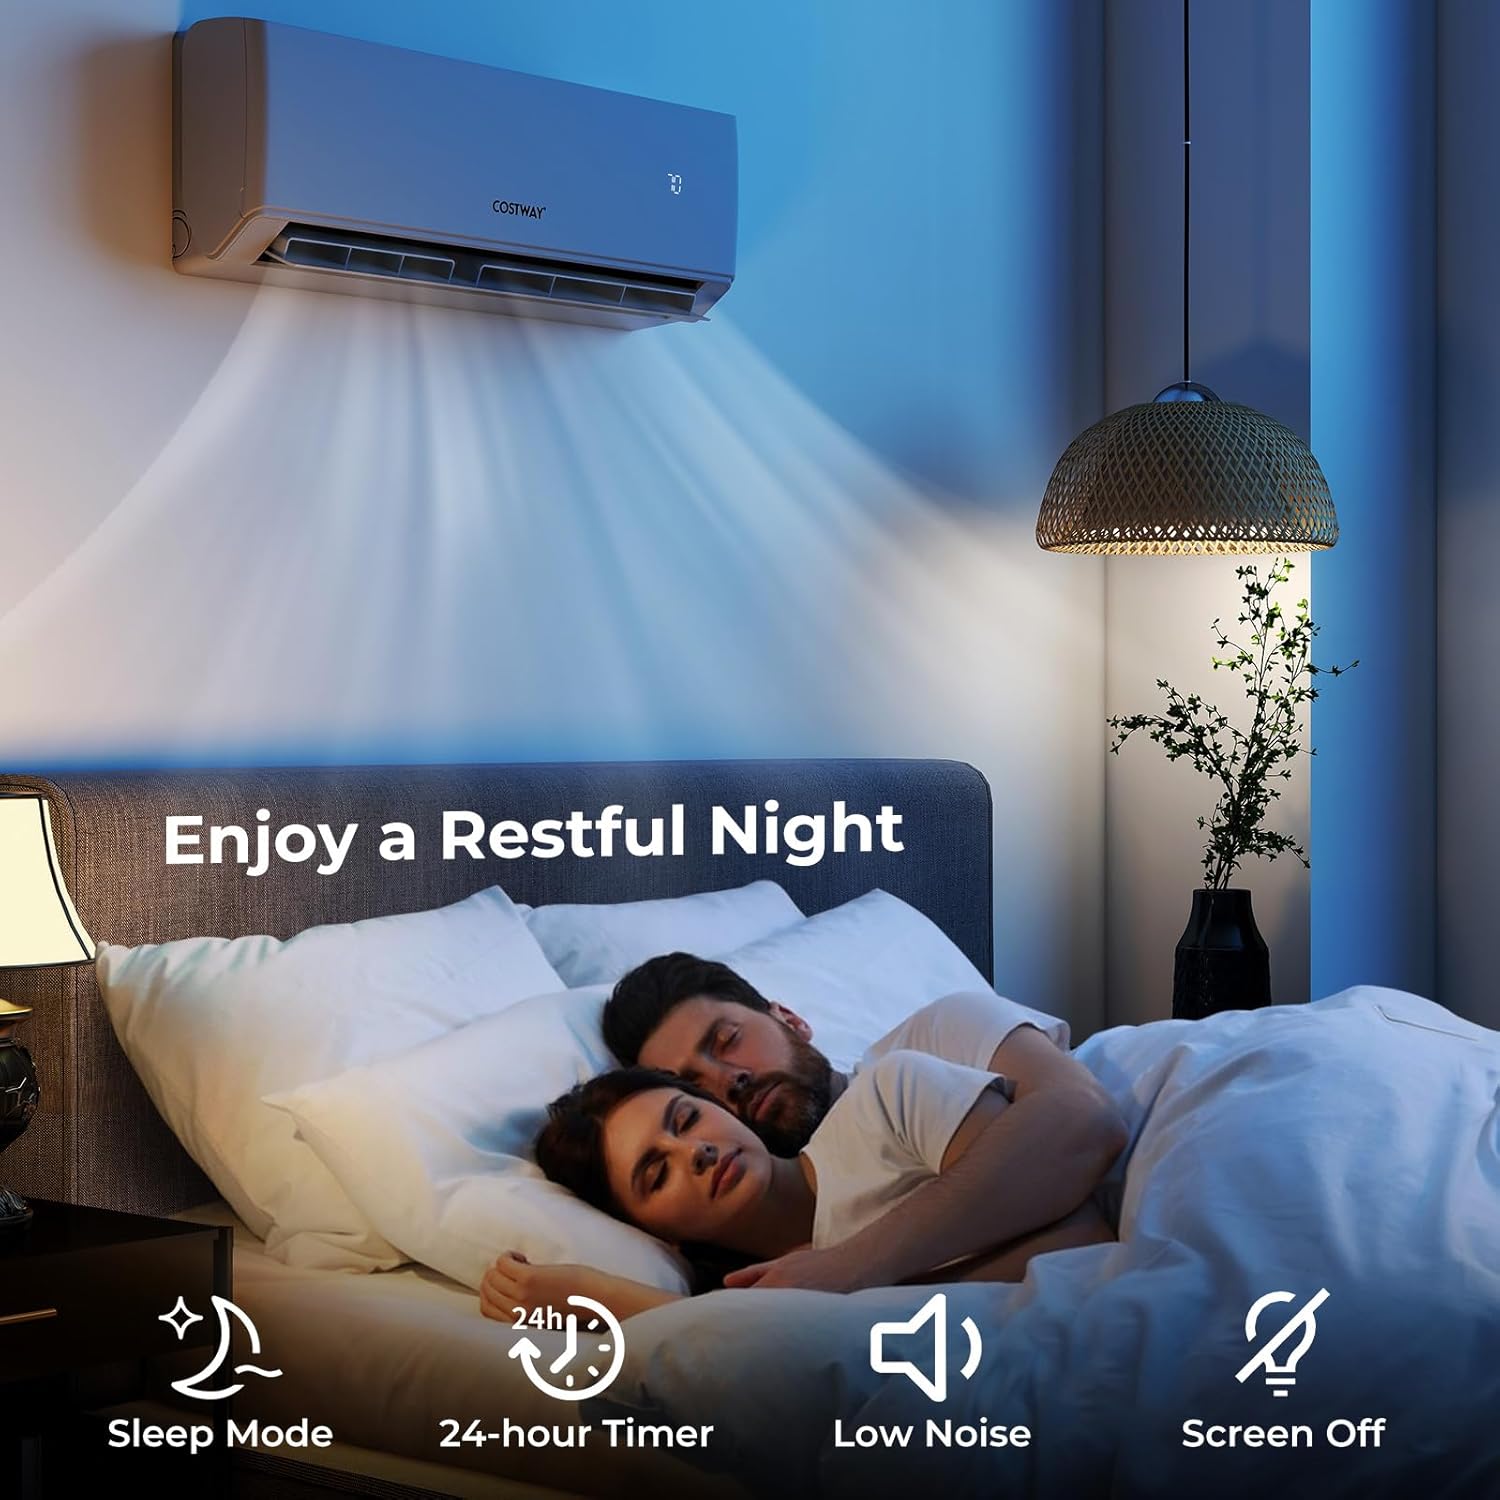
Image: Enjoy a restful night with Sleep Mode, 24-hour Timer, Low Noise, and Screen Off functions.
4. Maintenance
Regular maintenance ensures the longevity and efficient performance of your air conditioner.
Filter Cleaning:
- The air filters can be easily removed and cleaned. Refer to the detailed instructions in the full product manual for proper cleaning procedures.
- Regular cleaning of filters is recommended to maintain air quality and system efficiency.

Image: Removable and washable filters for cleaner air.
5. Troubleshooting
If you encounter any issues with your air conditioner, please refer to the following common troubleshooting tips. For more complex problems, contact customer support.
- Unit Not Turning On: Check power supply, circuit breaker, and ensure the remote control batteries are functional.
- Insufficient Cooling/Heating: Verify correct mode selection, temperature settings, and ensure air filters are clean. Check for any obstructions to airflow.
- Unusual Noises: Minor noises during operation are normal. If loud or unusual noises occur, check for loose parts or contact support.
- Water Leakage: Ensure the drainage pipe is correctly installed and not blocked.
- Remote Control Issues: Check battery levels and ensure no obstructions between the remote and the indoor unit.
6. Specifications
Detailed technical specifications for your COSTWAY 30k Quad 4 Zone Mini Split Air Conditioner.
| Specification | Value |
|---|---|
| Brand | COSTWAY |
| Model Number | c93dfbb6-0896-4db9-8478-4489b3ca37ee |
| Capacity | 3 Tons (30000 BTU) |
| Cooling Power | 30000 British Thermal Units |
| SEER2 Rating | 23 |
| HSPF2 Rating | 10 |
| Voltage | 208-230V |
| Refrigerant | R32 |
| Noise Level | 30 Decibels |
| Item Weight | 24.4 pounds |
| Product Dimensions | 17.9"D x 41.2"W x 31.8"H |
| Special Features | WiFi Enabled, Multiple Modes & Speeds |
| Installation Type | Split System |
| Form Factor | Mini-Split |
| Color | White |
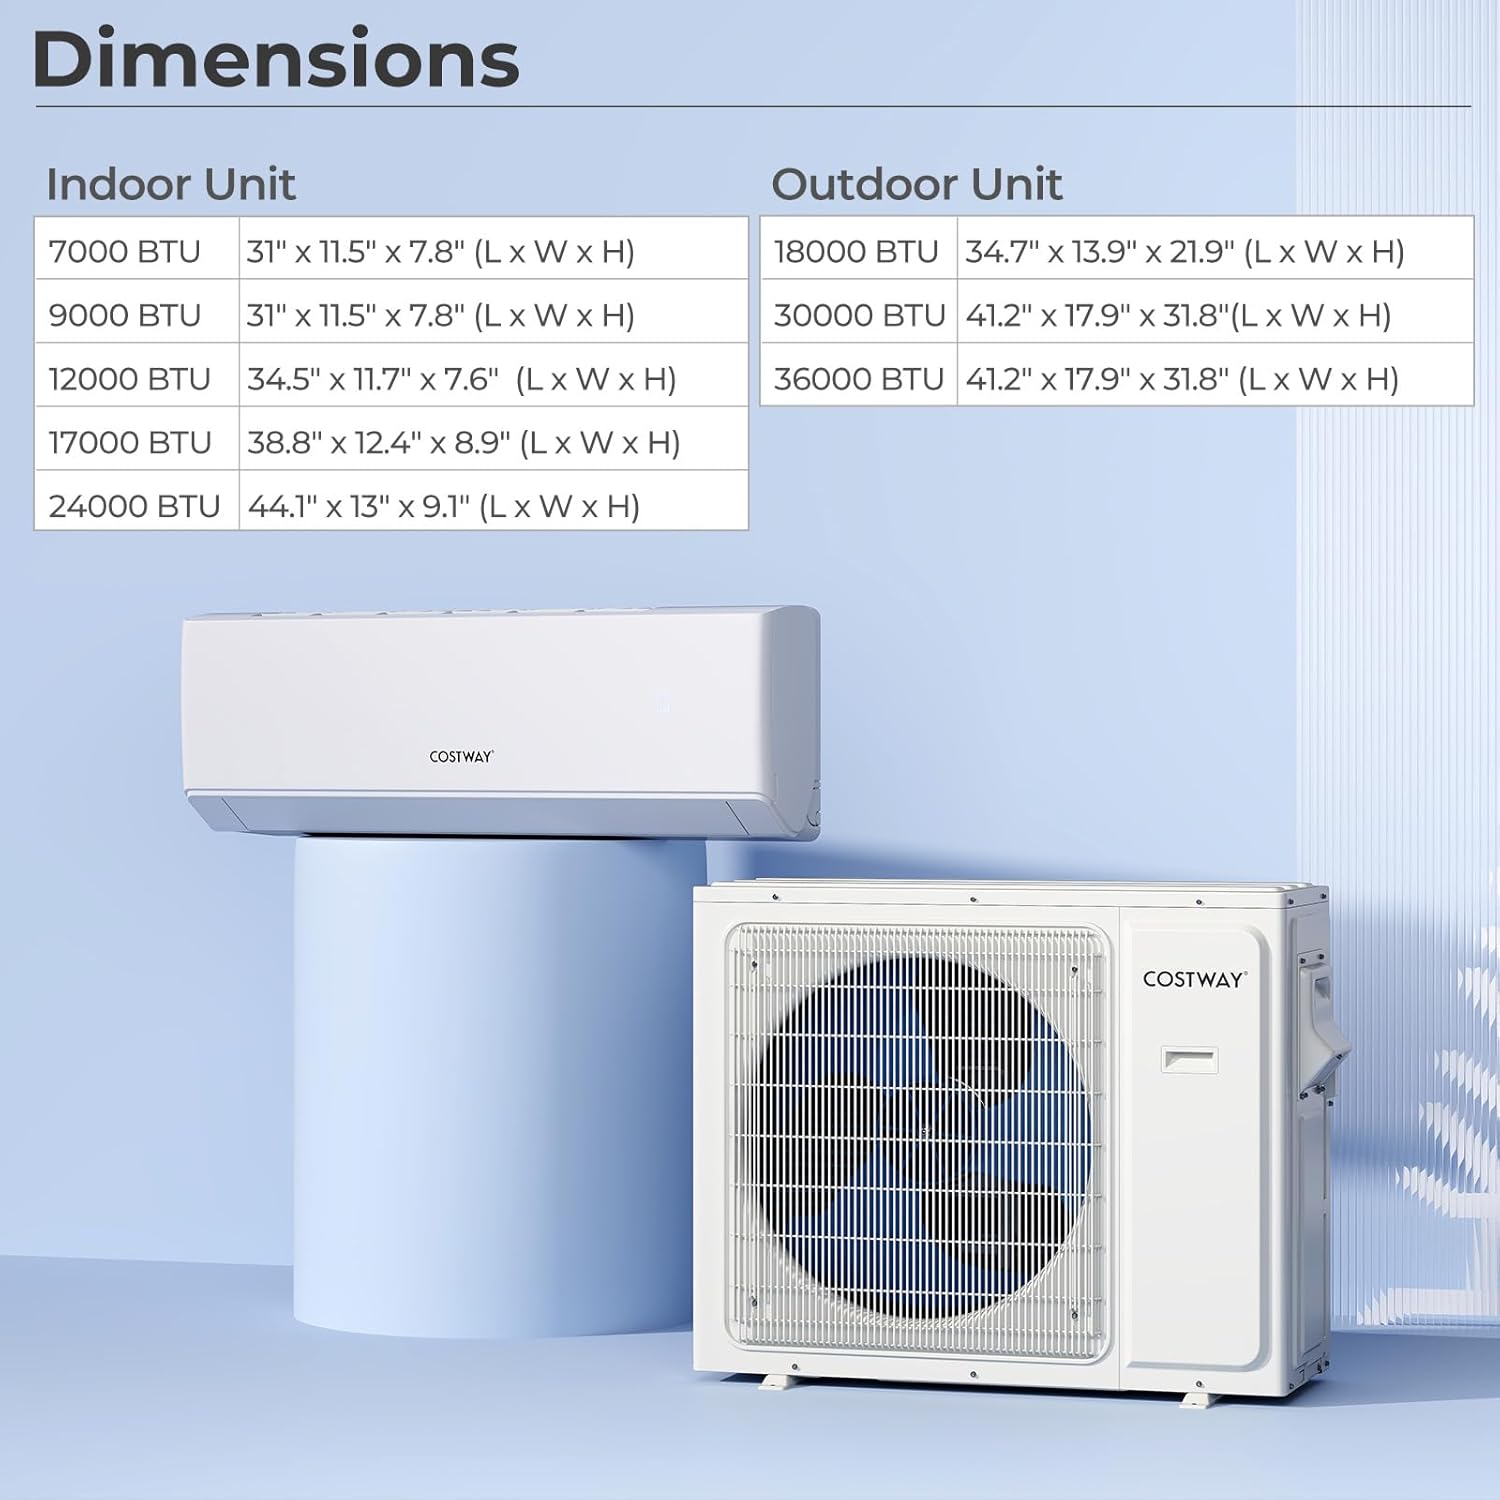
Image: Dimensions for indoor and outdoor units.

Image: Energy efficiency ratings and refrigerant type.
7. Warranty & Support
COSTWAY is committed to providing excellent customer service and product support.
Warranty Information:
- Multi-Zone Models: 5-year compressor warranty + 3-year parts warranty.
- Single Zone Models: 8-year compressor warranty + 5-year parts warranty.
Customer Support:
- Lifetime Technical Support: Access to technical assistance for the lifetime of your product.
- 24/7 Support: Available via phone, email, or live chat for any inquiries or issues.


