1. Introduction
The EFUZCOCI STC-3028 is a versatile dual digital controller designed for precise management of both temperature and humidity. This device integrates a thermometer and hygrometer, making it suitable for various applications such as incubators, terrariums, and environmental control systems. This manual provides detailed instructions for the proper installation, operation, and maintenance of your STC-3028 controller.
2. Product Overview
The STC-3028 features two distinct digital displays for simultaneous temperature and humidity readings, along with intuitive control buttons for setting parameters. It includes a combined temperature and humidity sensor for accurate environmental monitoring.

Image 2.1: Front view of the EFUZCOCI STC-3028 Dual Digital Thermostat and Hygrometer. This image shows the compact design of the controller with its dual digital displays and control buttons.

Image 2.2: Detailed view of the STC-3028 front panel. The left display shows temperature (°C) with its working indicator, and the right display shows humidity (%RH) with its working indicator. Below each display is the real-time detection value. On the right, there are four buttons: two for temperature adjustment (up/down) and two for humidity adjustment (up/down), which also serve as Start/Stop buttons for setting parameters.

Image 2.3: Dimensions of the STC-3028 controller and its sensor. The main unit measures approximately 85mm (3.35") in width, 75mm (2.95") in depth, and 34mm (1.34") in height. The sensor cable length is 1 meter, and the sensor head measures approximately 55mm (2.17") in length, 25mm (0.98") in width, and 15mm (0.59") in thickness.
3. Specifications
| Feature | Specification |
|---|---|
| Model | STC-3028 |
| Input Voltage Options | AC 110-220V, DC 12V, DC 24V |
| Measuring Temperature Range | -50°C to +110°C |
| Measuring Humidity Range | 00%RH to 100%RH |
| Temperature Accuracy | ±1°C |
| Humidity Accuracy | ±0.1%RH |
| Relay Output Contact Capacity | 10A/240VAC |
| Shell Material | PC + ABS fireproof |
| Sensor Length | 1 meter |
| Item Weight | 50 Grams (1.76 ounces) |
4. Setup and Wiring
Proper wiring is crucial for the safe and correct operation of the STC-3028. Ensure the power supply matches the specific model (AC 110-220V, DC 12V, or DC 24V) you are installing. Always disconnect power before performing any wiring.
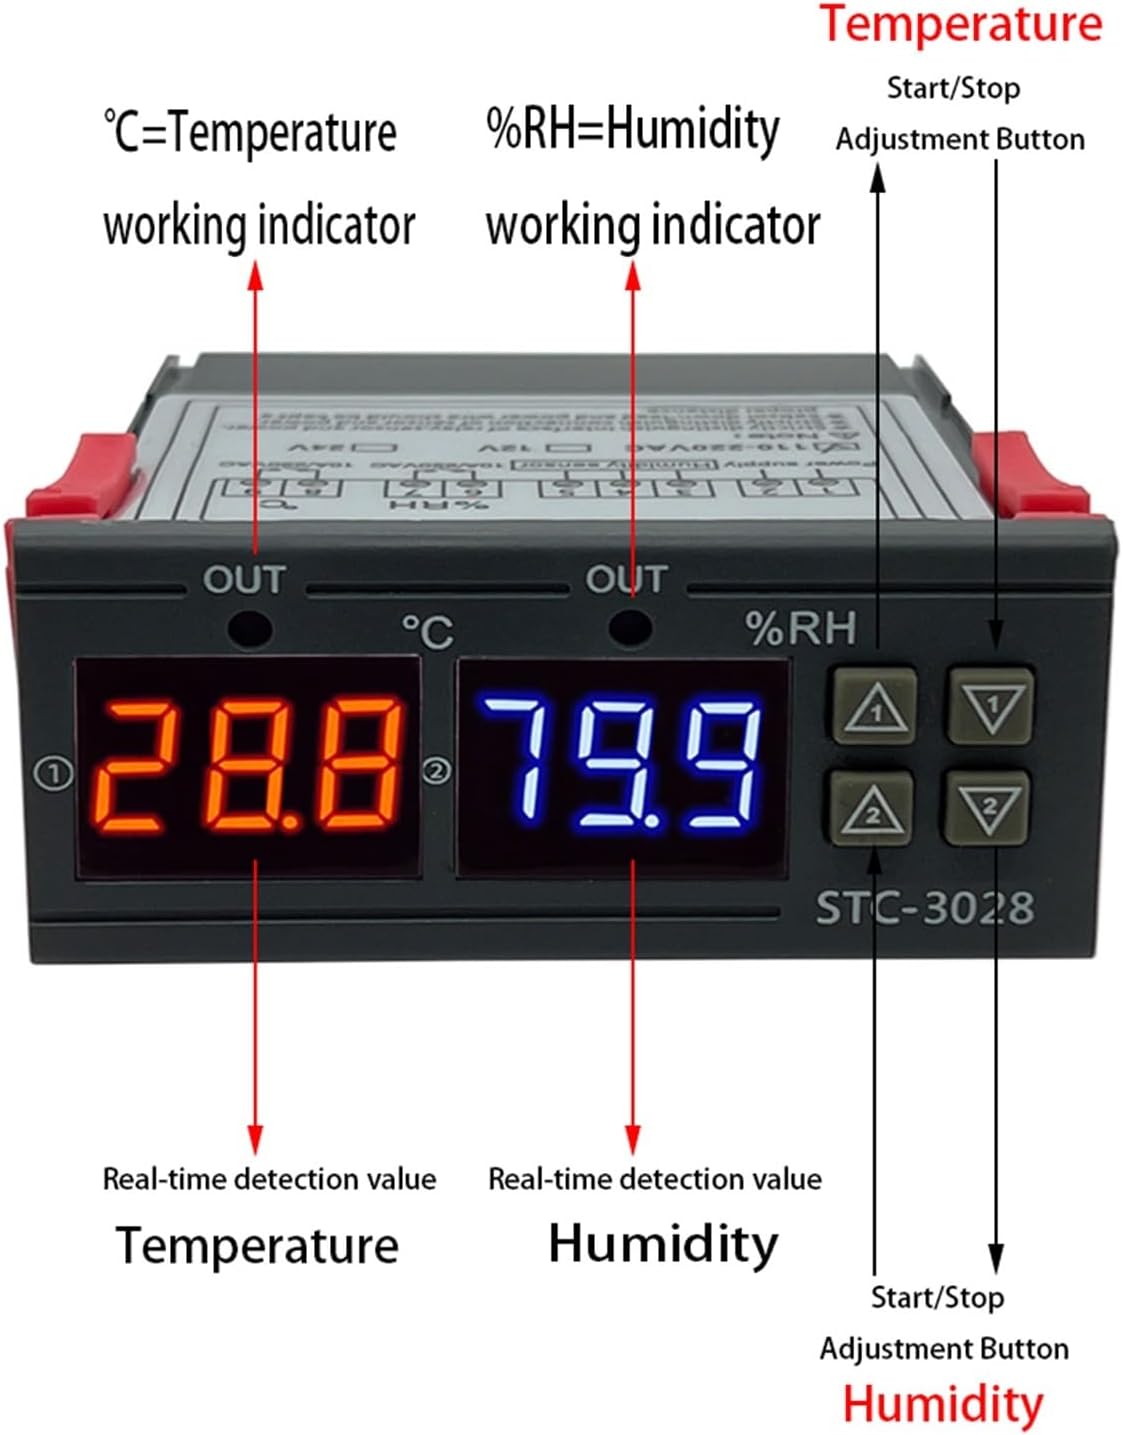
Image 4.1: Back panel of the STC-3028 showing the wiring terminals and diagram. The diagram indicates connections for power supply, sensor, and output loads. Terminals 1 and 2 are for power input (e.g., 12V DC for the DC12V model). Terminals 3 and 4 are for the temperature and humidity sensor. Terminals 5 and 6 are for the temperature control output (e.g., heating or cooling load). Terminals 7 and 8 are for the humidity control output (e.g., humidification or dehumidification load).
Wiring Instructions:
- Power Supply: Connect your power source (AC 110-220V, DC 12V, or DC 24V, depending on your model) to terminals 1 and 2. Ensure correct polarity for DC models.
- Sensor Connection: Connect the combined temperature and humidity sensor to terminals 3 and 4.
- Temperature Control Output: Connect your temperature-controlled device (e.g., heater or cooler) to terminals 5 and 6.
- Humidity Control Output: Connect your humidity-controlled device (e.g., humidifier or dehumidifier) to terminals 7 and 8.
Important Note:
- Strictly distinguish between the interface of the relay sensor and power supply.
- Strictly distinguish between the connection of sensor and power supply.
- The sensor should be kept at a proper distance from the power supply and load wiring to avoid interference.
5. Operating Instructions
The STC-3028 allows you to set desired temperature and humidity ranges for automatic control.
Setting Temperature Parameters:
- Set Start Temperature: Press the 'Temperature Up' button (top right, labeled with an up arrow and '1') once. The display will flash. Use the 'Temperature Up' or 'Temperature Down' (bottom right, labeled with a down arrow and '2') buttons to adjust the desired start temperature. Press the 'Temperature Up' button again to confirm.
- Set Stop Temperature: Press the 'Temperature Down' button once. The display will flash. Use the 'Temperature Up' or 'Temperature Down' buttons to adjust the desired stop temperature. Press the 'Temperature Down' button again to confirm.
Temperature Control Modes:
- If the Start Temperature > Stop Temperature: The controller operates in Refrigeration Mode. The output will activate when the temperature rises above the Start Temperature and deactivate when it drops below the Stop Temperature.
- If the Start Temperature < Stop Temperature: The controller operates in Heating Mode. The output will activate when the temperature drops below the Start Temperature and deactivate when it rises above the Stop Temperature.
Setting Humidity Parameters:
- Set Start Humidity: Press the 'Humidity Up' button (top left, labeled with an up arrow and '1') once. The display will flash. Use the 'Humidity Up' or 'Humidity Down' (bottom left, labeled with a down arrow and '2') buttons to adjust the desired start humidity. Press the 'Humidity Up' button again to confirm.
- Set Stop Humidity: Press the 'Humidity Down' button once. The display will flash. Use the 'Humidity Up' or 'Humidity Down' buttons to adjust the desired stop humidity. Press the 'Humidity Down' button again to confirm.
Humidity Control Modes:
- If the Start Humidity > Stop Humidity: The controller operates in Dehumidification Mode. The output will activate when humidity rises above the Start Humidity and deactivate when it drops below the Stop Humidity.
- If the Start Humidity < Stop Humidity: The controller operates in Humidification Mode. The output will activate when humidity drops below the Start Humidity and deactivate when it rises above the Stop Humidity.
6. Calibration
The STC-3028 allows for calibration of both temperature and humidity readings to ensure accuracy.
Temperature Calibration:
Press and hold both the 'Temperature Up' and 'Temperature Down' buttons simultaneously for 3 seconds. The display will show '0.0'. You can then use the 'Temperature Up' or 'Temperature Down' buttons to adjust the calibration value (increase or decrease). A positive value will increase the displayed temperature, and a negative value will decrease it. Press any other button or wait for a few seconds to save and exit.
Humidity Calibration:
Press and hold both the 'Humidity Up' and 'Humidity Down' buttons simultaneously for 3 seconds. The display will show '0.0'. You can then use the 'Humidity Up' or 'Humidity Down' buttons to adjust the calibration value (increase or decrease). A positive value will increase the displayed humidity, and a negative value will decrease it. Press any other button or wait for a few seconds to save and exit.
7. Restore Factory Settings
To restore the controller to its default factory settings:
After connecting to the power supply, press and hold both the 'Temperature Up' and 'Humidity Up' buttons (the two top buttons) simultaneously. The display will show '888' briefly, then automatically return to the actual temperature interface. This indicates that the settings have been successfully restored.
8. Maintenance
To ensure the longevity and accurate performance of your STC-3028 controller, follow these general maintenance guidelines:
- Cleaning: Gently wipe the unit with a soft, dry cloth. Do not use abrasive cleaners or solvents.
- Sensor Care: Keep the sensor clean and free from dust or debris. Avoid submerging the sensor in liquids unless it is specifically designed for such use.
- Environmental Conditions: Operate the controller within its specified temperature and humidity ranges. Avoid exposure to extreme temperatures, high humidity, or corrosive environments.
- Wiring Inspection: Periodically check all wiring connections to ensure they are secure and free from damage.
9. Troubleshooting
If you encounter issues with your STC-3028, consider the following common troubleshooting steps:
- No Display/Power: Verify that the power supply is correctly connected to terminals 1 and 2 and that the voltage matches the controller's requirements (AC 110-220V, DC 12V, or DC 24V). Check for blown fuses or tripped circuit breakers.
- Inaccurate Readings: Ensure the sensor is clean and properly connected to terminals 3 and 4. Perform a calibration as described in Section 6.
- Output Not Activating: Check your set start and stop parameters to ensure they are configured correctly for the desired heating/cooling or humidification/dehumidification mode. Verify that the load device is properly connected to the output terminals (5-6 for temperature, 7-8 for humidity) and is functional.
- Erratic Behavior: Ensure the sensor and power wiring are kept separate to minimize electrical interference.
- Resetting: If the device behaves unexpectedly, try restoring factory settings as described in Section 7.
If problems persist after attempting these steps, contact customer support for further assistance.
10. Warranty and Support
This product is manufactured by EFUZCOCI. For specific warranty information, please refer to the documentation provided at the time of purchase or contact your retailer. For technical support or inquiries, please reach out to the seller or manufacturer through the contact information provided with your product.


