
Introduction
This manual provides detailed instructions for the operation and maintenance of your Ocean Digital WR-336M Wi-Fi Internet FM Radio. Please read this manual thoroughly before using the device to ensure proper functionality and to maximize your user experience. Keep this manual for future reference.
Safety Information
- Ensure the power adapter voltage matches your local power supply.
- Do not expose the device to rain, moisture, or extreme temperatures.
- Avoid placing the device near heat sources or in direct sunlight.
- Do not open the device casing; refer all servicing to qualified personnel.
- Keep the device away from strong magnetic fields.
- Unplug the device during lightning storms or when unused for extended periods.
Package Contents
Verify that all items are present in the package:
- Ocean Digital WR-336M Internet Radio
- Power Adapter
- Remote Control (batteries not included)
- Owner's Manual (this document)

Image: The product packaging, the radio unit, its power adapter, remote control, and user manual are displayed.
Product Overview
Front Panel
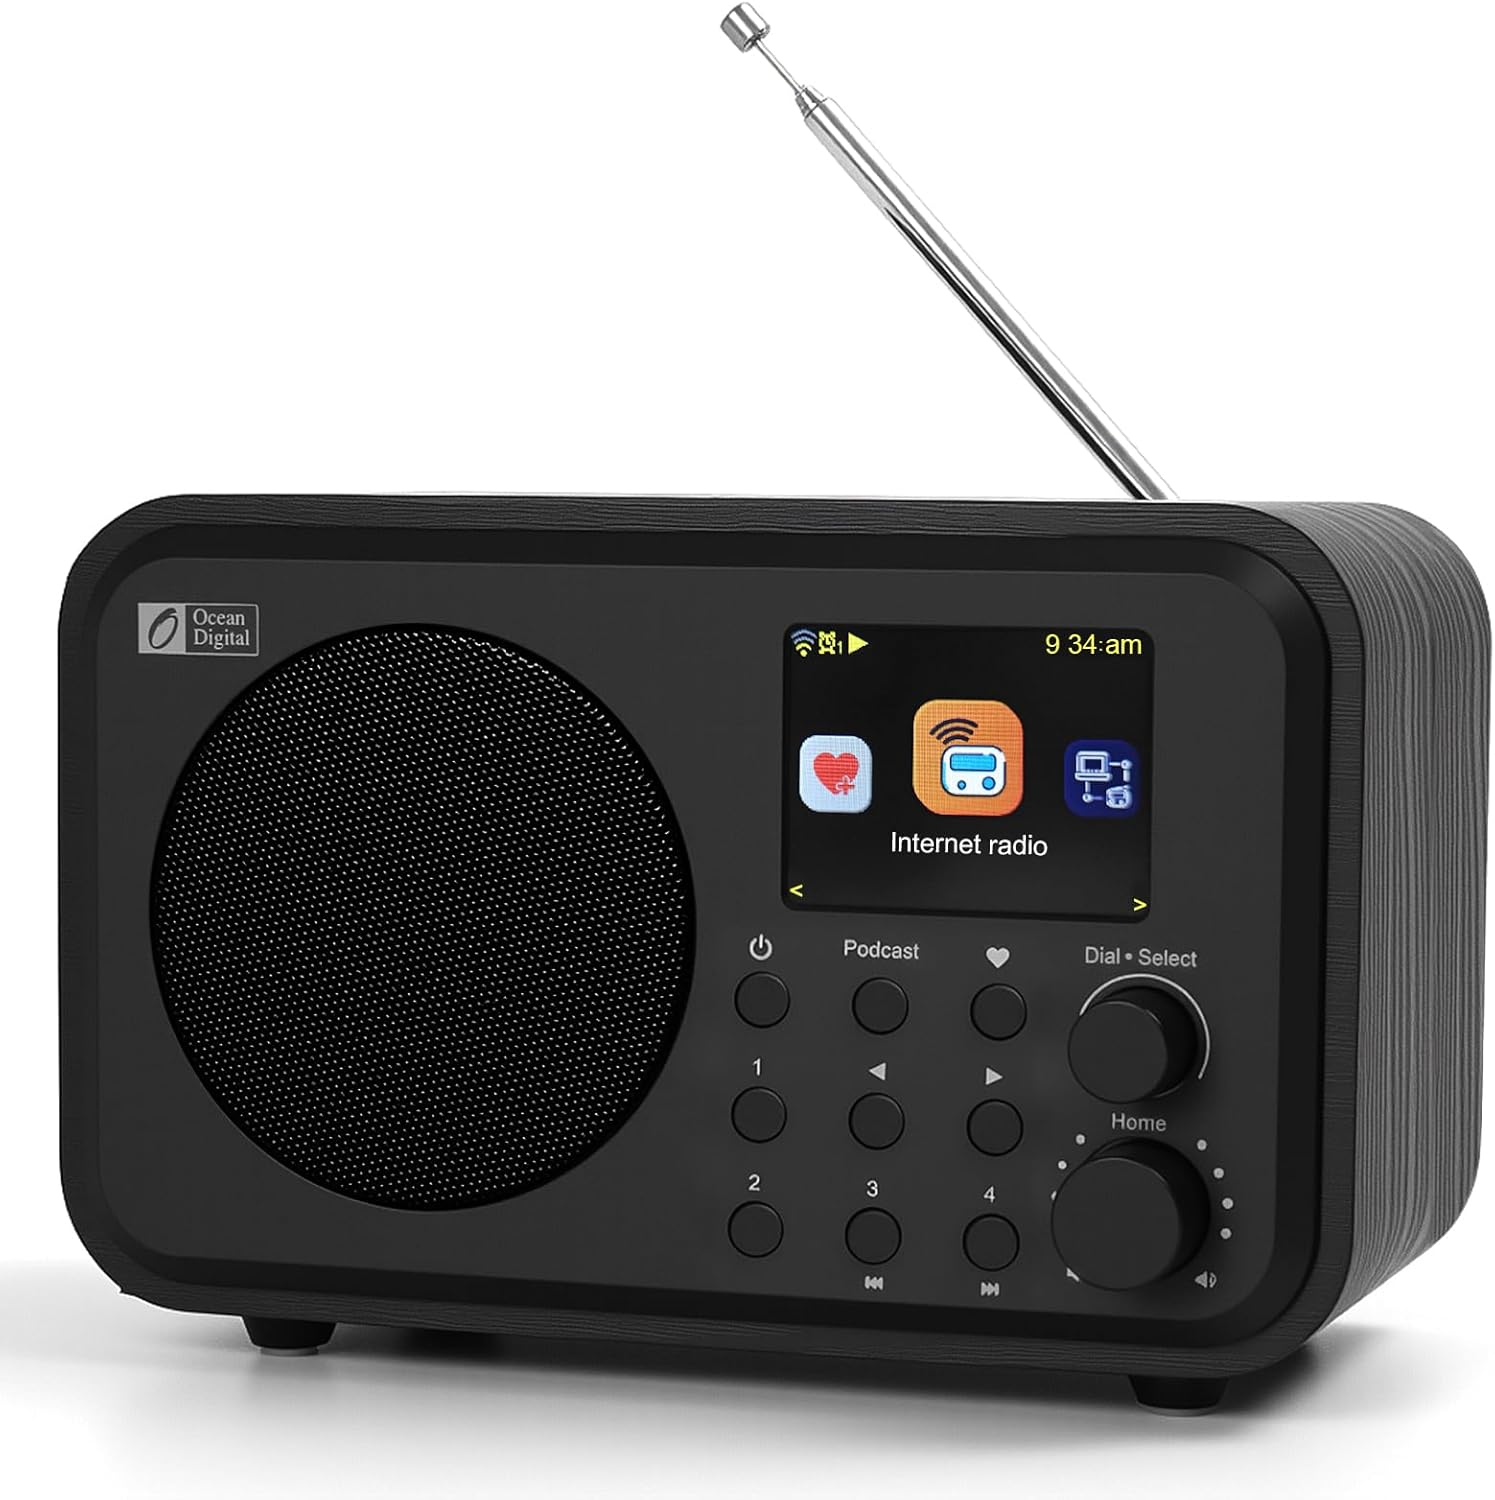
Image: A front-facing view of the Ocean Digital WR-336M radio, showcasing its speaker grille on the left, a 2.4-inch color display on the right, and various control buttons and a dial below the display.
- 2.4" Color Display: Shows station information, time, and menu options.
- Speaker: Integrated audio output.
- Control Buttons: Power, Podcast, Presets (1-4), Navigation (Up/Down/Left/Right), Play/Pause, Home.
- Dial/Select Knob: For menu navigation and volume control.
Rear Panel

Image: The back panel of the Ocean Digital WR-336M radio, featuring a DC 5V power input, a USB playback port, and a 3.5mm headphone output jack. An extendable antenna is also visible.
- DC IN 5V: Power input port.
- USB Playback: Port for connecting a USB flash drive for audio playback.
- Headphone Out (3.5mm): For connecting headphones or external speakers.
- Telescopic Antenna: For FM radio reception.
Setup
1. Power Connection
- Connect the provided power adapter to the "DC IN 5V" port on the rear of the radio.
- Plug the power adapter into a standard wall outlet.
- The radio will power on automatically or can be turned on using the Power button.
2. Initial Setup (First Use)
Upon first power-on, the radio will guide you through initial setup steps:
- Language Selection: Use the Dial/Select knob to choose your preferred language and press the knob to confirm.
- Time/Date Setting: Set the current time and date. The radio can synchronize time via the internet once connected.
- Network Configuration:
- Select "Wi-Fi Network" from the menu.
- The radio will scan for available Wi-Fi networks.
- Select your network from the list.
- Enter your Wi-Fi password using the on-screen keyboard and the Dial/Select knob for navigation and selection. Press "OK" to confirm.
- Once connected, the Wi-Fi icon will appear on the display.
Note: A stable Wi-Fi connection is required for Internet Radio and Podcast functions.
Operating Instructions
1. Internet Radio
Access thousands of internet radio stations worldwide.
- From the main menu, select "Internet Radio".
- You can browse stations by "Genre", "Region", or use the "Search" function to find specific stations.
- Use the Dial/Select knob to navigate and select a station.

Image: The radio's display showing the "Internet Radio" option, surrounded by icons representing other features like FM Radio, Bluetooth, Alarm Clock, Podcast, and Sleep Timer.
2. FM Radio
Listen to local FM broadcasts.
- Extend the telescopic antenna on the rear of the unit for optimal reception.
- From the main menu, select "FM Radio".
- The radio will automatically scan for available FM stations.
- Use the Dial/Select knob to tune to a station.
3. Bluetooth Mode
Connect your smartphone or other Bluetooth-enabled device to play audio through the radio's speaker.
- From the main menu, select "Bluetooth".
- The radio will enter pairing mode and become discoverable.
- On your external device, search for Bluetooth devices and select "WR-336M" to pair.
- Once connected, you can play audio from your device through the radio.
4. USB Playback
Play audio files directly from a USB flash drive.
- Insert a USB flash drive containing audio files into the "USB Playback" port on the rear of the radio.
- From the main menu, select "USB".
- Browse your files and folders using the navigation buttons or Dial/Select knob.
- Select an audio file to begin playback.
5. Podcast
Discover and listen to podcasts.
- From the main menu, select "Podcast" or press the dedicated "Podcast" button.
- You can "Browse" by category, "Search" for specific podcasts, or access "History" and "Subscribed" lists.
- Select a podcast and then an episode to play.

Image: The radio's display showing the "Podcasts" menu, with options such as "Listen again", "History", "Browse", and "Search" highlighted.
6. Dual Alarm Clock
Set up to two independent alarms.
- Access the "Alarm" settings from the main menu.
- Select "Alarm 1" or "Alarm 2".
- Configure the alarm time, source (buzzer, internet radio, FM radio), volume, and repeat frequency (daily, weekdays, weekends, once).
- Ensure the alarm is enabled.

Image: The Ocean Digital WR-336M radio placed on a bedside table, with its display showing alarm settings. A person is sleeping in the background, indicating the alarm clock function.
7. Sleep Timer
Set a timer for the radio to automatically turn off.
- Access the "Sleep Timer" settings from the main menu.
- Select the desired duration (e.g., 15, 30, 60 minutes).
- The radio will play for the set duration and then power off.
8. Dimmer
Adjust the display brightness.
- Access "Dimmer" settings from the main menu or system settings.
- Adjust the brightness level for both active and standby modes.
9. Presets
Save your favorite stations for quick access.
- Saving a Preset: While listening to a station, press and hold one of the numbered preset buttons (1-4) until "Preset Saved" appears. For additional presets (up to 150), navigate to "My Favorite" in the menu and select "Add Current Station".
- Recalling a Preset: Briefly press the corresponding numbered preset button (1-4). For other saved stations, navigate to "My Favorite" and select from the list.
Maintenance
- Cleaning: Use a soft, dry cloth to clean the exterior of the radio. Do not use abrasive cleaners or solvents.
- Antenna: Handle the telescopic antenna carefully to avoid damage.
- Storage: If storing for an extended period, unplug the power adapter and store the radio in a cool, dry place.
Troubleshooting
| Problem | Possible Cause | Solution |
|---|---|---|
| No power | Power adapter not connected or faulty outlet. | Ensure the power adapter is securely connected and the outlet is functional. |
| Cannot connect to Wi-Fi | Incorrect password, out of range, or network issue. | Verify Wi-Fi password, move radio closer to router, restart router, or check network settings. |
| Internet radio buffering or cutting out | Weak Wi-Fi signal or slow internet connection. | Improve Wi-Fi signal strength, reduce network congestion, or check internet speed. |
| Poor FM reception | Antenna not extended or interference. | Fully extend and adjust the telescopic antenna. Move the radio away from electronic devices that may cause interference. |
| No sound | Volume too low, mute activated, or headphone connected. | Increase volume, check if mute is active, or disconnect headphones if using the internal speaker. |
| Remote control not working | Batteries depleted or incorrect orientation. | Replace remote control batteries (2x AAA, not included). Ensure correct polarity. |
Specifications
- Model: WR-336M
- Dimensions (L x W x H): 7.28 x 3.94 x 4.49 inches (18.5 x 10 x 11.4 cm)
- Weight: 1.78 pounds (0.81 kg)
- Power Source: Corded Electric (DC 5V)
- Connectivity: Wi-Fi (2.4 GHz), Bluetooth, USB Playback
- Display: 2.4-inch Color Display
- Audio Output: Integrated Speaker, 3.5mm Headphone Jack
- Radio Bands: Internet Radio, FM Radio
- Additional Features: Dual Alarm Clock, Sleep Timer, Kitchen Timer, Dimmer, Podcast Player
- Remote Control Batteries: 2x AAA (not included)
Warranty and Support
For warranty information and technical support, please refer to the official Ocean Digital website or contact their customer service directly. Details are typically provided on the product packaging or a separate warranty card.
Manufacturer: Ocean Digital
Website: www.oceandigital.com (Note: This is a placeholder URL, please refer to your product documentation for the correct support website.)


