
1. Introduction
This manual provides essential information for the installation, operation, and maintenance of your A-Tech 16GB (2x8GB) DDR5 5600MHz PC5-44800 DIMM memory upgrade kit. This memory kit is specifically designed for compatibility with ASUS S5 Mini Tower S503MER and S500MER desktop systems. Please read these instructions carefully before proceeding with installation.
2. Product Overview
The A-Tech 16GB Kit consists of two 8GB DDR5 DIMM modules, operating at a speed of 5600MHz (PC5-44800). These modules are Non-ECC Unbuffered (UDIMM) and adhere to the JEDEC DDR5 standard of 1.1V. This memory upgrade is designed to enhance system speed, performance, and reduce bottlenecks by increasing available RAM resources.

Figure 1: A-Tech 16GB DDR5 RAM Kit (2x8GB) in its retail packaging.

Figure 2: Two individual A-Tech 8GB DDR5 RAM modules.

Figure 3: Next-generation DDR5 memory offers improved stability, efficiency, and bandwidth.
3. Setup and Installation
Installation of A-Tech memory modules is designed to be a simple plug-and-play process. However, it is crucial to refer to your specific system's manual (ASUS S5 Mini Tower S503MER or S500MER) for correct memory seating and channel guidelines. Incorrect installation can lead to system instability or failure to boot.
Safety Precautions:
- Always power off your computer and unplug it from the power source before opening the case.
- Discharge any static electricity from your body by touching a grounded metal object (e.g., the computer's metal chassis) before handling memory modules.
- Handle memory modules by their edges, avoiding contact with the gold connectors or the chips.
Installation Steps:
- Prepare Your System: Power down your ASUS S5 Mini Tower desktop and disconnect all cables, especially the power cord.
- Open the Case: Carefully open your computer's case to access the motherboard and RAM slots. Consult your ASUS S5 manual for specific instructions on opening the case.
- Locate RAM Slots: Identify the available DDR5 DIMM slots on your motherboard. Your system manual will indicate the recommended slots for dual-channel configuration.
- Release Existing Modules (if applicable): If you are replacing existing RAM, gently push the small clips on both ends of the DIMM slot outwards to release the module. Remove the old module.
- Install New Modules: Align the notch on the A-Tech DDR5 module with the key in the DIMM slot. Ensure the clips on the slot are open. Firmly and evenly press down on both ends of the memory module until the clips snap into place, securing the module.
- Close the Case: Once both modules are securely installed, close your computer's case and reconnect all cables.
- Power On: Power on your computer. The system should automatically detect the new memory. You may need to enter the BIOS/UEFI setup to verify the new RAM capacity and speed.

Figure 4: A-Tech memory is designed for desktop computers. Always verify compatibility with your system's manual.
4. Operating
Once installed, the A-Tech DDR5 RAM operates passively within your system. The operating system and applications will automatically utilize the increased memory capacity. No specific user interaction is required for the RAM to function. The primary benefit will be observed through improved multitasking, faster application loading, and overall system responsiveness.

Figure 5: Upgrading with A-Tech memory can reduce bottlenecks and speed up data processing.
5. Maintenance
A-Tech DDR5 memory modules are designed for long-term reliability and require minimal maintenance. To ensure optimal performance and longevity:
- Keep System Clean: Regularly clean the interior of your computer case to prevent dust buildup, which can impede airflow and lead to overheating.
- Avoid Physical Damage: Do not bend or apply excessive force to the memory modules.
- Static Electricity: Always take anti-static precautions when handling memory modules.
6. Troubleshooting
If you encounter issues after installing your A-Tech memory, consider the following troubleshooting steps:
- System Not Booting:
- Ensure the memory modules are fully seated in their slots and the clips are locked.
- Verify that the modules are installed in the correct slots as per your motherboard's manual for dual-channel operation.
- Try installing only one module at a time to identify if a specific module is faulty.
- Incorrect Memory Capacity Detected:
- Check your system's BIOS/UEFI settings to confirm the detected RAM amount.
- Ensure your operating system is 64-bit to fully utilize 16GB of RAM.
- Update your motherboard's BIOS/UEFI to the latest version, as this can improve memory compatibility.
- System Instability or Crashes:
- Run a memory diagnostic tool (e.g., Windows Memory Diagnostic) to check for errors.
- Ensure your system's power supply unit (PSU) is adequate for all components, including the new RAM.
If issues persist, please contact A-Tech support for further assistance.
7. Specifications
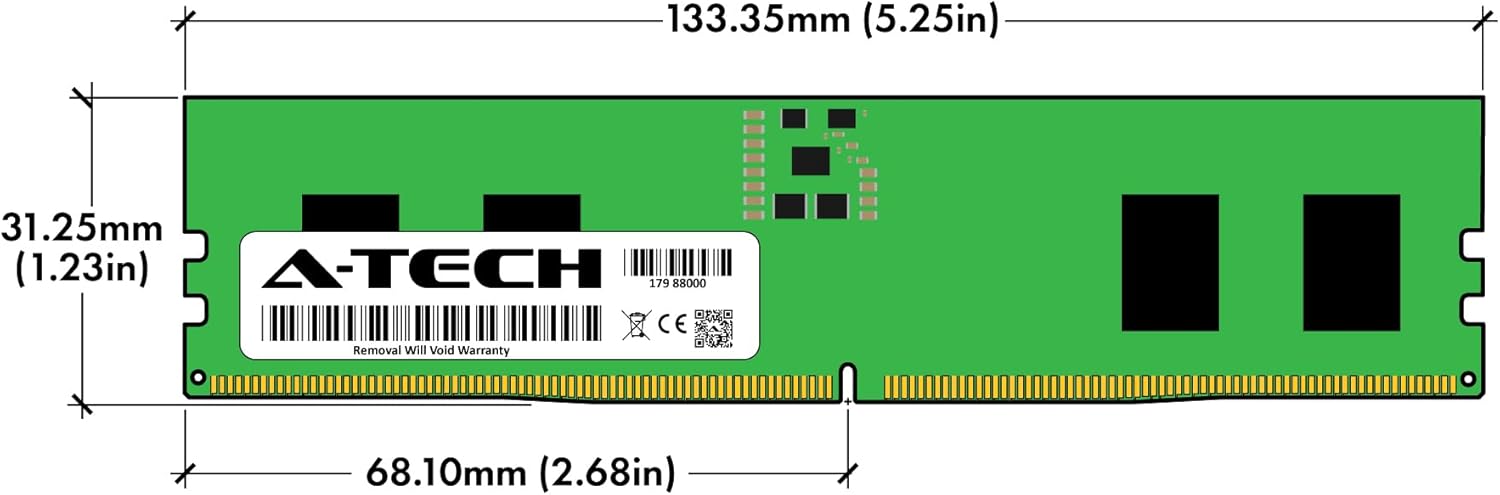
Figure 6: Physical dimensions of an A-Tech DDR5 RAM module.
| Feature | Detail |
|---|---|
| RAM Capacity | 16 GB (2 x 8GB Modules) |
| RAM Type | DDR5 DIMM |
| Memory Speed | 5600 MHz (PC5-44800) |
| Voltage | 1.1 Volts |
| Pin Count | 288-Pin |
| Error Correction | Non-ECC Unbuffered (UDIMM) |
| Compatible Devices | ASUS S5 Mini Tower S503MER, S500MER Desktop |
| Item Dimensions (LxWxH) | 5.25 x 1.23 x 0.15 inches (133.35 x 31.25 x 3.81 mm) |
| Item Weight | 1.6 ounces (approx. 45 grams) |
8. Warranty and Support
All A-Tech memory modules undergo stringent quality control testing to ensure dependable and reliable performance. A-Tech products are covered with a Limited Lifetime Warranty. For support or warranty claims, please visit the A-Tech website or contact their support team.
For additional information and support, you may visit: atechmemory.com/pages/qr

Figure 7: A-Tech memory modules undergo extensive quality control testing for reliable performance.

