1. Introduction
This manual provides detailed instructions for the installation, operation, and maintenance of your Sinjet H10 Rear View Mirror Camera System. This system is designed to enhance driving safety and convenience by providing clear front and rear views, recording capabilities, and smart features.
The Sinjet H10 features a 9.2-inch IPS touchscreen with a 60FPS refresh rate, FHD 1080P front and rear cameras, and digital signal transmission for stable performance. It includes advanced functionalities such as night vision, time-lapse recording, collision locking, and smart voltage protection.
2. Package Contents
Please verify that all items listed below are included in your package:
- Sinjet H10 Rear View Mirror Screen (with built-in voltage protection)
- Detached Front Camera
- Rear Camera (IP67 waterproof)
- Mounting Type-179 Bracket
- Power Cable
- Rear Camera Cable Set
- 64GB Memory Card
- User Manual

Image 2.1: All components included in the Sinjet H10 package.
3. Product Overview
The Sinjet H10 integrates a high-resolution display and dual cameras into a sleek rear view mirror design. The front camera is detached for flexible placement, while the rear camera is waterproof for external mounting.
Key Features:
- 9.2-inch IPS Touchscreen: 60FPS refresh rate, 3000 NIT peak brightness for clear visibility in various lighting conditions.
- Dual FHD 1080P Cameras: Front (108°) and Rear (100°) cameras for comprehensive coverage.
- Sony IMX 462 Rear Camera Sensor: Provides sharp, detailed footage and reduced glare in low-light conditions.
- Digital Signal Transmission: FAKRA coaxial cable ensures stable, interference-free video.
- IP68 Waterproof Rear Camera: Reliable performance in all weather conditions.
- Smart Voltage Protection: Prevents battery drain and enables continuous parking monitoring.
- Time-Lapse Recording: Records at 1 frame per second to save storage and capture extended periods.
- Collision Locking (G-Sensor): Automatically locks crucial footage during impacts.
- Loop Recording: Overwrites older files when the memory card is full.
- Built-in WiFi (H6 and H10 models): Allows real-time viewing and management of recorded videos via smartphone.
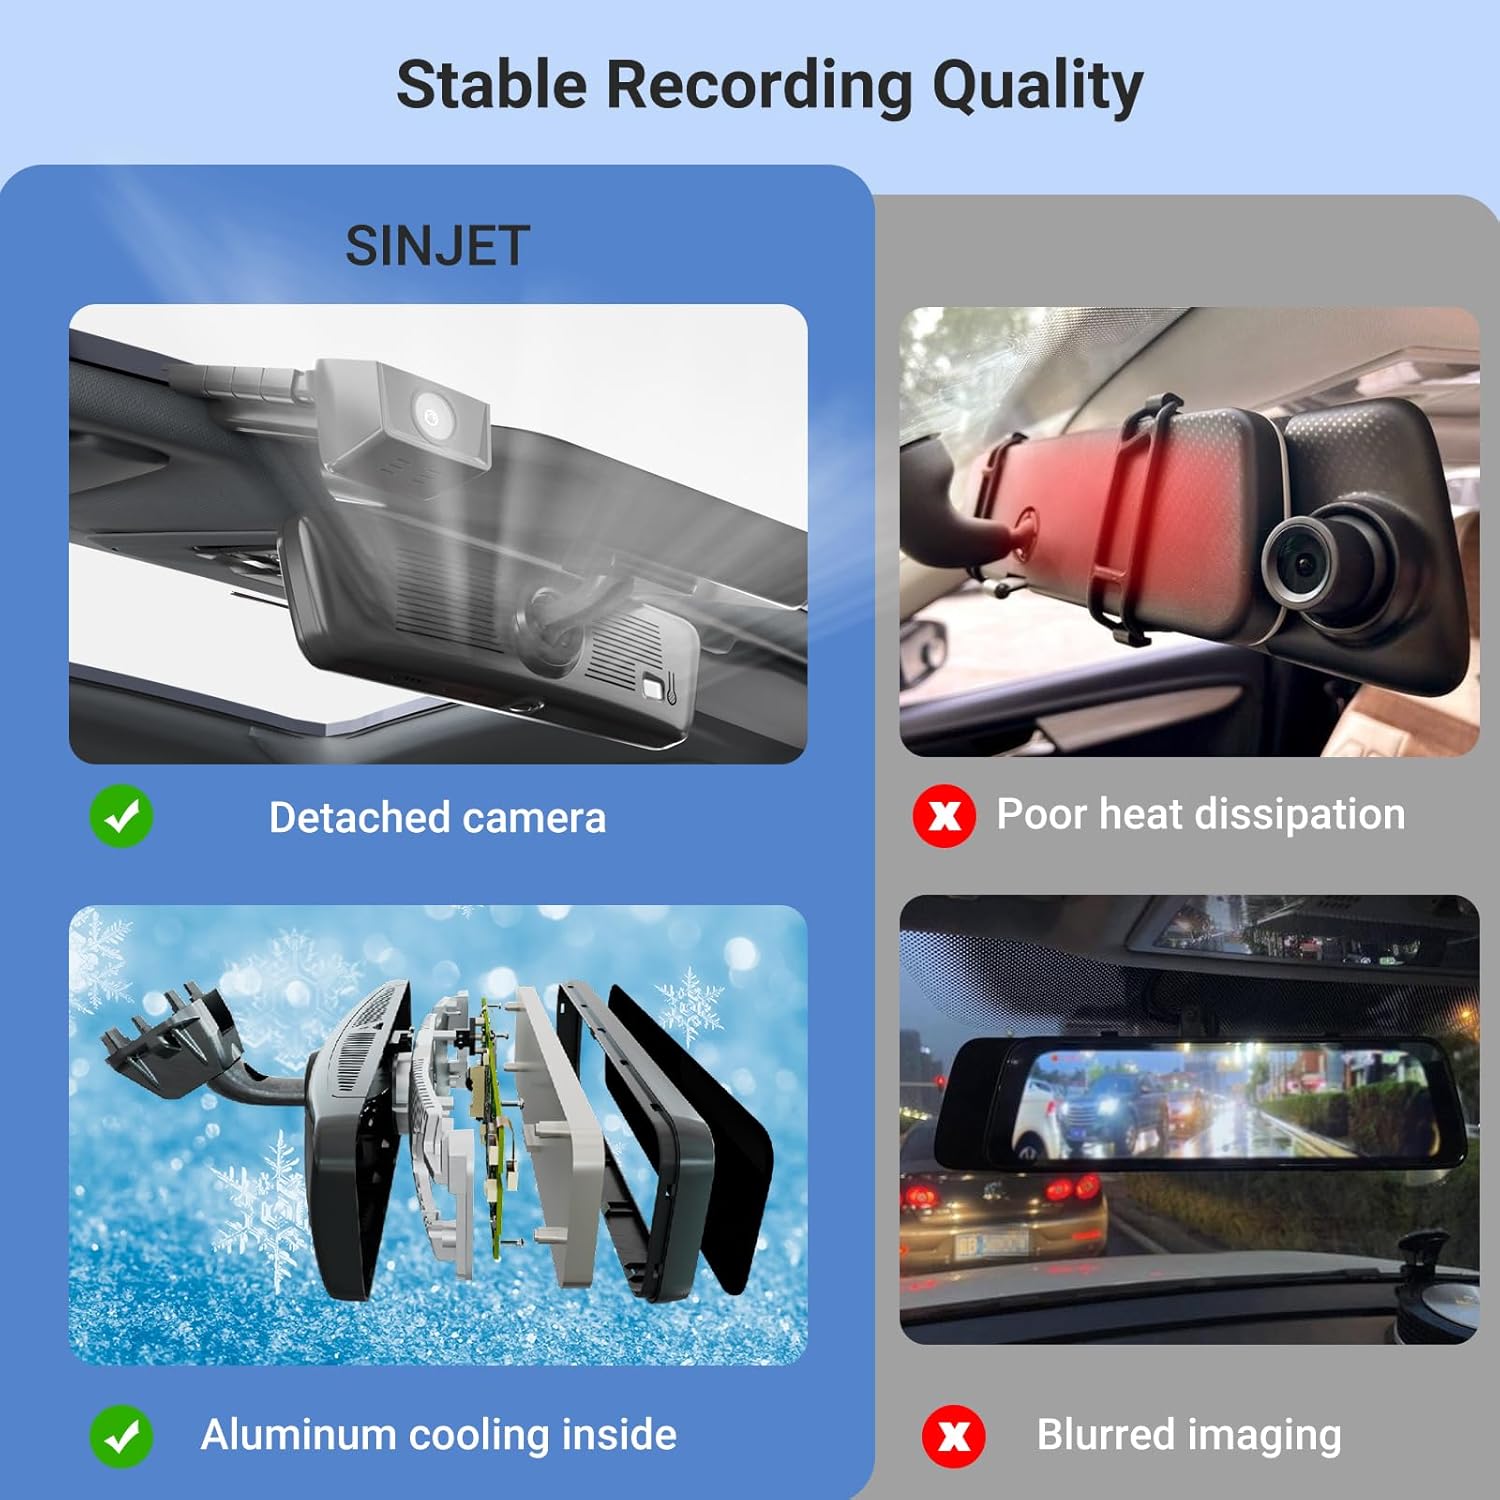
Image 3.1: Illustration of stable recording quality features, including detached camera design and internal aluminum cooling for heat dissipation.

Image 3.2: Visual comparison demonstrating the smooth, low-latency visuals provided by the 60 FPS refresh rate.

Image 3.3: Details on the Super Night Vision capabilities, highlighting the Sony IMX 462 CMOS sensor and IP68 waterproof rear camera.

Image 3.4: Examples of the camera's performance in challenging conditions, including clear low-light visibility, anti-fog, and glare reduction from headlights.
4. Installation Guide
The Sinjet H10 is designed for a drill-free installation, replacing your existing rear view mirror. Ensure your vehicle is compatible with the Type-179 bracket or obtain the correct bracket for your specific model.
4.1. Mirror Installation
- Carefully remove your vehicle's original rear view mirror.
- Attach the provided Type-179 mounting bracket to the Sinjet H10 mirror unit.
- Install the Sinjet H10 mirror unit onto your vehicle's windshield mount.
4.2. Camera Installation
- Mount the detached front camera to your windshield using the adhesive pad, ensuring a clear view of the road.
- Mount the rear camera (IP68 waterproof) at the rear of your vehicle, typically above the license plate, ensuring a clear view.
4.3. Wiring
Connect the power cable and rear camera cable to the main mirror unit. Route the cables discreetly along the vehicle's headliner and A-pillars to the fuse box and rear of the vehicle, respectively. Use the provided trim tool to tuck wires neatly.
The power supply connects to the vehicle's ACC circuit to prevent battery drain and enable continuous parking monitoring. The system includes connectors that plug into the fuse box, eliminating the need to splice or cut wires.

Image 4.1: Components for mirror installation, including the OEM bracket and removable cable compartment.

Image 4.2: Diagram illustrating the flexible power supply connection points for the mirror monitor, front camera, and rear camera to the vehicle's fuse box (BAT+ and GND ACC).
4.4. Installation Video Guide
For a visual walkthrough of the unboxing and installation process, please refer to the video below:
Video 4.3: Unboxing and installation guide for the Sinjet H10 Rear View Mirror Camera System.
5. Operating Instructions
The Sinjet H10 features an intuitive touchscreen interface for easy control.
5.1. Power On/Off
The system typically powers on automatically with the vehicle's ignition. To manually power on/off, use the power button located on the top of the mirror unit.
5.2. Screen Display & View Switching
- Default View: The screen displays the rear camera view by default.
- Switching Views: Swipe left or right on the touchscreen to switch between front view, rear view, or a split-screen display showing both.
- Mirror Mode: When the screen is off, the unit functions as a standard rear view mirror.
5.3. Recording Functions
- Start/Stop Recording: Tap the record icon on the screen to manually start or stop recording.
- Loop Recording: Videos are recorded in segments (e.g., 3 minutes). When the memory card is full, the oldest unlocked files are overwritten.
- G-Sensor (Collision Locking): In the event of a sudden impact or collision, the built-in G-sensor automatically detects the event and locks the current recording segment to prevent it from being overwritten.
- Time-Lapse Recording: This feature records at 1 frame per second, ideal for extended parking monitoring to save storage space.
5.4. Settings & Playback
- Access Settings: Swipe down or tap the settings icon to access the menu.
- Recorder Settings: Adjust loop recording duration, auto-switch to rear view, sound recording, and time-lapse video duration.
- General Settings: Configure screen clock, beep sound, volume, auto screen off, gravity sensing sensitivity, front camera settings, date and time, date/time format, factory reset, and format TF-Card.
- Playback: Access recorded files (Normal, Emergency, Photo, Rear View) directly from the device.
5.5. WiFi Connectivity
For H6 and H10 models, built-in WiFi allows you to connect your smartphone to the device. This enables real-time viewing of live footage and convenient downloading/management of recorded videos without removing the SD card.

Image 5.1: Illustration of the high-speed WiFi feature for quick video downloads to a smartphone.
Video 5.2: Short demonstration of the Sinjet H10's display effect during rainy conditions, showcasing its clarity.
6. Maintenance
6.1. Cleaning
- Screen: Use a soft, lint-free cloth to gently wipe the touchscreen. Avoid abrasive materials or harsh chemicals.
- Camera Lenses: Keep the front and rear camera lenses clean for optimal video quality. Use a lens cleaning solution and a microfiber cloth.
6.2. SD Card Management
- Formatting: Regularly format the SD card (e.g., once a month) through the device settings to ensure optimal performance and prevent data corruption.
- Capacity: The system supports 32GB-128GB memory cards. A 64GB card is included.
7. Troubleshooting
If you encounter issues with your Sinjet H10, please refer to the following common solutions:
- Device Not Powering On: Check all power connections, especially the fuse box connection. Ensure the vehicle's ignition is on.
- Recording Issues: Ensure the SD card is properly inserted and formatted. Check if loop recording is enabled. If the card is full, format it.
- Poor Video Quality: Clean the camera lenses. Ensure the cameras are securely mounted and not obstructed. Check settings for resolution.
- Screen Not Responding: Try restarting the device using the power button. If unresponsive, use the reset button on the back of the mirror unit.
- Rear Camera Not Displaying: Check the rear camera cable connection. Ensure the rear camera is not damaged.
- Factory Reset: If persistent issues occur, perform a factory reset through the device settings. This will revert all settings to their default values.
8. Technical Specifications
| Feature | Specification |
|---|---|
| Product Dimensions | 13 x 7 x 4 inches |
| Item Weight | 2.6 pounds |
| Model Number | H10 |
| Screen Size | 9.2 inches |
| Screen Type | IPS Touchscreen |
| Refresh Rate | 60 FPS |
| Screen Brightness | Up to 3000 NIT (peak brightness) |
| Front Camera Resolution | FHD 1080P |
| Rear Camera Resolution | FHD 1080P |
| Rear Camera Sensor | Sony IMX 462 |
| Front Camera View Angle | 108° |
| Rear Camera View Angle | 100° |
| Rear Camera Waterproof Rating | IP68 |
| Connectivity Technologies | Powerline, Wireless (for WiFi) |
| Special Features | Built-In Display, G-Sensor, Loop Recording, Parking Monitor, Time-Lapse Recording, Dual Camera, Night Vision, Touch Screen, Smart Voltage Protection, Expandable Memory (32GB-128GB), Split Design |
| Included Memory Card | 64GB |
| Color | Black |
9. Safety Information
- Always ensure the device is securely mounted and does not obstruct your view of the road.
- Do not attempt to disassemble or modify the device, as this may void the warranty and cause damage.
- Keep cables clear of moving parts and heat sources within the vehicle.
- Operate the touchscreen only when it is safe to do so, preferably when the vehicle is stationary.
10. Warranty and Support
For specific warranty information, please refer to the documentation provided with your purchase or contact the seller directly. Sinjet products are designed for quality and reliability.
If you require technical assistance or have questions regarding your Sinjet H10, please contact Sinjet customer support through the retailer where the product was purchased or visit the official Sinjet store for contact details.


