
1. Introduction
This manual provides comprehensive instructions for the safe and efficient operation of your TEKCOPLUS TK501PLUS 18-Egg Incubator. This device is designed to facilitate the hatching of various poultry eggs, including chicken, duck, goose, and quail, through precise control of temperature, humidity, and automatic egg turning. Please read this manual thoroughly before initial use and retain it for future reference.

Image 1.1: The TEKCOPLUS TK501PLUS 18-Egg Incubator, showcasing its transparent dome, control panel, and capacity for eggs, with two water bottles attached for humidity control.
2. Safety Instructions
- Always connect the incubator to a grounded power outlet.
- Do not immerse the main unit (top cover with electronics) in water or other liquids.
- Ensure the power cord is not damaged or pinched.
- Keep the incubator away from direct sunlight, drafts, and extreme temperature fluctuations.
- Supervise children and pets around the incubator.
- Unplug the incubator before cleaning or performing any maintenance.
- Use only the provided power adapter.
3. Package Contents
Verify that all components listed below are present in your package:
- 1 x TEKCOPLUS TK501PLUS Egg Incubator (main unit)
- 1 x Power Supply (AC Adapter and Power Cord)
- 1 x English Instruction Manual
- 1 x Cleaning Brush
- 2 x Water Bottles
- 2 x Egg Trays (one for large eggs, one for small eggs)

Image 3.1: All items included in the TEKCOPLUS TK501PLUS Egg Incubator package, laid out next to the main incubator unit.
4. Product Overview and Components
Familiarize yourself with the various parts of your incubator for proper assembly and operation.

Image 4.1: An exploded diagram illustrating the individual components of the incubator, including the top cover, gears, transparent cover, egg trays, grid, base, water bottles, and adaptor.
- Top Cover: Contains the control panel, heating element, fan, and motor for egg turning.
- Small Gear & Big Gear: Part of the automatic egg turning mechanism.
- Ventilation Switch: Allows adjustment of airflow.
- Transparent Cover: Provides visibility into the incubation chamber.
- Egg Tray: Two interchangeable trays for different egg sizes.
- Grid: Supports the egg trays and provides a surface for hatching.
- Base: The bottom section of the incubator, housing water channels.
- Water Bottle & Adaptor: Used for external water replenishment to maintain humidity.
5. Setup
- Unpack and Inspect: Carefully remove all components from the packaging and inspect for any damage.
- Assemble Gears: For first-time use, install the small gear onto the shaft extending from the top cover. Then, install the big gear onto the small gear, ensuring it aligns with the motor shaft.
- Place Grid and Egg Tray: Place the grid into the base, then select the appropriate egg tray (for 8 large eggs or 18 chicken eggs) and place it on top of the grid.
- Attach Water Bottles: Fill the provided water bottles with distilled water and attach them to the adaptors on the side of the base. Ensure they are securely fitted to prevent leaks.
- Connect Power: Connect the power adapter to the incubator and then plug it into a suitable electrical outlet. The incubator will power on and display current temperature and humidity.
- Pre-heat: Allow the incubator to run for at least 2-3 hours to stabilize the internal temperature and humidity before placing eggs inside.
6. Operation
6.1 Temperature Control
The incubator features a smart temperature control system with a precision of ±1°F. The recommended operating temperature range is 97°F to 103.5°F.
- Setting Temperature: Use the control panel buttons (usually '+' and '-') to adjust the desired temperature. Refer to the specific instructions on the control panel for detailed steps.
- Temperature Alarm: The incubator is equipped with an auto-alarm that triggers and blinks if the temperature deviates more than ±2°F / ±1°C from the set point.
6.2 Humidity Control
Maintaining proper humidity is crucial for successful hatching. The incubator allows for external water replenishment.
- Adding Water: Fill the external water bottles with distilled water. The water will automatically be drawn into the internal channels to maintain humidity.
- Humidity Alarm: A humidity alarm activates if levels drop below 40% after 2 hours of use. Ensure water bottles are filled to prevent this.
- Adjusting Humidity: Depending on the incubation stage, you may need to adjust humidity. This is primarily done by ensuring the water channels are adequately filled.

Image 6.2.1: Illustration of the incubator's temperature and humidity alarm system, which alerts users to significant deviations from set parameters.
6.3 Automatic Egg Turning
The incubator features a motorized turning system to mimic natural hen behavior, promoting healthy embryo development.
- Turning Intervals: Selectable intervals of 60, 90, or 120 minutes are available. Refer to the control panel for setting this feature.
- Observation: The transparent cover allows for observation of the egg turning process.

Image 6.3.1: The incubator's transparent design allows for a 360-degree view of the eggs as they are automatically turned at set intervals (60, 120, or 180 minutes).
6.4 Egg Candling
The built-in candler light allows you to monitor embryo development.
- Using the Candler: Place an egg over the candler light on the top cover to illuminate the egg and observe the embryo's growth.
- Identifying Non-Developing Eggs: Look for signs such as small cracks, moving air bubbles (indicating detachment), unfertilized eggs (clear), or dead embryos (dark spots/rings).
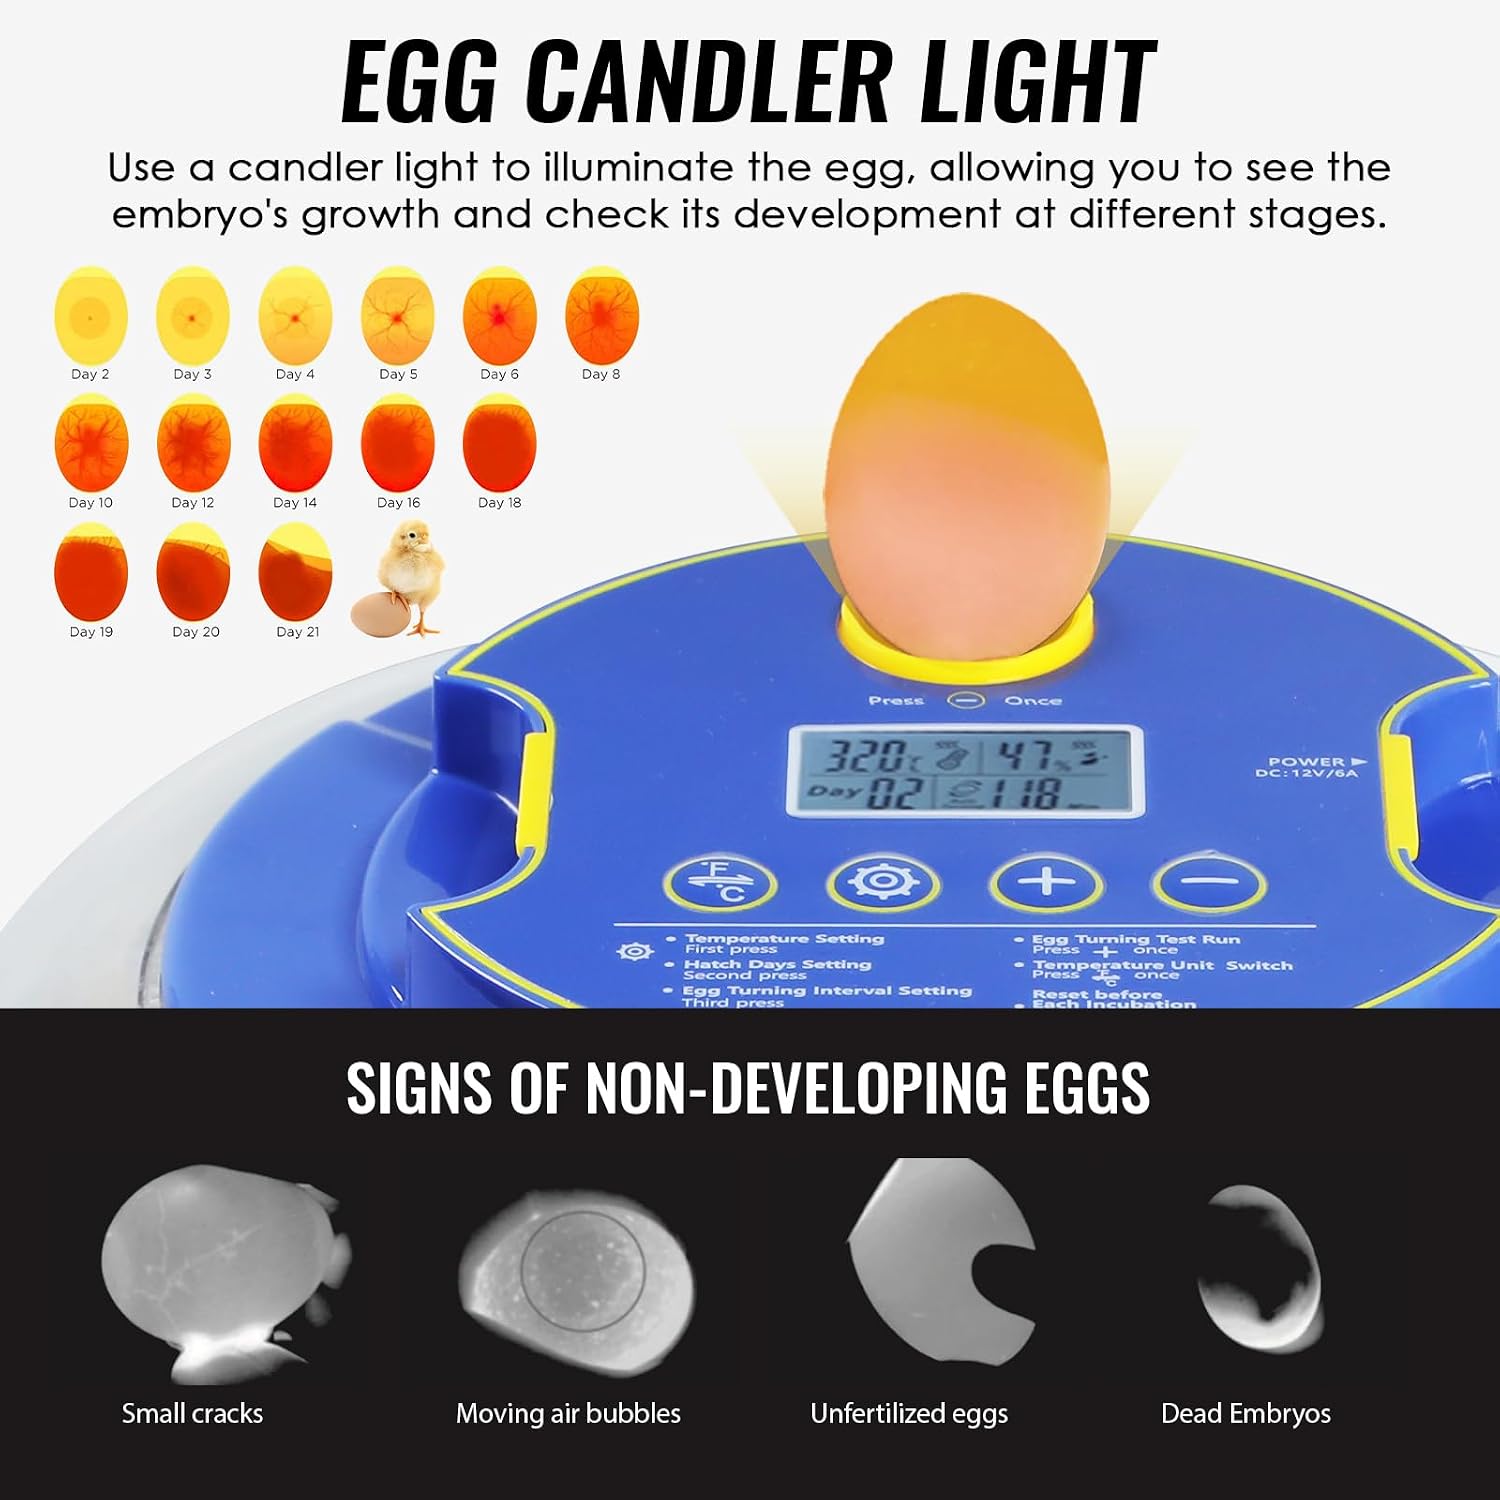
Image 6.4.1: The integrated egg candler light helps users observe embryo development and identify non-developing eggs, with visual examples of different stages and issues.
6.5 Egg Capacity and Types
The incubator includes two different egg trays to accommodate various egg sizes.
- Large Egg Tray: Designed for 8 large fertilized eggs, such as duck, turkey, or goose eggs.
- Small Egg Tray: Designed for 18 chicken eggs.
- Important Note: Only one egg tray can be used in the incubator at a time.

Image 6.5.1: Visual representation of the two included egg trays, illustrating their capacity for 8 large eggs (duck, turkey, goose) or 18 chicken eggs.
7. Maintenance and Cleaning
Regular cleaning ensures optimal performance and hygiene for your incubator.

Image 7.1: A guide distinguishing between washable and non-washable components of the incubator, emphasizing that the top cover (containing electronics) should not be submerged.
- Washable Parts: The base, grid, egg trays, transparent cover, and water bottles can be cleaned directly by flushing or soaking with water. Use a mild detergent if necessary and rinse thoroughly.
- Non-Washable Parts: The top cover, which contains the electronic components, fan, and heating element, is NOT washable. Do not immerse it in water. Clean this part with a slightly damp cloth, ensuring no moisture enters the electronic components. Use the provided cleaning brush to remove dust or debris from the fan area.
- Disinfection: After each hatch, it is recommended to disinfect all washable parts with a poultry-safe disinfectant solution to prevent bacterial growth.
- Storage: When not in use, ensure all parts are completely dry before reassembling and storing the incubator in a clean, dry place.
8. Troubleshooting
This section addresses common issues you might encounter during operation.
| Problem | Possible Cause | Solution |
|---|---|---|
| Incubator not powering on. | Power cord not connected; faulty outlet; power adapter issue. | Check power connections. Try a different outlet. Ensure power adapter is functioning. |
| Temperature alarm sounds. | Temperature deviation of ±2°F / ±1°C from set point. | Check ambient room temperature. Ensure incubator is not in a draft or direct sunlight. Verify settings. |
| Humidity alarm sounds. | Humidity below 40% after 2 hours of use. | Refill water bottles. Ensure water channels in the base are not dry. |
| Eggs not turning automatically. | Gears not properly installed; motor malfunction; turning function disabled. | Check gear assembly. Ensure automatic turning is enabled in settings. Contact support if motor issue suspected. |
| Poor hatch rates. | Incorrect temperature/humidity; infertile eggs; improper egg handling; ventilation issues. | Verify temperature and humidity settings with an external thermometer/hygrometer. Ensure eggs are fertile and handled correctly. Adjust ventilation. |
9. Specifications
| Feature | Detail |
|---|---|
| Model Number | TK501PLUS |
| Product Dimensions | 13 x 7.8 x 14 inches (approx. 33 x 19.8 x 35.6 cm) |
| Item Weight | 5.5 pounds (approx. 2.5 kg) |
| Egg Capacity | 18 Chicken Eggs OR 8 Large Eggs (Duck, Turkey, Goose) |
| Temperature Control Range | 97°F - 103.5°F (36.1°C - 39.7°C) |
| Temperature Precision | ±1°F |
| Automatic Egg Turning | Yes, with selectable intervals (60/90/120 mins) |
| Humidity Control | External water fill system |
| Built-in Features | Egg Candler Light, Temperature/Humidity Alarms, LED Control Panel |
| Material | ABS and PC |
| Manufacturer | Tekcoplus LTd |
10. Warranty and Support
For warranty information, technical support, or service inquiries regarding your TEKCOPLUS TK501PLUS Egg Incubator, please contact TEKCOPLUS directly through their official website or the retailer from whom you purchased the product. Please have your model number (TK501PLUS) and purchase date available when contacting support.
Manufacturer: Tekcoplus LTd