1. Introduction
This manual provides detailed instructions for the installation, operation, and maintenance of your Generic Starlink Mini Router. This high-performance WiFi extender is designed to seamlessly expand your existing Starlink mesh network, offering both wired (Ethernet) and wireless setup options. It is compatible with Starlink Gen 2 Router, Starlink Gen 3 Router, Starlink Mini Router, and Starlink Mini Kit, but not with Starlink Gen 1 routers or third-party mesh systems for wireless networking. The router supports versatile installation, allowing for tabletop placement or wall mounting.
For optimal performance, position the Mini Router within two rooms of your main router and avoid obstructions such as concrete walls and metal appliances.
2. Important Safety Information
- Read all instructions carefully before use.
- Keep the device away from water, moisture, and extreme temperatures.
- Use only the provided power supply. Using unauthorized power adapters may damage the device and void the warranty.
- Do not attempt to open, disassemble, or repair the device yourself. Refer all servicing to qualified personnel.
- Ensure proper ventilation around the router to prevent overheating.
- Keep out of reach of children.
3. What's in the Box
Verify that all items listed below are included in your package:
- Mini Router
- Power Supply
- Stand
- #7 Wood Screws (x2)
- Drywall Anchors (x2)
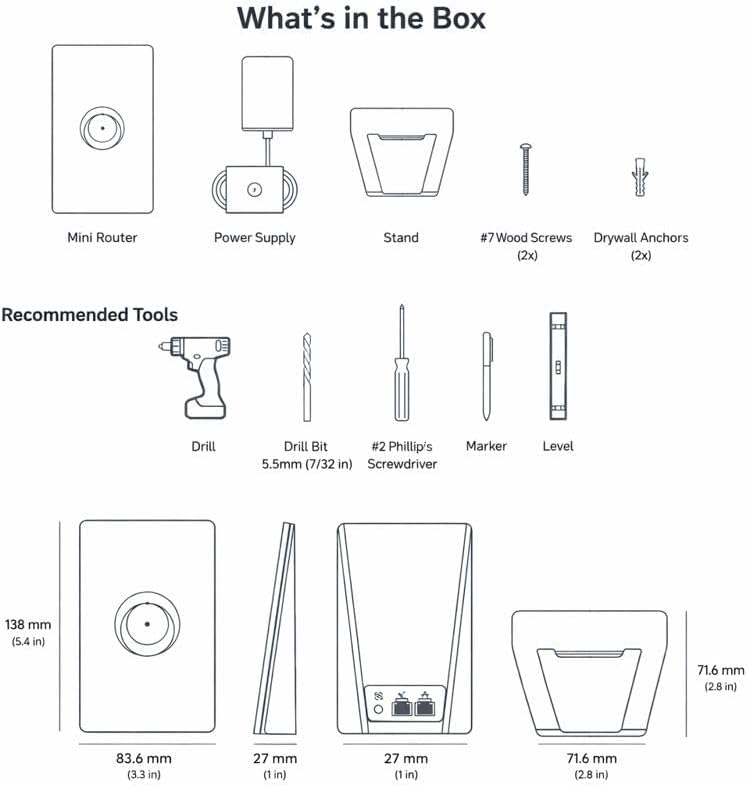
Image: Contents of the Starlink Mini Router package, including the router unit, power supply, mounting stand, two wood screws, and two drywall anchors. This diagram also illustrates recommended tools for installation such as a drill, drill bit, screwdriver, marker, and level.
4. Specifications
| Feature | Detail |
|---|---|
| Brand | Generic |
| Model Name | Starlink Mini Router |
| Special Feature | Portable |
| Frequency Band Class | Dual-Band |
| Wireless Communication Standard | 802.11ax |
| Compatible Devices | Laptop (and other Wi-Fi enabled devices) |
| Recommended Uses For Product | Internet Access |
| Included Components | Mini Router, Power Supply, Stand, #7 Wood Screws x2, Drywall Anchors x2 |
| Connectivity Technology | Satellite (via Starlink system) |
| Color | White |
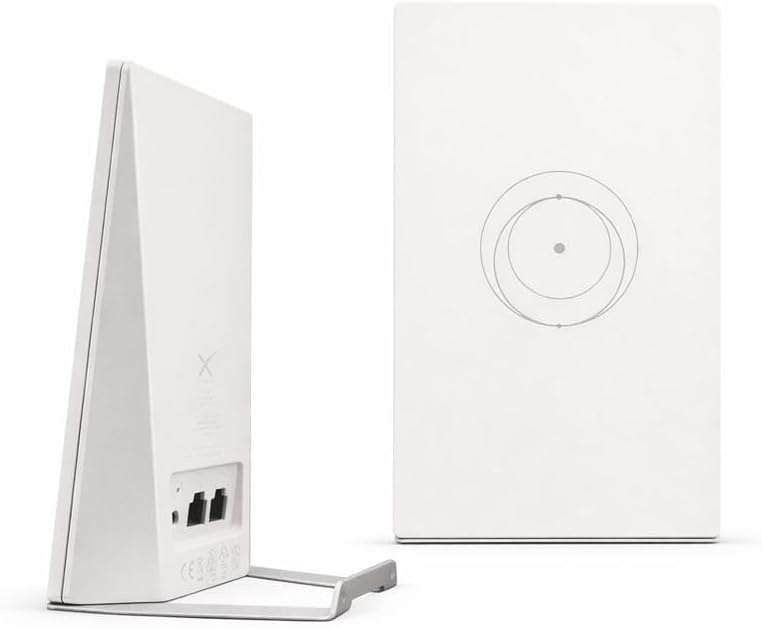
Image: Dimensions of the Starlink Mini Router, illustrating its compact size for flexible placement.
5. Setup and Installation
5.1 General Setup
- Ensure your main Starlink Kit is fully set up and connected to the internet before adding the Mini Router.
- Choose a suitable location for your Mini Router. It can be placed on a tabletop or mounted on a wall.
- Connect the provided power supply to the Mini Router and plug it into a power outlet.
- Proceed with either Wireless Mesh Setup or Wired Mesh Setup as described below.
5.2 Wireless Mesh Setup
This method allows the Mini Router to extend your Starlink network wirelessly.
- Ensure your Starlink Kit is set up and connected to the internet prior to adding your mesh nodes.
- Find suitable install locations for your mesh nodes and plug them into power outlets.
- Open the Starlink App on your mobile device.
- Wait 1-2 minutes for a "New Mesh Node(s)" notification to appear in the app.
- If a notification does not appear in the app, try positioning your router closer to your main router.
- Tap "Pair" or "Pair All". The node(s) will begin connecting on the "Network" screen. Connection will take about 1-5 minutes.
- Repeat with additional mesh nodes if applicable.

Image: Wireless Mesh Guide, showing the connection flow for adding a Mini Router to an existing Starlink network wirelessly.
5.3 Wired Mesh Setup
This method uses an Ethernet cable for a more stable and potentially faster connection between mesh nodes.
- Set up your Starlink Kit as shown in the install instructions and ensure you are online.
- Place your Starlink Router Mini in the desired location and connect the power supply.
- Plug in an Ethernet cable into the LAN port of the back of your existing Starlink router or Starlink Mini. For Gen 3, you will need to remove the protective cover to access the ports.
- Run the Ethernet cable from the main router to your Starlink Router Mini. Connect to the WAN port of your router (Starlink symbol) to create a wired mesh network.
- Repeat with additional mesh nodes if applicable.

Image: Wired Mesh Guide, detailing the Ethernet connection for a stable mesh network setup.
5.4 Installation Options
The Starlink Mini Router offers flexible installation:
- Tabletop Placement: Use the included stand to place the router on any flat surface. Ensure it is in an open area for optimal signal.
- Wall Mount Installation: Use the included screws and drywall anchors to securely mount the router to a wall. Refer to the 'What's in the Box' diagram for recommended tools like a drill and screwdriver.

Image: Rear view of the Starlink Mini Router, highlighting its ports and the included stand for tabletop use.
6. Operating the Starlink Mini Router
6.1 Basic Operation
Once powered on and successfully paired with your main Starlink router, the Mini Router will automatically begin extending your Wi-Fi network. Devices within its range will detect the extended network and connect seamlessly, provided they have the correct Wi-Fi credentials.
6.2 Mesh Network Functionality
The Mini Router functions as a mesh node, creating a unified Wi-Fi network with your main Starlink router. This means your devices can roam freely throughout your coverage area without manually switching networks. The system intelligently directs your devices to the strongest signal.
6.3 Performance Optimization
- Placement: For best results, place the Mini Router within two rooms of your main Starlink router.
- Obstructions: Avoid placing the router near significant obstructions such as concrete walls, large metal appliances (refrigerators, microwaves), or large bodies of water (aquariums), as these can degrade Wi-Fi signal strength and range.
- Starlink App: Utilize the Starlink App to monitor your network status, check signal strength, and manage connected devices.
7. Maintenance
- Cleaning: Gently wipe the router with a soft, dry cloth. Do not use liquid cleaners or abrasive materials.
- Firmware Updates: The Starlink system typically handles firmware updates automatically. Ensure your router is connected to the internet to receive these updates, which improve performance and security.
- Ventilation: Ensure the router's ventilation openings are not blocked to prevent overheating.
- Power Cycle: If you experience minor connectivity issues, try power cycling the router by unplugging it from the power outlet for 10 seconds and then plugging it back in.
8. Troubleshooting
8.1 No Internet Connection
- Check Main Starlink: Ensure your primary Starlink system is online and functioning correctly.
- Power: Verify the Mini Router is properly plugged into a working power outlet.
- Pairing: If using wireless mesh, confirm the Mini Router is successfully paired via the Starlink App. If wired, ensure the Ethernet cable is securely connected to the correct ports (LAN on main router, WAN on Mini Router).
- Restart: Try restarting both your main Starlink router and the Mini Router.
8.2 Poor Wi-Fi Signal or Slow Speeds
- Placement: Relocate the Mini Router closer to your main Starlink router or to a more central location within your desired coverage area.
- Obstructions: Move the router away from large metal objects, concrete walls, or other sources of interference.
- Interference: Other electronic devices (cordless phones, microwaves) operating on similar frequencies can cause interference. Try moving them away from the router.
- Starlink App: Use the Starlink App to check signal strength and identify potential issues.
8.3 Mini Router Not Appearing in Starlink App
- Power: Confirm the Mini Router is powered on.
- Proximity: Bring the Mini Router closer to your main Starlink router during the initial pairing process.
- Compatibility: Ensure your main Starlink router is a Gen 2, Gen 3, or Mini Router, as Gen 1 routers are not compatible for wireless mesh networking.
- Restart App: Close and reopen the Starlink App.
9. Warranty Information
This Generic Starlink Mini Router comes with a standard manufacturer's warranty. Please refer to the warranty card included in your product packaging or contact the retailer for specific details regarding warranty duration and terms. The warranty typically covers defects in materials and workmanship under normal use. Damage resulting from misuse, accidents, unauthorized modifications, or improper installation is generally not covered.
10. Customer Support
For further assistance, technical support, or warranty claims, please contact your retailer or the manufacturer's customer service. Have your product model number and purchase information ready when contacting support.
You may also find additional resources and FAQs on the official Starlink support website for general Starlink system inquiries.


