
1. Introduction
Thank you for purchasing the Ivation IVARVAC10 6,500 BTU Camper Air Conditioner. This unit is designed to provide efficient cooling, dehumidification, and ventilation for recreational vehicles, caravans, motorhomes, and similar confined spaces. Its unique split design allows for over-the-window sill installation, maintaining window functionality and reducing indoor noise. Please read this manual thoroughly before installation and operation to ensure proper use and maintenance.

Figure 1.1: Ivation IVARVAC10 Camper Air Conditioner
2. Safety Information
Always follow basic safety precautions when using electrical appliances to reduce the risk of fire, electric shock, and personal injury.
- Ensure the power supply matches the voltage requirements of the unit (115V).
- Do not operate the unit with a damaged power cord or plug.
- Do not insert fingers or objects into the air outlet or inlet.
- Keep the unit away from water and moisture.
- Ensure the unit is securely installed to prevent falling.
- Unplug the unit before cleaning or performing any maintenance.
- This appliance is not intended for use by persons (including children) with reduced physical, sensory, or mental capabilities, or lack of experience and knowledge, unless they have been given supervision or instruction concerning use of the appliance by a person responsible for their safety.
3. Package Contents
Verify that all items listed below are included in your package:
- Air Conditioner Unit (Indoor)
- Compressor Unit (Outdoor)
- Mounting Brackets (2 sets)
- Protective Sleeve
- Rubber Dampers
- Hand Screws
- M6 Screws
- M6 Gaskets
- Hose (integrated, connecting both units)

Figure 3.1: Included Components
4. Product Overview
The Ivation IVARVAC10 features a split design with an indoor unit and an outdoor compressor unit connected by a flexible hose. This design allows for quiet operation indoors and efficient heat exchange outdoors.
4.1 Unit Dimensions
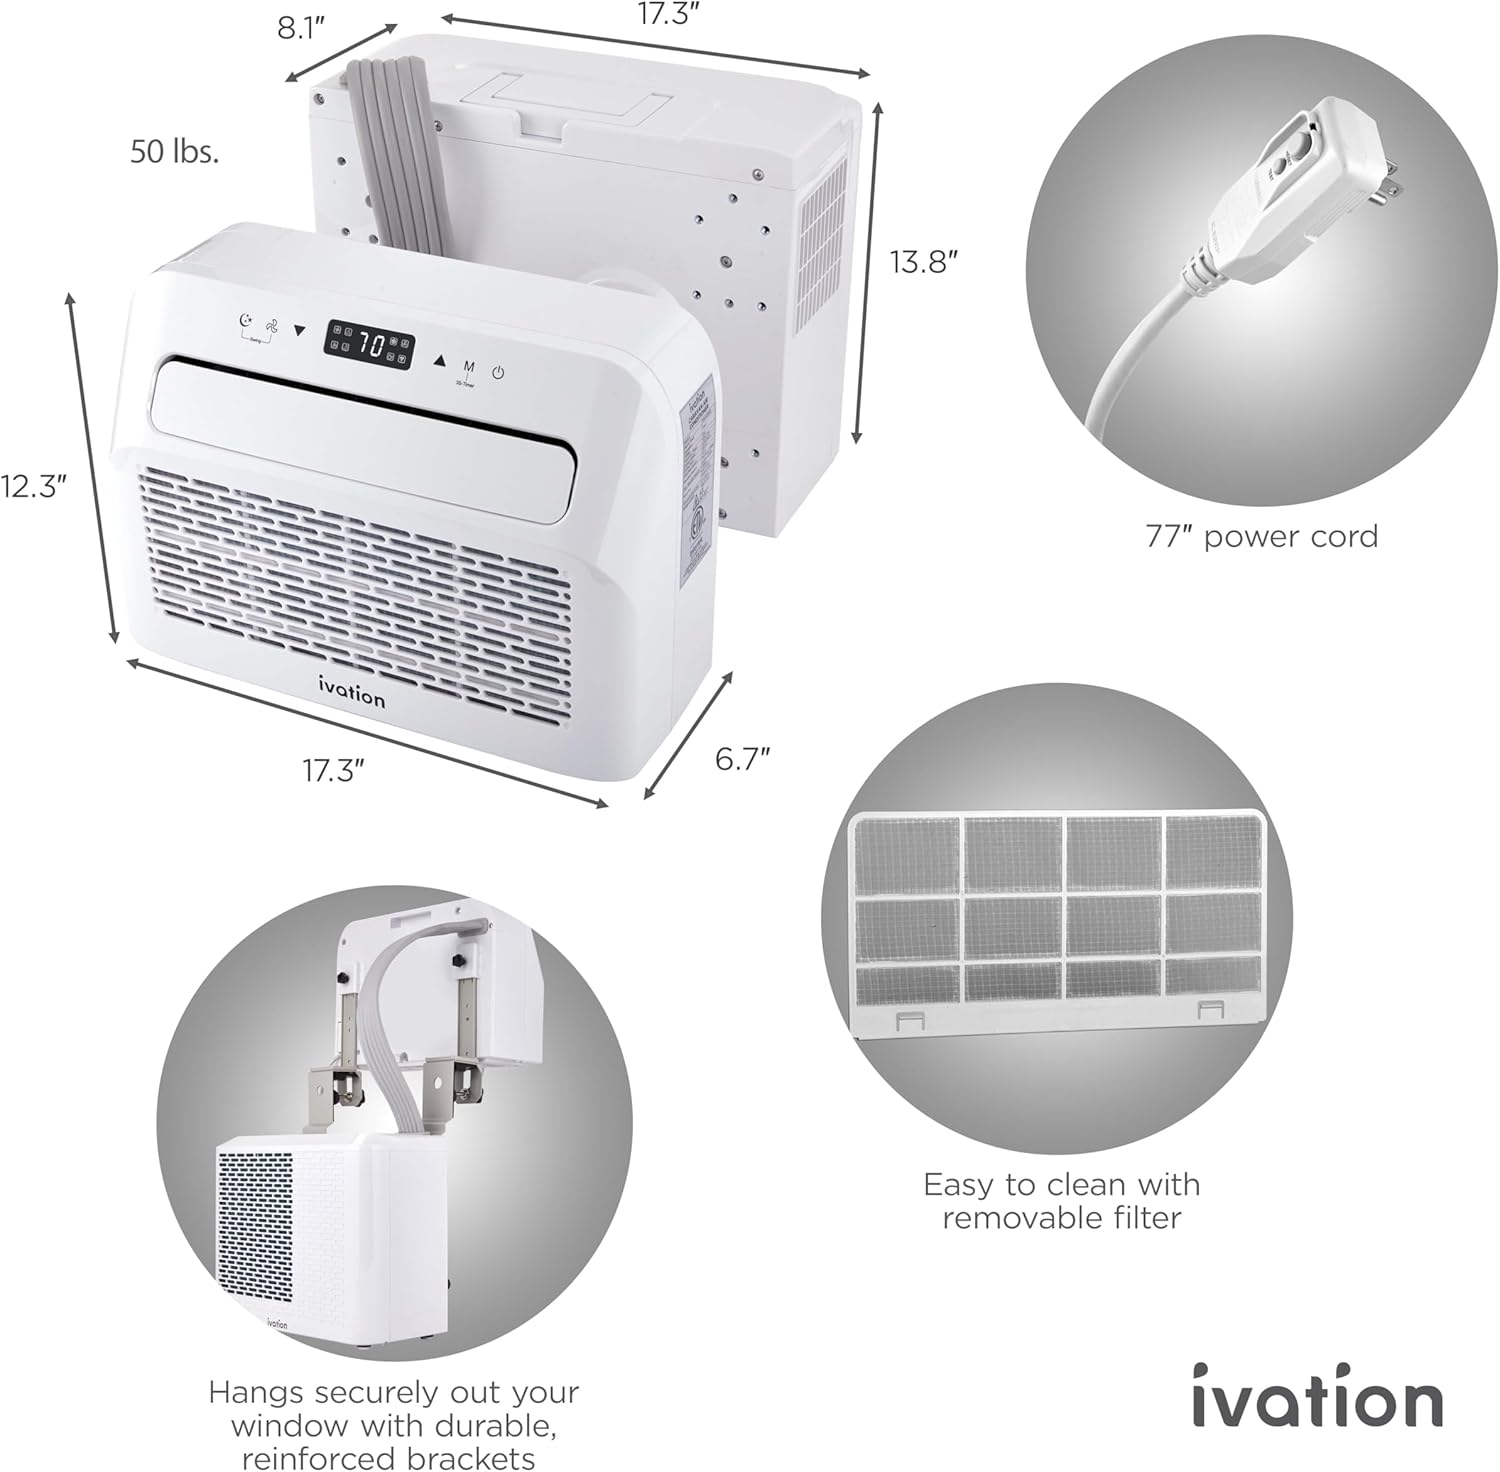
Figure 4.1: Product Dimensions and Key Features
The indoor unit measures approximately 17.3" W x 12.3" H x 6.7" D. The outdoor unit measures approximately 17.3" W x 13.8" H x 8.1" D. The total weight is approximately 46.3 lbs.
4.2 Control Panel

Figure 4.2: Control Panel Layout
- Power Button: Turns the device on and off.
- Mode Button: Switches between Cooling, Fan, and Dehumidification modes.
- Increase/Decrease Buttons: Adjusts temperature or timer settings.
- Fan Speed Button: Changes fan speed.
- Sleep Mode Button: Activates or deactivates sleep mode.
- Swing Function: Controls the automatic swing of the air vents.
- Control Panel Display: Shows current temperature, timer, and mode indicators.
5. Setup & Installation
This air conditioner is designed for over-the-window sill installation in RVs, campers, and similar vehicles. Ensure your window can support the unit's weight and dimensions.
5.1 Pre-Installation Checklist
- Verify window dimensions: Minimum height 8.1 inches, maximum width 13.8 inches.
- Ensure a stable surface for the outdoor compressor unit if not fully suspended.
- Confirm access to a 115V power outlet.
5.2 Installation Steps
- Attach Mounting Brackets: Secure the mounting brackets to the indoor unit using the provided M6 screws and gaskets. Ensure they are firmly attached.
- Position Indoor Unit: Place the indoor unit over the window sill. The brackets should rest securely on the sill, with the unit extending into the interior.
- Connect Outdoor Unit: Attach the outdoor compressor unit to the indoor unit using the integrated hose. The outdoor unit will hang outside the window, supported by the indoor unit and its brackets.
- Secure with Hand Screws and Dampers: Use the hand screws and rubber dampers to further stabilize the unit and absorb vibrations.
- Apply Protective Sleeve: If desired, use the protective sleeve to cover the hose connection for added protection and aesthetics.
- Power Connection: Plug the power cord into a grounded 115V electrical outlet.

Figure 5.1: Unit Installed in an RV Window

Figure 5.2: Split Design Installation Concept

Figure 5.3: Outdoor Compressor Unit Mounted
Video 5.4: Official Ivation IVARVAC10 RV Air Conditioner overview and installation demonstration. This video provides a visual guide to the product's features and how it is set up.
6. Operating Instructions
Familiarize yourself with the control panel (Figure 4.2) before operating the unit.
6.1 Power On/Off
- Press the Power Button (1) to turn the unit on or off.
6.2 Mode Selection
- Press the Mode Button (2) repeatedly to cycle through the available modes:
- Cooling Mode: Provides air conditioning.
- Fan Mode: Circulates air without cooling.
- Dehumidification Mode: Removes moisture from the air.
6.3 Temperature Adjustment
- In Cooling mode, use the Increase/Decrease Buttons (3) to set the desired temperature between 60°F and 86°F (16°C and 30°C).
6.4 Fan Speed
- Press the Fan Speed Button (4) to adjust the fan speed (e.g., Low, Medium, High).
6.5 Swing Function
- Press the Swing Button (6) to activate or deactivate the automatic air vent swing, distributing air more evenly.
6.6 Sleep Mode
- Press the Sleep Mode Button (5) to enter sleep mode. In this mode, the unit operates quietly and gradually adjusts the temperature for comfortable sleep.
6.7 Timer Function
- Press and hold the Mode Button (2) for 3 seconds to activate the timer. Use the Increase/Decrease Buttons (3) to set the desired operating duration.
7. Maintenance
Regular maintenance ensures optimal performance and extends the lifespan of your air conditioner.
7.1 Cleaning the Air Filter
The unit features a removable, washable air filter. Clean it regularly, especially during frequent use.
- Unplug the air conditioner from the power outlet.
- Locate the air filter access panel (refer to Figure 4.1 for general location).
- Remove the air filter.
- Wash the filter with warm, soapy water. Rinse thoroughly.
- Allow the filter to air dry completely before reinstalling. Do not expose to direct sunlight or heat.
- Reinstall the dry filter and close the access panel.
Figure 7.1: Removable Air Filter
7.2 General Cleaning
- Wipe the exterior of the unit with a soft, damp cloth.
- Do not use harsh chemicals, abrasives, or solvents.
- Ensure no water enters the electrical components.
8. Troubleshooting
Before contacting customer support, review the following common issues and solutions:
| Problem | Possible Cause | Solution |
|---|---|---|
| Unit does not turn on. | No power, power cord unplugged, circuit breaker tripped. | Check power connection, ensure outlet is functional, reset circuit breaker. |
| Unit is not cooling effectively. | Dirty air filter, doors/windows open, room too large, air intake/outlet blocked. | Clean air filter, close all doors/windows, ensure unit is appropriate for space, clear obstructions. |
| Water leakage from indoor unit. | Unit not level, drain hose blocked or improperly installed. | Ensure unit is level, check drain hose for kinks or blockages, verify secure connection. |
| Unusual noise during operation. | Loose parts, unit not stable, foreign object in fan. | Check for loose components, ensure stable installation, inspect for obstructions (unplug first). |
9. Specifications
| Feature | Detail |
|---|---|
| Brand | Ivation |
| Model Name | IVARVAC10 |
| Cooling Power | 6,500 BTU |
| Capacity | 0.54 tons |
| Product Dimensions (D x W x H) | 17.3"D x 13.8"W x 8.1"H |
| Item Weight | 46.3 pounds |
| Voltage | 115 volts |
| Wattage | 650 watts |
| Noise Level | 52 dB |
| Seasonal Energy Efficiency Ratio (SEER) | 14.5 |
| Annual Energy Consumption | 567 kilowatt hours per year |
| Control Method | Push Button |
| Operating Mode | Cooling, Fan, Dehumidification |
| Installation Type | Window (Over-the-Sill) |
| Compressor Type | Rotary Scroll |
| Window Opening Max Width | 13.8 inches |
| Window Opening Min Height | 8.1 inches |
10. Warranty & Support
This Ivation IVARVAC10 Camper Air Conditioner comes with a 1 Year Limited Warranty. Please retain your proof of purchase for warranty claims.
For technical support, troubleshooting assistance beyond this manual, or warranty inquiries, please contact Ivation customer service. Contact information can typically be found on the manufacturer's website or product packaging.
