
1. Product Overview
This manual provides instructions for the assembly, operation, and maintenance of your Feonase Queen Bed Frame, Model 749B1. This bed frame features a luxury wingback headboard with a built-in charging station, upholstered button tufting, and a sturdy wooden slat support system designed for noise-free use.

Image: Overview of the Feonase Ingenuity Bed Frame design.
Key Features:
- Luxury Wingback Headboard: Features a 16-inch wide wingback design with nailhead trim and button tufting, providing a sophisticated aesthetic and comfortable backrest.
- Integrated Charging Station: Includes 2 AC outlets and 2 USB ports on the headboard for convenient device charging. A 4-inch storage space is also available on top of the headboard.
- Sturdy Construction: Built with a solid metal frame and 12 thickened wooden slats with central cross support for enhanced durability and stability.
- Noise-Free Design: EVA strips are integrated between the slats and metal frame to minimize noise from friction.
- Underbed Storage: Provides 8 inches of clearance for additional storage space.
2. Setup and Assembly
Before beginning assembly, ensure all components are present and undamaged. It is recommended to assemble the bed frame in the room where it will be used. Two people are recommended for assembly.
Package Contents:

Image: All bed frame components laid out before assembly.
Refer to the detailed assembly instructions included in your package for a complete list of parts and step-by-step guidance. All pieces are labeled with sequence numbers for easy identification.
Assembly Steps (General Guidance):
- Unpack Components: Carefully remove all parts from the packaging and lay them out on a clean, soft surface to prevent scratches. Verify all parts against the included parts list.
- Assemble Headboard: Attach the wingback sections to the main headboard panel. Ensure all bolts are securely tightened.
- Attach Side Rails: Connect the side rails to the assembled headboard and footboard.
- Install Support Legs: Securely attach all support legs to the bed frame.
- Place Wooden Slats: Position the wooden slats across the bed frame. The slats are typically attached with Velcro for quick and easy installation. Ensure EVA strips are properly placed to prevent noise.

Image: Close-up of thickened wooden slats, solid support legs, and central cross support for stability.

Image: Illustration of Velcro attachment for wooden slats, simplifying assembly.

Image: Detail showing EVA mute strips designed to reduce noise from slat friction.
3. Operating Instructions
Using the Charging Station:
The integrated charging station is located on the top surface of the headboard. It provides convenient access to power for your electronic devices.
- AC Outlets: Two 110V/12A AC outlets are available for standard electrical plugs.
- USB Ports: Two 5V/2A USB ports are provided for charging USB-compatible devices.
- Power Cord: The charging station is powered by a 6.6-foot power cord. Plug this cord into a standard wall outlet.

Image: The headboard's integrated charging station with devices connected.

Image: Close-up view of the charging station, highlighting the 2 AC outlets and 2 USB ports.

Image: Diagram illustrating the specifications of the built-in charging station.
Headboard Storage:
The top of the headboard provides a 4-inch deep storage space. This area is suitable for placing small items such as books, mobile phones, or decorative objects.
Video: Demonstration of the 16-inch deluxe wingback headboard and its 4-inch storage space with integrated charging ports.
4. Maintenance
General Care:
- Cleaning Fabric: For the upholstered parts, gently vacuum with an upholstery attachment to remove dust. For spills, blot immediately with a clean, dry cloth. Do not use harsh chemicals or abrasive cleaners.
- Cleaning Frame: Wipe metal and wood components with a soft, damp cloth. Dry thoroughly.
- Tighten Fasteners: Periodically check and tighten all bolts and screws to ensure the bed frame remains stable and noise-free.
Charging Station Care:
- Ensure the power cord is not pinched or damaged.
- Do not overload the outlets or USB ports.
- Keep liquids away from the charging station.
5. Troubleshooting
Common Issues and Solutions:
| Problem | Possible Cause | Solution |
|---|---|---|
| Bed frame is squeaking. | Loose fasteners; slats rubbing against frame. | Tighten all bolts and screws. Ensure EVA strips are correctly positioned between slats and frame. |
| Charging station not working. | Power cord unplugged; outlet issue; device compatibility. | Check if the power cord is securely plugged into a wall outlet. Test the wall outlet with another device. Ensure your device is compatible with USB charging. |
| Bed frame feels unstable. | Loose connections; uneven floor. | Re-tighten all assembly bolts. Ensure the bed is on a level surface. |
6. Specifications
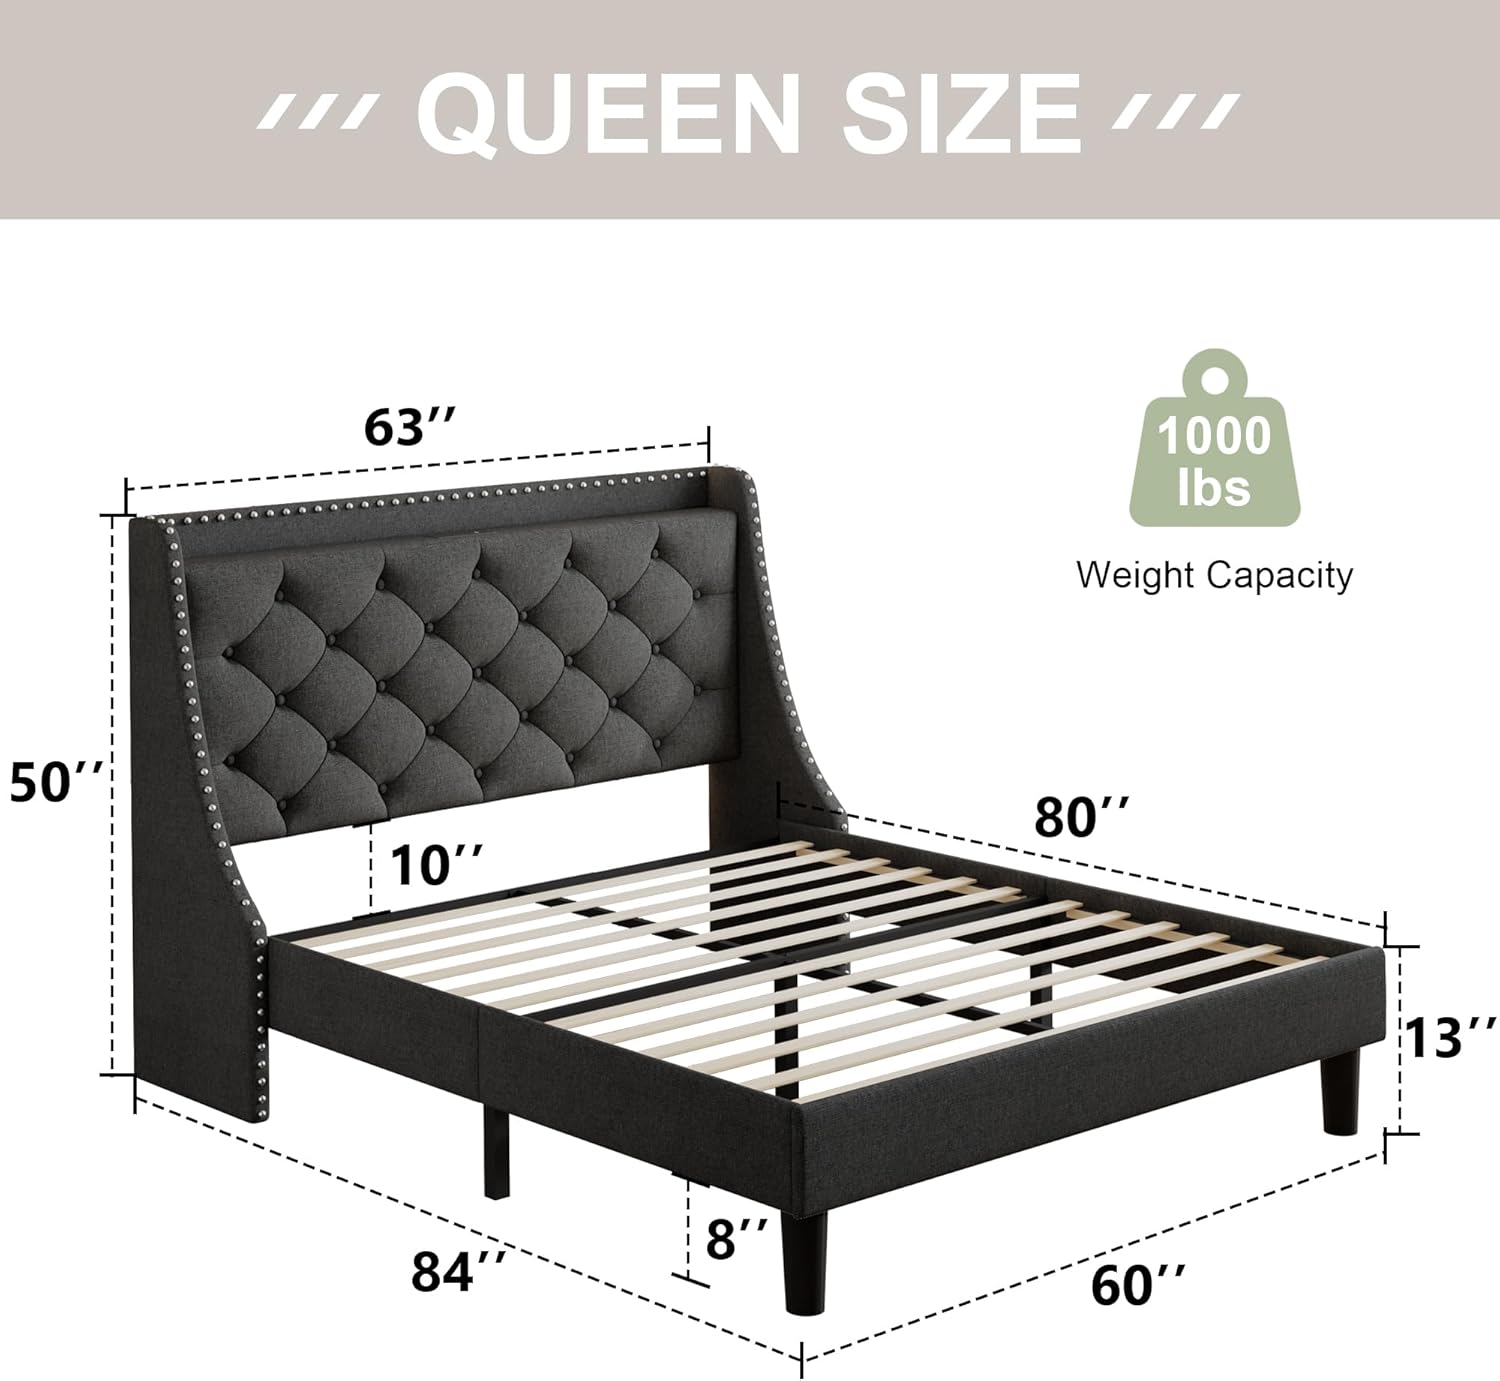
Image: Diagram showing the dimensions of the Queen size bed frame.
| Feature | Detail |
|---|---|
| Model Number | 749B1 |
| Size | Queen |
| Product Dimensions (L x W x H) | 84" x 63" x 50" |
| Material | Wood, Metal, Foam, Fabric (Upholstered) |
| Headboard Material | Foam and Fabric |
| Color | Dark Gray |
| Weight Capacity | 1000 Pounds |
| Underbed Clearance | 8 inches |
| Charging Station | 2 AC Outlets (110V/12A), 2 USB Ports (5V/2A) |
| Assembly Required | Yes |
| Special Features | Squeak Resistant, Headboard Storage, Underbed Storage |

Image: The 8-inch underbed storage space, suitable for boxes and other items.
7. Warranty and Support
Warranty Information:
Please refer to the warranty card included with your product for specific warranty terms and conditions. Generally, Feonase products are designed for durability and quality. For any manufacturing defects or issues arising from normal use, please contact customer service.
Customer Support:
For assistance with assembly, missing parts, or any other inquiries, please contact Feonase customer support. Contact information can typically be found on the product packaging or the official Feonase website. Please have your model number (749B1) and purchase details ready when contacting support.