
1. Introduction
This manual provides essential information for the safe and efficient operation, setup, and maintenance of your ONEVAN Electric Bag Sewing Machine. Please read it thoroughly before using the device to ensure proper function and to prevent injury or damage.
The ONEVAN Electric Bag Sewing Machine is designed for industrial bag closing applications, capable of handling various materials such as fabric, jute, and kraft paper bags. It features a powerful 210W copper motor and a portable, battery-powered design for maximum flexibility.
2. Safety Instructions
Always follow these safety guidelines to reduce the risk of electric shock, fire, or serious injury.
- Read All Instructions: Familiarize yourself with the machine's operation before use.
- Keep Work Area Clean: Cluttered areas invite accidents.
- Avoid Dangerous Environments: Do not use the machine in damp or wet locations. Do not expose it to rain.
- Keep Children Away: Do not allow children or untrained personnel to operate the machine.
- Secure the Workpiece: Ensure the bag or material being sewn is stable to prevent unexpected movement.
- Use Proper Accessories: Only use accessories recommended by the manufacturer.
- Disconnect Power: Always disconnect the power source (remove battery) before making adjustments, changing needles, or performing maintenance.
- Avoid Accidental Starting: Ensure the switch is in the OFF position before inserting the battery.
- Wear Appropriate Clothing: Do not wear loose clothing or jewelry that could get caught in moving parts.
- Eye Protection: Always wear safety glasses to protect against flying debris.
- Battery Safety: Use only the specified charger and batteries. Do not short-circuit, incinerate, or expose batteries to high temperatures.
- Sharp Needle: The needle is sharp. Handle with care to avoid injury.
3. Product Features
The ONEVAN Electric Bag Sewing Machine is engineered for high performance and durability.
- Powerful Motor: Equipped with a 210W pure copper motor for efficient and reliable operation.
- High Sewing Speed: Achieves 1800-2600 stitches per minute for rapid bag closing.
- Portable Design: Lightweight at approximately 3 kg, with a compact ergonomic design for comfortable extended use.
- Battery Operated: Powered by two 3000mAh lithium batteries, providing 3-4 hours of continuous operation.
- Adjustable Stitch Length: Stitch length can be adjusted from 7-11 mm to suit different materials.
- Adjustable Sewing Depth: Sewing depth is adjustable from 0.2-6 mm.
- Maximum Sewing Thickness: Capable of sewing materials up to 8-15 mm thick.
- Automatic Thread Cutter: Enhances productivity by automatically cutting the thread after sewing.
- Versatile Material Compatibility: Suitable for various materials including general fabrics, woven bags, paper bags, and leather.

Image: Overview of the ONEVAN Electric Bag Sewing Machine highlighting its power and stitching capabilities.

Image: The machine is suitable for a wide range of materials, including various types of bags and fabrics.
4. Setup
4.1. Unpacking and Inspection
Carefully remove all components from the packaging. Inspect the machine for any signs of damage during transit. Ensure all listed accessories are present.
4.2. Battery Installation and Charging
The machine operates on two 3000mAh lithium batteries. Before first use, ensure the batteries are fully charged using the provided charger.
- Insert the charged batteries into the designated battery slots on the machine.
- To charge, connect the charger to a power outlet and then to the battery pack.
- A full charge typically provides 3-4 hours of continuous operation.

Image: The machine is powered by two high-capacity 3000 mAh batteries, ensuring extended operation.
4.3. Thread Installation
Correct thread installation is crucial for proper stitching. Follow these steps carefully:
- Pass the thread through the hole in the top metal guide.
- Pass the thread through the two holes in the white tension button.
- Turn the ring at the back of the machine to lift the needle bar and pass the thread through the guide.
- Pass the thread from the front of the needle hole to the back. Ensure the thread is stretched taut.
- Finally, put the needle bar down and tighten the white tension button.
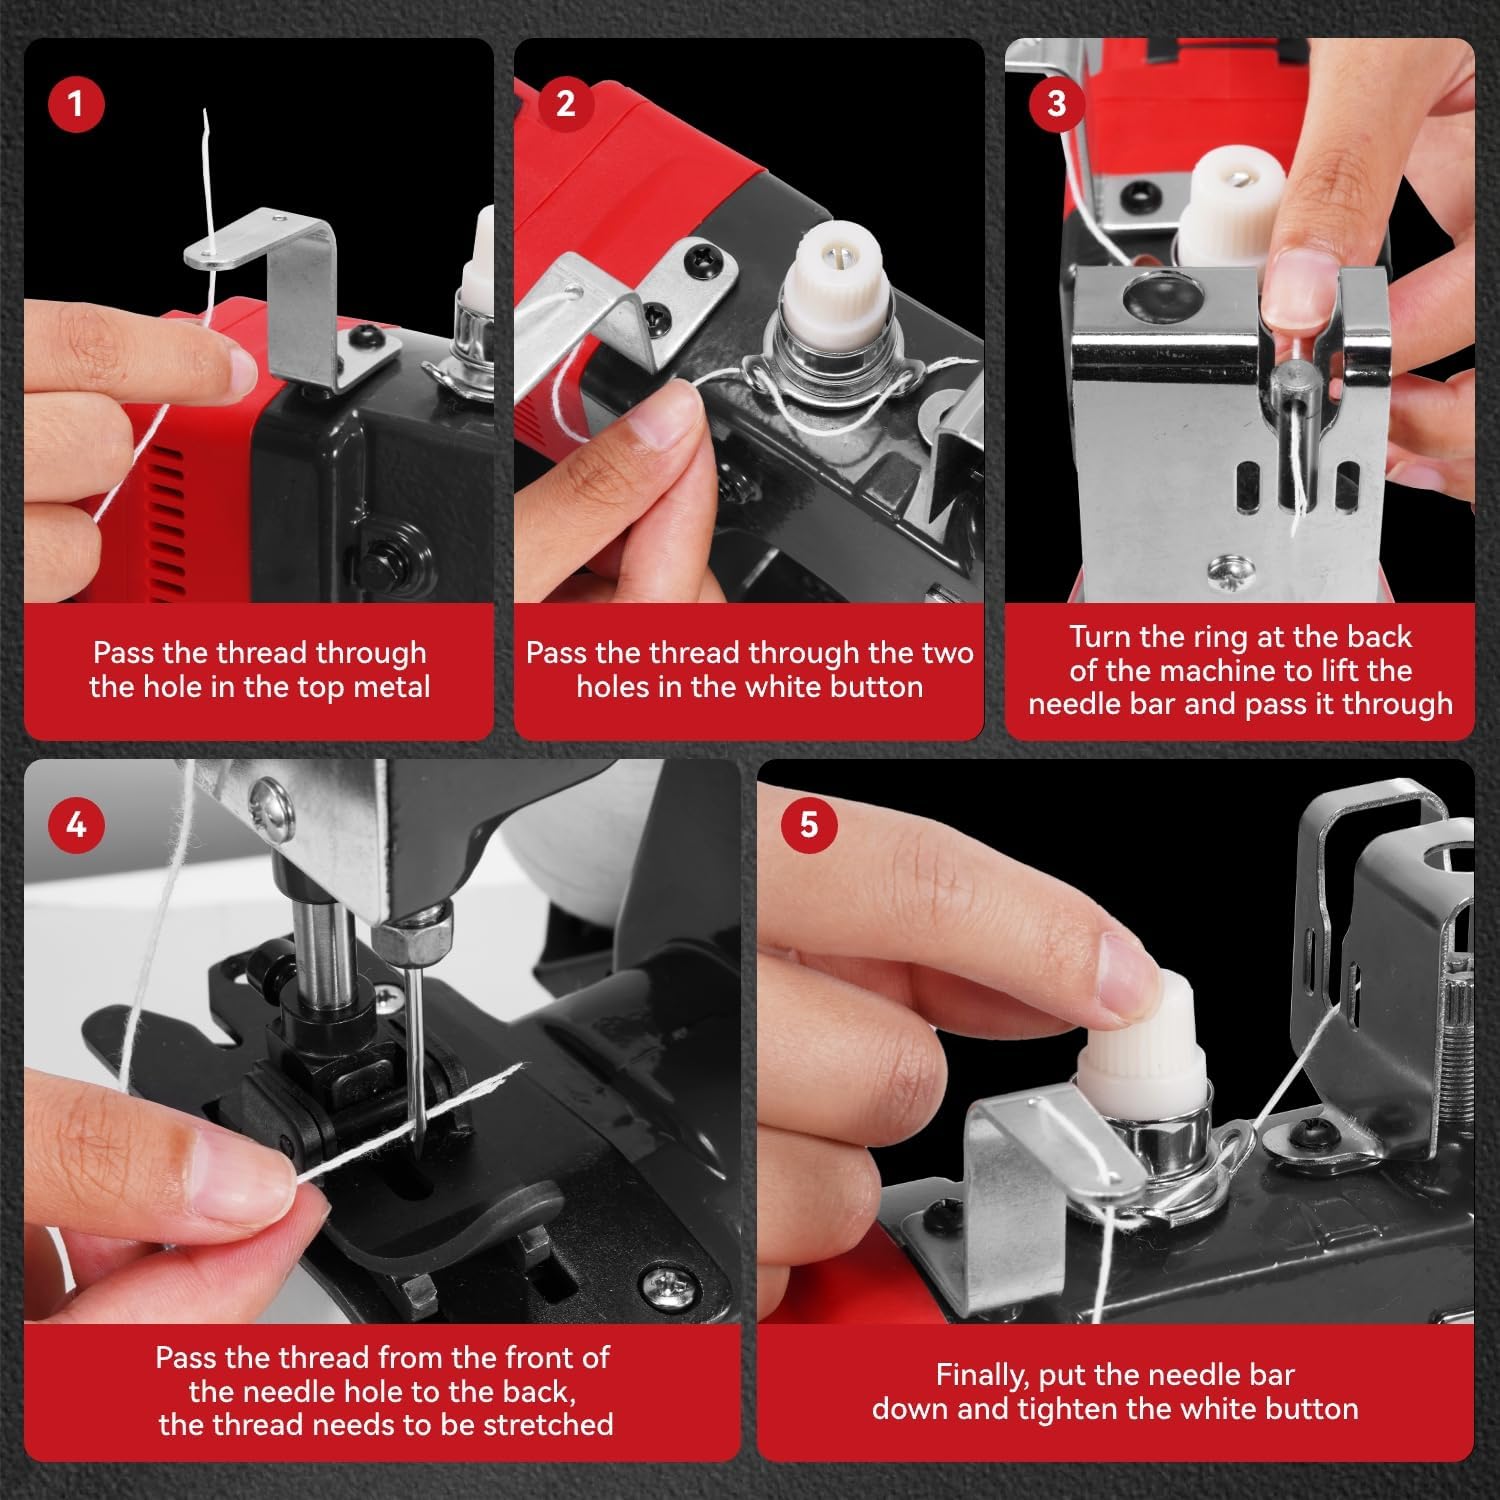
Image: Step-by-step guide for correctly threading the sewing machine.
4.4. Adjusting Suture Pressure and Stitch Spacing
The machine allows for adjustment of suture pressure and stitch spacing to optimize performance for different materials.
- Suture Pressure: Adjust the white knob at the top of the machine to control the pressure on the thread.
- Stitch Spacing (Length): Use the red dial on the side of the machine to adjust the stitch length between 7-11 mm.

Image: Details on how to adjust suture pressure and stitch spacing for optimal sewing results.
5. Operating Instructions
Once the machine is set up and threaded, you can begin sewing.
- Power On: Ensure the battery is inserted and the power switch is in the 'ON' position.
- Positioning: Hold the machine firmly with one hand, guiding the material with the other. Position the bag opening under the needle.
- Start Sewing: Press the trigger to start the motor and begin sewing. Guide the machine smoothly along the edge of the bag.
- Automatic Thread Cutter: At the end of the seam, the machine's automatic thread cutter will engage to trim the thread, improving efficiency.
- Power Off: Release the trigger and switch the power to 'OFF' when finished or when pausing operation.

Image: Demonstrates the proper way to hold and operate the sewing machine for bag closing.
5.1. Operational Video
Video: This video demonstrates the general operation of the ONEVAN Electric Bag Sewing Machine, showing how to handle the device and sew various materials.
6. Maintenance
Regular maintenance ensures the longevity and optimal performance of your sewing machine.
- Cleaning: Regularly clean dust and lint from the needle area, thread path, and motor vents using a soft brush or compressed air. Ensure the battery is removed before cleaning.
- Lubrication: Apply a small amount of sewing machine oil to moving parts as indicated in the diagram (if provided with the physical product) or to areas of friction.
- Needle Replacement: Replace the needle if it becomes bent, dull, or broken. Always use genuine replacement needles. To replace, loosen the needle clamp screw, remove the old needle, insert the new needle with the flat side facing the back, and tighten the screw.
- Battery Care: Store batteries in a cool, dry place. Do not leave them fully discharged for extended periods.
7. Troubleshooting
Refer to this section for common issues and their solutions.
| Problem | Possible Cause | Solution |
|---|---|---|
| Machine does not start | Battery not inserted correctly or discharged; Power switch off. | Check battery insertion and charge level. Ensure power switch is ON. |
| Thread breaks frequently | Incorrect threading; Needle bent or dull; Thread tension too high; Poor quality thread. | Re-thread the machine carefully. Replace needle. Adjust thread tension. Use good quality thread. |
| Skipped stitches | Needle bent or incorrect size for material; Incorrect threading; Material not feeding smoothly. | Replace needle with correct type/size. Check threading. Ensure material feeds evenly. |
| Uneven stitches | Incorrect stitch length setting; Inconsistent material feeding. | Adjust stitch length. Maintain consistent speed and pressure when guiding material. |
| Machine jams | Excess lint/debris; Thread tangled in mechanism. | Remove battery. Carefully clear any jammed thread or debris. Clean the machine. |
8. Specifications
| Feature | Specification |
|---|---|
| Brand | ONEVAN |
| Motor Power | 210W Pure Copper Motor |
| Battery Type | Lithium-ion (3000mAh x 2) |
| Battery Runtime | 3-4 hours (continuous) |
| Sewing Speed | 1800-2600 stitches/minute |
| Motor Speed | 12000-18000 rpm |
| Adjustable Stitch Length | 7-11 mm |
| Adjustable Sewing Depth | 0.2-6 mm |
| Max Sewing Thickness | 8-15 mm |
| Weight | Approx. 3 kg |
| Dimensions (L x W x H) | 30 x 10 x 20 cm |
| Material | Acrylonitrile Butadiene Styrene (ABS) |
| Color | Red |
9. Warranty and Support
For warranty information or technical support, please refer to the documentation included with your purchase or contact the seller directly. Keep your proof of purchase for any warranty claims.