
1. Introduction
Thank you for choosing the Chujianxi Mini Action Camera 1080P. This compact and versatile camera is designed to capture your adventures in high definition, whether on land or underwater. This manual provides essential information for setting up, operating, maintaining, and troubleshooting your device. Please read it thoroughly before use to ensure optimal performance and longevity of your camera.
2. What's in the Box
Carefully unpack your Chujianxi Mini Action Camera and verify that all items listed below are included:
- Chujianxi Mini Action Camera
- Waterproof Case
- 360° Rotating Back Clip
- Magnetic Lanyard
- Type-C Data Cable
- Camera Frame
- Mounting Adapter
- Rectangular Rubber Pad
- Bike Mounts
- Helmet Mount
- Side Mount
- Instruction Manual

Image: All accessories included with the Chujianxi Mini Action Camera.
3. Product Overview
The Chujianxi Mini Action Camera is designed for ease of use and portability. It features a compact body with essential controls and ports.

Image: Front view of the Chujianxi Mini Action Camera.
Key Components:
- Lens: Wide-angle lens for capturing broad scenes.
- Power/Record Button: Used to power on/off and start/stop recording.
- Microphone: For audio recording.
- LED Indicator: Displays camera status (e.g., recording, charging).
- Micro SD Card Slot: For memory card insertion.
- Type-C Port: For charging and data transfer.
- Magnetic Base: For quick attachment to metallic surfaces.

Image: Size comparison of the camera, demonstrating its compact form factor.
4. Setup
4.1 Charging the Camera
Before first use, fully charge the camera. Connect the included Type-C cable to the camera's Type-C port and the other end to a USB power adapter (not included) or a computer's USB port. The LED indicator will show charging status and turn off when fully charged.
4.2 Inserting a Micro SD Card
The camera requires a Micro SD card (TF card) for storing recordings. A card is not included in the package.
- Open the protective cover on the side of the camera.
- Insert a Micro SD card (Class 10 or higher, up to 256GB, V30 recommended) into the card slot with the contacts facing down until it clicks into place.
- Close the protective cover securely.
Note: Format the Micro SD card in the camera settings via the mobile app before initial use to ensure compatibility and optimal performance.
5. Operating Instructions
5.1 Power On/Off
- Power On: Press and hold the Power/Record button for 2-3 seconds until the LED indicator lights up.
- Power Off: Press and hold the Power/Record button for 2-3 seconds until the LED indicator turns off.
5.2 Recording Video
- With the camera powered on, short press the Power/Record button to start video recording. The LED indicator will flash.
- Short press the Power/Record button again to stop recording. The LED indicator will stop flashing.
5.3 Taking Photos
In video standby mode, a single short press of the Power/Record button will capture a photo. The LED indicator will flash once.
5.4 Loop Recording
The camera supports loop recording. When the Micro SD card is full, the oldest files will be overwritten automatically to make space for new recordings. This feature can be managed via the mobile app.

Image: Camera supports recording while charging and loop recording functionality.
6. App Connectivity (WiFi)
The Chujianxi Mini Action Camera can be controlled and managed via a dedicated mobile application.
- Download the official Chujianxi app from your smartphone's app store (iOS or Android).
- Power on the camera.
- On your smartphone, go to WiFi settings and connect to the camera's WiFi network (SSID and password can be found in the camera's settings or manual).
- Open the Chujianxi app. You should now see a live view from the camera and be able to control recording, adjust settings, and download files.
6.1 PC Webcam Function
Connect the camera to your computer using the Type-C cable. The camera can function as a webcam for video calls or live streaming.

Image: Mobile app interface for controlling the camera via WiFi.
7. Mounting Options
The camera comes with a variety of accessories for flexible mounting in different scenarios.
7.1 Magnetic Attachment
The camera features a built-in magnet, allowing it to be securely attached to any metallic surface. This is ideal for quick setup on vehicles, refrigerators, or other metal objects.
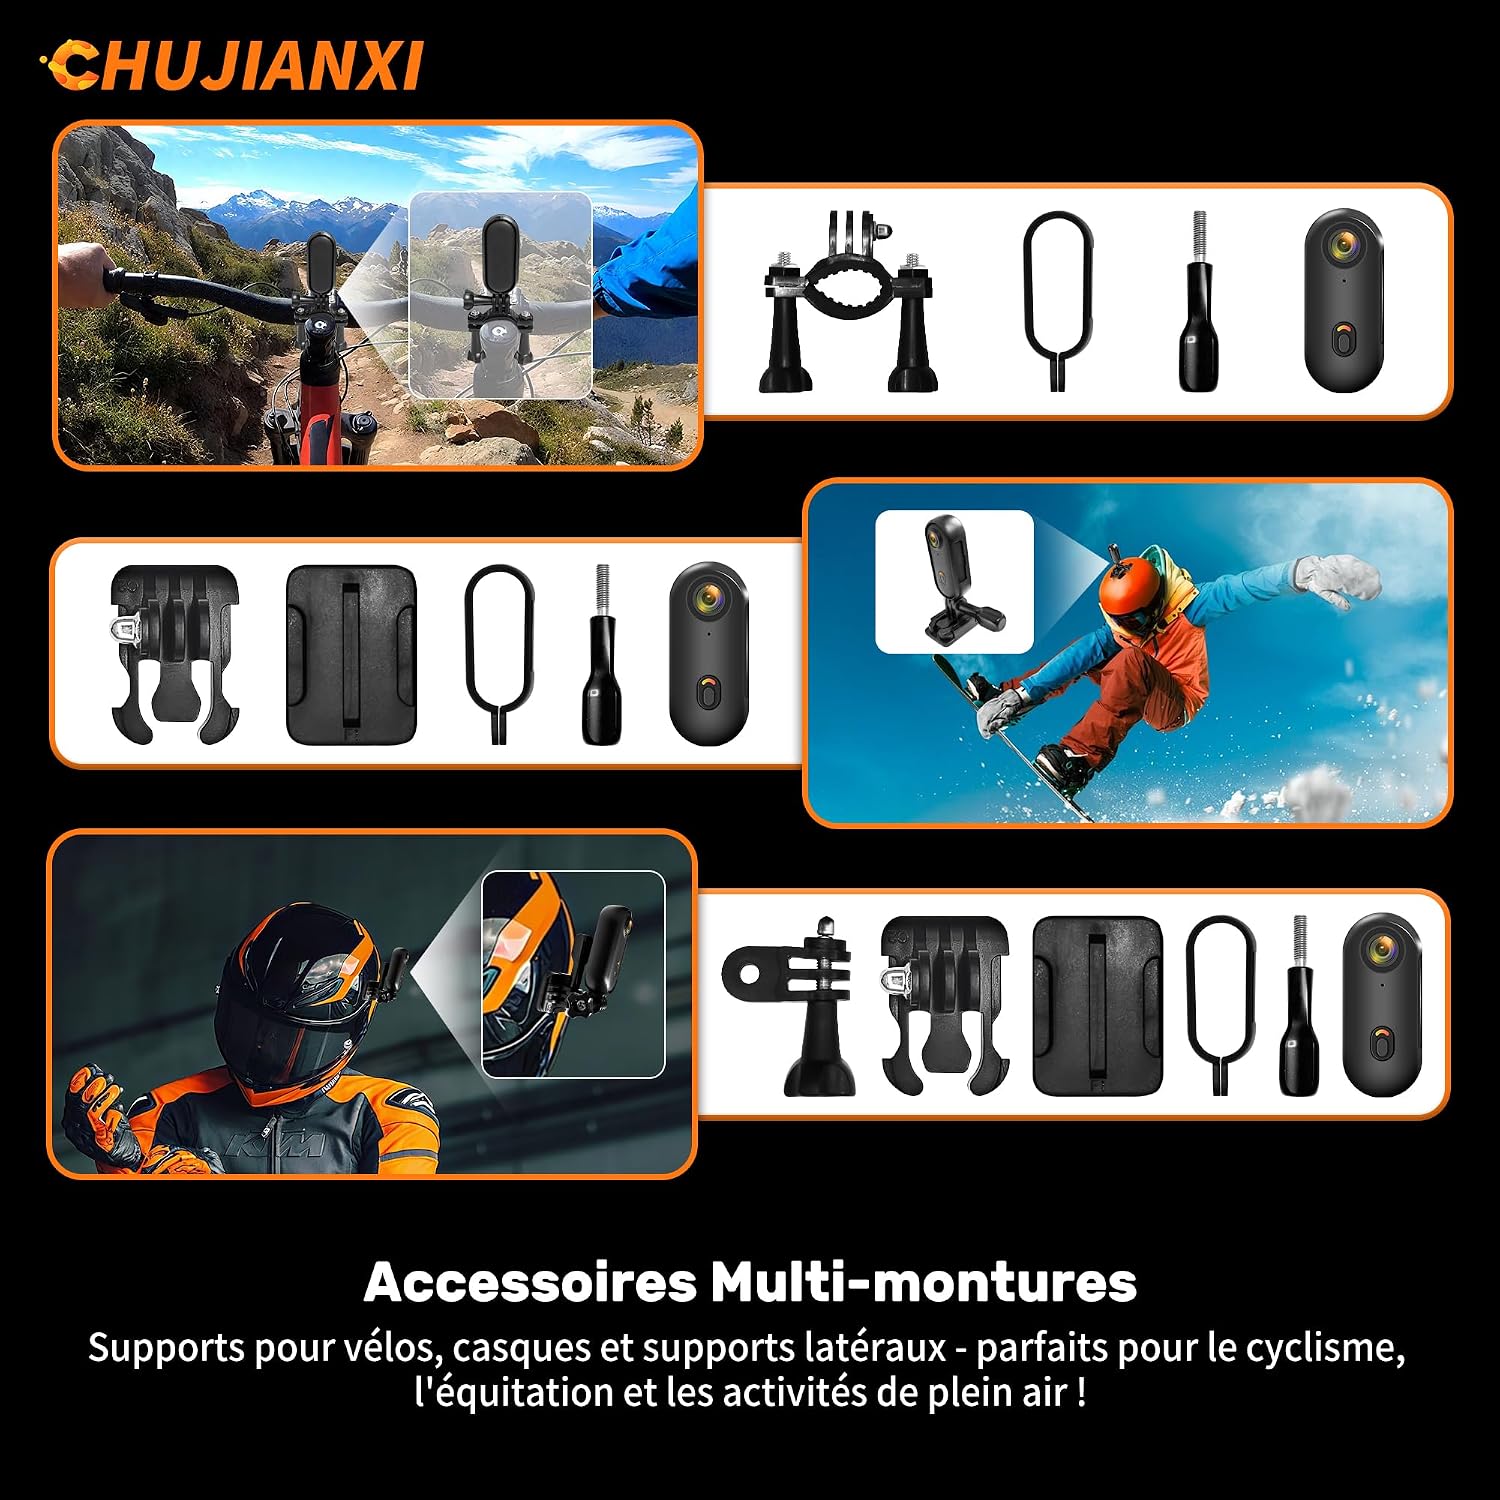
Image: Magnetic mounting of the camera.
7.2 Using the 360° Rotating Back Clip
Attach the camera to the 360° rotating back clip. This allows you to clip the camera onto clothing, backpacks, or other straps and adjust the angle as needed.
7.3 Other Mounts
Utilize the included bike mounts, helmet mount, and side mount with the camera frame or waterproof case for specific activities like cycling, skiing, or vlogging. These mounts provide secure attachment and versatile angles.

Image: Examples of the 6 versatile mounting kits in use.
7.4 Waterproof Case Usage
To use the camera underwater, it must be placed inside the included waterproof case. The case protects the camera up to a depth of 30 meters.
- Ensure the camera is clean and dry before placing it in the case.
- Open the waterproof case latch and carefully insert the camera.
- Close the latch firmly to ensure a watertight seal.
- Before submerging, perform a leak test by placing the empty case in water for a few minutes.

Image: Camera secured within the waterproof case.
8. Maintenance
- Cleaning: Use a soft, dry cloth to clean the camera body. For the lens, use a specialized lens cleaning cloth and solution. Do not use harsh chemicals.
- Waterproof Case Care: After each use in water, rinse the waterproof case with fresh water and allow it to air dry. Check the rubber seal for any debris or damage.
- Storage: Store the camera in a cool, dry place away from direct sunlight and extreme temperatures. Remove the Micro SD card if storing for extended periods.
- Battery: For optimal battery life, avoid fully discharging the battery frequently. Charge the camera periodically if not used for a long time.
9. Troubleshooting
9.1 Camera Not Turning On
- Ensure the battery is charged. Connect the camera to a power source.
- Press and hold the Power/Record button for at least 3 seconds.
9.2 Recording Issues
- Check if a Micro SD card is inserted correctly and has sufficient free space.
- Ensure the Micro SD card is Class 10 or higher and formatted correctly.
- The battery might be low. Charge the camera.
9.3 WiFi Connection Problems
- Ensure the camera's WiFi is enabled.
- Check your phone's WiFi settings to ensure it's connected to the camera's network.
- Restart both the camera and your smartphone.
9.4 Waterproof Case Leakage
- Always perform a leak test with the empty case before use.
- Ensure the rubber seal is clean, free of debris, and properly seated.
- Verify the latch is securely closed.
10. Specifications
| Feature | Specification |
|---|---|
| Brand | Chujianxi |
| Model Name | Chujianxi Camera Sport 1080P |
| Video Recording Resolution | 1080p Full HD |
| Effective Video Resolution | 1080 Pixels |
| Effective Photo Resolution | 12.2 Megapixels (4032x3024) |
| Sensor Technology | CMOS |
| Connectivity Technology | USB, Wi-Fi |
| Flash Memory Type | Micro SD (up to 256GB, Class 10, V30) |
| Video Capture Format | MP4 |
| Image Format Supported | JPEG |
| Audio Format Supported | AAC |
| Special Features | One-touch recording, Lightweight, Magnetic, Thumb-sized, Waterproof case |
| Water Resistance Level | Waterproof (with case, up to 30 meters) |
| Image Stabilization | Digital |
| Weight | 35 Grams |
| Battery | 1 AAA (included) |
| Lens Type | Wide Angle |
| Focus Type | Auto Focus |
| Viewing Angle | 120 Degrees |
| Compatible Devices | Smartphone, PC |
11. Warranty and Support
Your Chujianxi Mini Action Camera 1080P comes with a 1-year manufacturer's warranty from the date of purchase. This warranty covers manufacturing defects and material faults under normal use. It does not cover damage caused by misuse, accidents, unauthorized modifications, or improper maintenance.
For warranty claims, technical support, or any questions regarding your product, please contact Chujianxi customer service through the retailer where you purchased the product or visit our official website for contact information.
Please retain your proof of purchase for warranty purposes.