
FTYHFEFH FTYHFEFH
Instruction Manual
Carburetor for Briggs & Stratton Engines
Model: FTYHFEFH
Product Overview
This carburetor is designed as a direct replacement for Briggs & Stratton engines, specifically models 31G777 and 31H707. It is manufactured to exact factory dimensions to ensure a perfect fit and easy installation. The durable, corrosion-resistant construction is intended for extended service life.
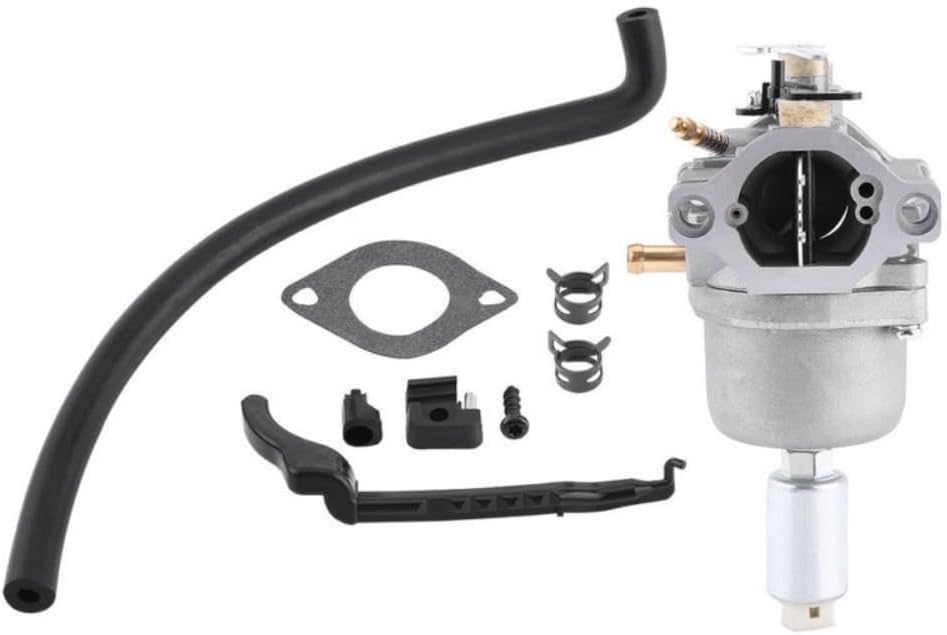
Image 1: Complete carburetor kit including the main carburetor unit, fuel hose, mounting gaskets, and hose clamps. This image shows all components included in the package.

Image 2: Front view of the carburetor, highlighting the air intake and throttle plate. The fuel bowl is visible at the bottom.

Image 3: Side view of the carburetor, showing the fuel inlet and choke mechanism. The robust metal construction is evident.

Image 4: Another side perspective of the carburetor, detailing the linkage points and mounting holes.

Image 5: Rear view of the carburetor, showing the engine mounting surface and internal components through the air intake.

Image 6: Composite image displaying four different angles of the carburetor, providing a comprehensive view of its design and features.
Setup and Installation
Before beginning installation, ensure the engine is cool and the fuel line is disconnected and drained to prevent spills. It is recommended to wear appropriate safety gear, including gloves and eye protection.
- Preparation: Disconnect the spark plug wire. Drain the fuel tank or clamp the fuel line to prevent fuel flow.
- Removal of Old Carburetor:
- Carefully disconnect the fuel line, throttle linkage, and choke linkage from the old carburetor.
- Unbolt the old carburetor from the engine manifold. Note the position of any gaskets.
- Remove the old carburetor and any old gasket material from the mounting surfaces.
- Installation of New Carburetor:
- Ensure the mounting surfaces on the engine and air filter housing are clean and free of debris.
- Place the new gaskets (included in the package) in their correct positions between the engine, carburetor, and air filter housing.
- Mount the new carburetor onto the engine, aligning it with the bolt holes. Secure it with the original bolts, tightening them evenly.
- Reconnect the fuel line, ensuring it is securely clamped.
- Reconnect the throttle and choke linkages to the new carburetor. Verify smooth operation of both.
- Final Checks:
- Inspect all connections for tightness and proper routing.
- Check for any kinks in the fuel line.
- Reconnect the spark plug wire.
For detailed engine-specific instructions, refer to your engine's service manual.
Operation
After installing the new carburetor, follow these general steps to start and operate your engine. Always refer to your engine's specific operating manual for precise instructions.
- Fueling: Ensure the fuel tank contains fresh, clean fuel appropriate for your engine type.
- Choke Application: For cold starts, engage the choke fully. As the engine warms up, gradually disengage the choke.
- Starting Procedure: Follow your engine's standard starting procedure (e.g., pull cord, electric start).
- Warm-up: Allow the engine to warm up for a few minutes before putting it under load.
- Idle Adjustment (if necessary): If the engine idles too high or too low after warm-up, a minor idle speed adjustment screw may be present on the carburetor. Adjust incrementally until a stable idle is achieved.
Note: This carburetor is pre-set from the factory for optimal performance. Further adjustments are typically not required.
Maintenance
Proper maintenance extends the life of your carburetor and ensures reliable engine performance.
- Fuel Quality: Always use fresh, clean fuel. Stale or contaminated fuel is a primary cause of carburetor issues. Consider using a fuel stabilizer if the engine will be stored for extended periods.
- Fuel Filter: Regularly inspect and replace the fuel filter (if equipped) to prevent debris from reaching the carburetor.
- Air Filter: Ensure the engine's air filter is clean and properly installed. A dirty air filter can cause the engine to run rich and affect carburetor performance.
- Storage: Before long-term storage, either run the engine until it runs out of fuel or drain the fuel system to prevent gum and varnish buildup in the carburetor.
- Cleaning: If performance issues arise due to fuel contamination, the carburetor may need to be disassembled and cleaned with a carburetor cleaner. This should only be performed by individuals with appropriate mechanical knowledge.
Troubleshooting
This section provides general guidance for common issues. For complex problems, consult a qualified technician.
| Problem | Possible Cause | Solution |
|---|---|---|
| Engine will not start | No fuel, stale fuel, clogged fuel filter, spark plug issue, incorrect choke setting. | Check fuel level and quality. Replace fuel filter. Inspect/replace spark plug. Adjust choke. |
| Engine runs rough or stalls | Dirty air filter, contaminated fuel, carburetor jets clogged, vacuum leak. | Clean/replace air filter. Drain and refill with fresh fuel. Clean carburetor (professional recommended). Check for loose connections. |
| Engine lacks power | Dirty air filter, restricted exhaust, carburetor not adjusted correctly (unlikely with new unit). | Clean/replace air filter. Check exhaust for blockages. Ensure proper fuel flow. |
| Fuel leak from carburetor | Loose bowl screws, damaged gasket, stuck float, worn needle valve. | Tighten screws. Replace gasket. Inspect float and needle valve for proper operation. |
Specifications
- Product Type: Carburetor Assembly
- Compatibility: Briggs & Stratton 31G777, 31H707 (and similar models as direct replacement)
- Brand: FTYHFEFH
- Model Number: FTYHFEFH
- Item Weight: 1 pound
- Product Dimensions: 1 x 1 x 1 inches (approximate)
- Manufacturer Part Number: 1
- UPC: 779603349969
Warranty and Support
This product is designed for durability and performance. For specific warranty information, please refer to the seller's policy or contact the manufacturer directly. General support for installation and troubleshooting can often be found through online resources or by consulting a professional small engine mechanic.
For further assistance, please contact your point of purchase or refer to the manufacturer's official website.
Ask a question about this manual
Ask about setup, troubleshooting, compatibility, parts, safety, or missing instructions. Manuals+ will review the question and use this page’s manual context to help answer it.