Introduction
Thank you for choosing the Ceybo Original Solar Voice Remote Control. This remote is designed to provide seamless control over your compatible Samsung Smart TV, featuring convenient solar charging, voice command capabilities, and dedicated shortcut buttons for popular streaming services. This manual will guide you through the setup, operation, and maintenance of your new remote control.

Image: Front and back view of the Ceybo Solar Voice Remote Control, showcasing its sleek design and solar charging panel on the rear.
Setup
1. Charging the Remote
Your Ceybo remote control features an eco-friendly solar charging panel and a USB-C port for convenient power options.
- Solar Charging: Place the remote control with its solar panel facing a light source (natural sunlight or indoor lighting) to charge the internal battery. For optimal charging, ensure the panel is exposed to light regularly.
- USB-C Charging: For faster charging or when light is insufficient, connect a USB-C cable (not included) to the remote's USB-C port and a power adapter.

Image: The Ceybo remote control positioned to receive sunlight, illustrating its solar charging capability.
2. Pairing with Your Samsung Smart TV
The Ceybo remote uses Bluetooth for connection. Follow these steps to pair it with your TV:
- Ensure your TV is powered on.
- Point the remote towards your TV.
- Simultaneously press and hold the Return button (curved arrow) and the Play/Pause button for 3 seconds or more.
- A red light on the remote will start blinking, indicating it is in pairing mode.
- A prompt will appear on your TV screen confirming that the remote is paired.
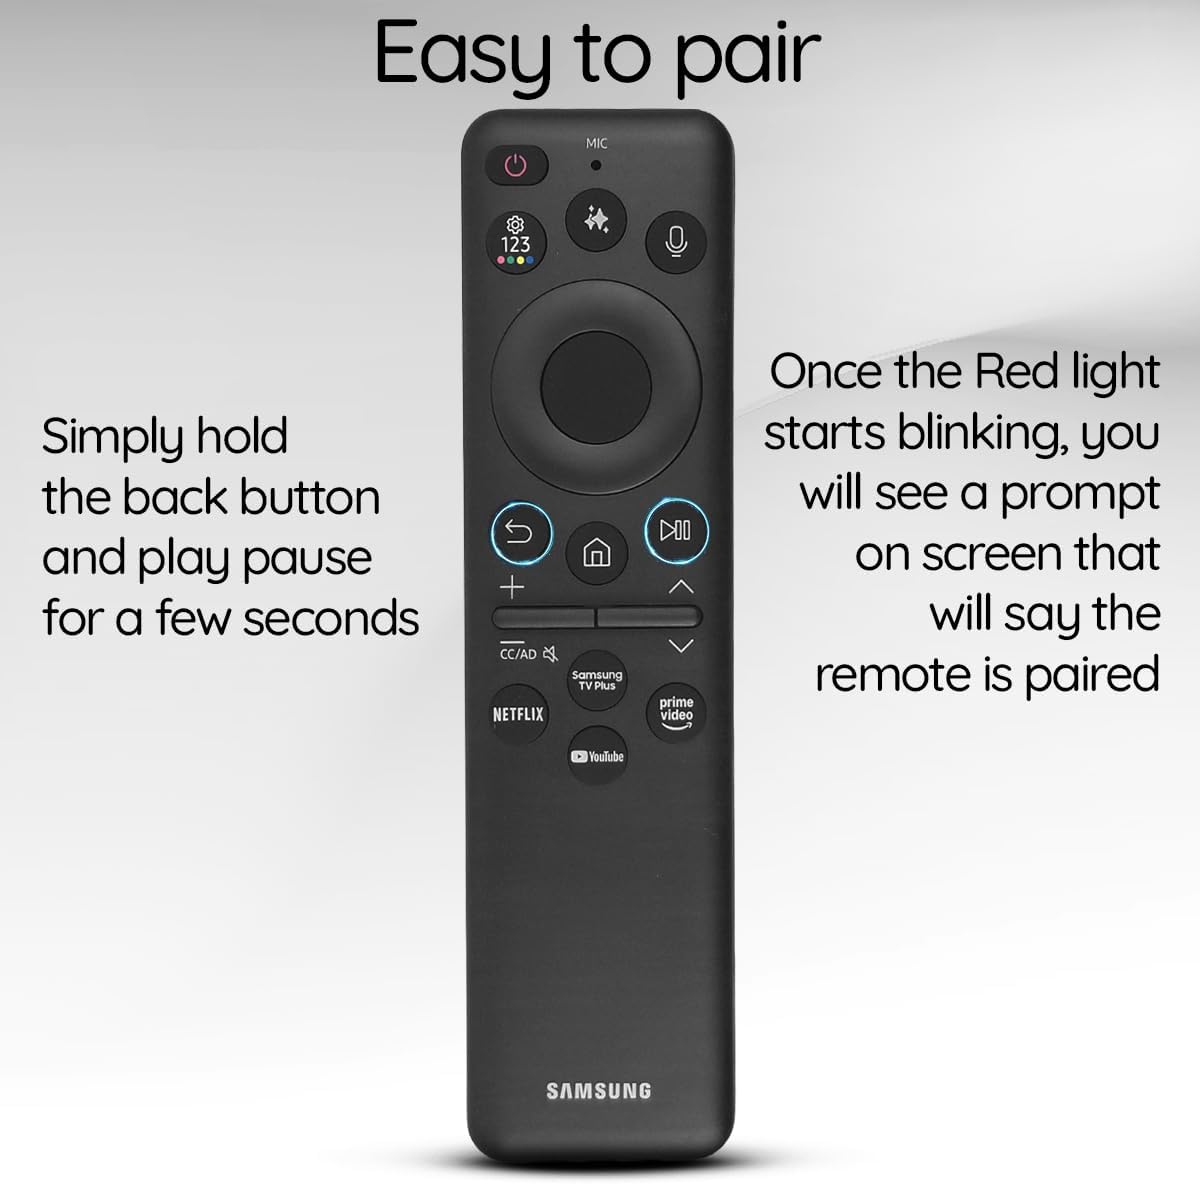
Image: The Ceybo remote control with a visual guide indicating the Return and Play/Pause buttons for pairing, and a text overlay explaining the pairing process.
Operating the Remote
Basic Functions
- Power Button: Located at the top right, press to turn the TV on or off.
- Volume Buttons (+/-): Adjust the TV's volume.
- Channel Buttons (Up/Down): Change TV channels.
- Directional Pad (Circular): Navigate menus and select items.
- Home Button: Return to the TV's home screen.
- Return Button: Go back to the previous screen or menu.
- Play/Pause Button: Control media playback.
Voice Control
Utilize the built-in voice assistant for hands-free control:
- Press the Microphone button (located near the top, with a microphone icon).
- Speak your command clearly, such as "Open Netflix," "Change to Channel 5," or "Increase volume."
- The TV will respond to your voice command.

Image: The Ceybo remote control with a magnified view of the microphone button, illustrating its use for voice commands.
Shortcut Buttons
Access your favorite streaming services instantly with dedicated shortcut buttons:
- Press the Netflix button to launch Netflix.
- Press the Prime Video button to launch Amazon Prime Video.
- Press the YouTube button to launch YouTube.
- Press the Samsung TV Plus button to access Samsung's free streaming service.

Image: The Ceybo remote control with a magnified view of the dedicated shortcut buttons for Netflix, Prime Video, YouTube, and Samsung TV Plus.
AI Button
Some Samsung Smart TVs feature AI capabilities. If your TV supports it, press the AI button (often depicted with a sparkle or star icon) to access AI features such as live translation or intelligent recommendations.

Image: The Ceybo remote control with a magnified view of the AI button, indicating its function for accessing artificial intelligence features.
Maintenance
- Cleaning: Wipe the remote control with a soft, dry cloth. Avoid using liquid cleaners or abrasive materials.
- Solar Panel Care: Keep the solar panel clean and free from obstructions to ensure efficient charging. Regularly expose the remote to light.
- Storage: Store the remote in a cool, dry place away from direct sunlight for prolonged periods if not in use, but ensure it receives light periodically to maintain charge.
Troubleshooting
- Remote not responding:
- Ensure the remote is charged. Try charging via USB-C or exposing it to bright light.
- Re-pair the remote with your TV by holding the Return and Play/Pause buttons simultaneously for 3 seconds.
- Check for any obstructions between the remote and the TV.
- Voice control not working:
- Ensure the remote is properly paired.
- Speak clearly and directly into the microphone.
- Check your TV's settings to ensure voice control is enabled.
- Shortcut buttons not launching apps:
- Ensure your TV is connected to the internet.
- Verify that the respective apps are installed and updated on your TV.
Specifications
| Feature | Detail |
|---|---|
| Model Number | BN59-01480A |
| Power Source | Solar Charging, USB-C |
| Connectivity | Bluetooth |
| Special Features | Voice Search, Dedicated Shortcut Buttons (Netflix, Prime Video, YouTube, Samsung TV Plus), AI Button |
| Compatible Devices | Samsung Smart Televisions |
| Color | Black |
| Item Weight | 3.2 ounces |
| Package Dimensions | 5.55 x 1.97 x 0.55 inches |
Compatibility
This Ceybo Solar Voice Remote Control (Model BN59-01480A) is compatible with a wide range of Samsung Smart TVs, including:
- Neo QLED 8K Series
- QLED Series
- Specific models include: QN42S90FAFXZA, QN43Q7FAAFXZA, QN43QN90FAFXZA, QN48S90FAFXZA, QN50Q7FAAFXZA, QN50QN90FAFXZA, QN55Q7FAAFXZA, QN55QN70FAFXZA, QN55QN80FAFXZA, QN55QN90FAFXZA, QN55S85FAFXZA, QN55S90FAFXZA, QN55S95FAFXZA, QN65Q7FAAFXZA, QN65QN70FAFXZA, QN65QN80FAFXZA, QN65QN900FFXZA, QN65QN90FAFXZA, QN65QN990FFXZA, QN65S85FAFXZA, QN65S90FAFXZA, QN65S95FAFXZA, QN75QN70FAFXZA, QN75QN80FAFXZA, QN75QN900FFXZA, QN75QN90FAFXZA, QN75QN990FFXZA, QN77S85FAFXZA, QN77S90FAFXZA, QN77S95FAFXZA, QN83S85FAFXZA, QN83S90FAFXZA, QN85Q7FAAFXZA, QN85QN70FAFXZA, QN85QN80FAFXZA, QN85QN900FFXZA, QN85QN90FAFXZA, QN85QN990FFXZA.

Image: The Ceybo remote control displayed alongside various Samsung Neo QLED and QLED televisions, illustrating its broad compatibility.

Image: A visual representation of the Ceybo remote control with a comprehensive list of compatible Samsung TV model numbers.
Warranty and Support
For warranty information and customer support, please refer to the documentation provided with your purchase or contact the seller directly. Keep your proof of purchase for any warranty claims.


