1. Introduction
This manual provides comprehensive instructions for the installation, operation, maintenance, and troubleshooting of your Masterplug EV Wall Charging Station, model EVCM3BS7BR. Please read this manual thoroughly before installation and use to ensure safe and efficient operation of the device. Keep this manual for future reference.

Figure 1: Masterplug EV Wall Charging Station in a home environment.
The Masterplug EVCM3BS7BR is a Type 2, single-phase electric vehicle charging station designed for wall mounting. It offers a maximum output of 7.4 kW (32A) and features an automatic lock function for the charging cable. The unit is RFID compatible for controlled access and is rated IP65 for indoor and outdoor use.
2. Safety Information
Always adhere to the following safety guidelines to prevent injury, damage to the product, or property damage:
- Installation must be performed by a qualified electrician in accordance with all local and national electrical codes and regulations.
- Do not attempt to open, disassemble, or modify the charging station. This may void the warranty and pose a safety risk.
- Ensure the charging cable and connector are free from damage before each use. Do not use if damaged.
- Keep children and pets away from the charging station during operation.
- The unit is designed for electric and hybrid vehicles with a Type 2 charging inlet. Do not attempt to charge other devices.
- Integrated safety protections include overload, short circuit, and overheating protection. Do not bypass these features.

Figure 2: Enhanced safeguards protect users and vehicles.
3. Package Contents
Verify that all items are present and undamaged upon unpacking:
- Masterplug EV Wall Charging Station (EVCM3BS7BR)
- Mounting hardware (screws, wall anchors)
- Drilling template
- RFID cards (2 included)
- User Manual (this document)

Figure 3: Charging Station (Front)

Figure 4: Charging Station (Side)

Figure 5: Charging Cable
4. Setup
4.1 Mounting the Charging Station
- Choose a suitable mounting location on a solid wall, ensuring adequate space for cable management and vehicle access.
- Use the provided drilling template to mark the four fixing points.
- Drill holes and insert wall anchors as required.
- Securely mount the charging station to the wall using the provided screws. The design allows for horizontal and vertical adjustment.

Figure 6: Easy installation and robust design with IK08 impact resistance.
4.2 Electrical Connection
Warning: Electrical installation must be performed by a certified electrician. Incorrect installation can lead to electric shock, fire, or damage to the unit.
- Ensure the main power supply is disconnected before commencing electrical work.
- Connect the charging station to a dedicated single-phase 230V, 32A circuit.
- Install appropriate overcurrent protection (e.g., circuit breaker) and residual current device (RCD) as per local regulations.
4.3 Initial Power-Up and RFID Setup
- Once electrical connections are complete and verified, restore power to the circuit.
- The LED indicator on the charging station will illuminate, indicating power is supplied.
- To enable controlled charging, present one of the included RFID cards to the RFID reader area on the charging station. The unit will register the card for future use.

Figure 7: RFID support for starting and stopping charging.
5. Operating Instructions
5.1 Starting a Charge
- Ensure your electric vehicle is parked and ready for charging.
- Insert the Type 2 charging connector firmly into your vehicle's charging inlet. The automatic lock function will engage, securing the connector.
- Present an authorized RFID card to the RFID reader on the charging station. The LED indicator will change, and charging will commence.
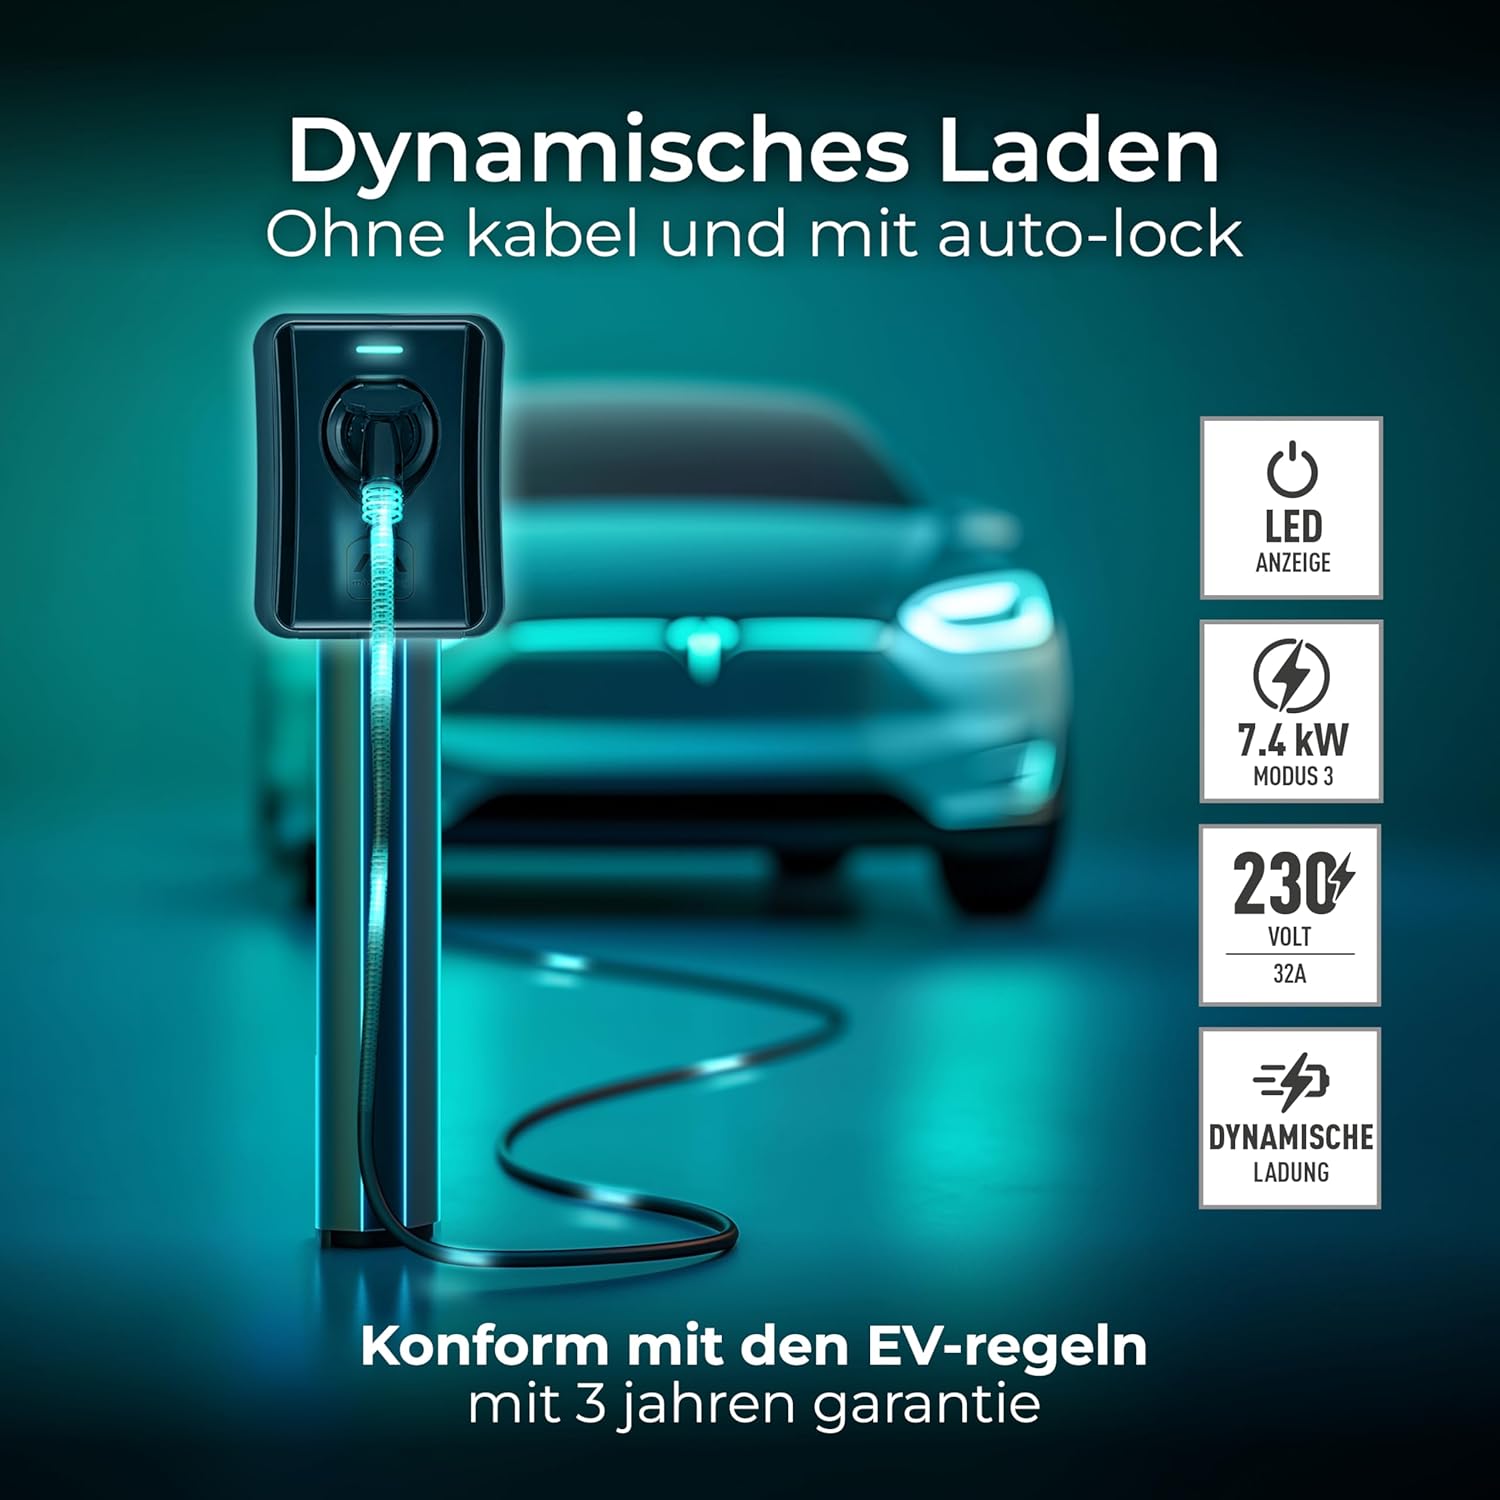
Figure 8: Dynamic charging with LED indicator and auto-lock function.
5.2 Stopping a Charge
- To stop charging, present the same authorized RFID card to the RFID reader again. The charging process will cease.
- Once charging has stopped, the automatic lock will disengage, allowing you to remove the charging connector from your vehicle.
- Always return the charging cable to its designated storage position to prevent damage.

Figure 9: Secure connector lock for safety and theft prevention.
5.3 LED Indicator Meanings
Refer to the following table for the meaning of the LED indicator lights:
| LED State | Meaning |
|---|---|
| Solid Blue | Standby / Ready to charge |
| Flashing Blue | Charging in progress |
| Solid Red | Error / Fault |
| Flashing Green | RFID card detected / Authorization pending |
6. Maintenance
Regular maintenance ensures the longevity and optimal performance of your charging station.
- Cleaning: Periodically wipe the exterior of the charging station with a soft, damp cloth. Do not use abrasive cleaners or solvents. Ensure the unit is powered off before cleaning.
- Inspection: Regularly inspect the charging cable and connector for any signs of wear, cuts, or damage. Check the housing of the charging station for cracks or loose components.
- Environmental Conditions: The unit has an IP65 rating, making it suitable for outdoor use and resistant to dust and water jets. It operates efficiently between -20°C and +50°C. Ensure the operating environment remains within these parameters.

Figure 10: Integrated safety protection and IP65 weather resistance.
7. Troubleshooting
If you encounter issues with your charging station, refer to the following common problems and solutions:
| Problem | Possible Cause | Solution |
|---|---|---|
| Charging does not start | No power, RFID card not authorized, connector not fully inserted, vehicle not ready. | Check power supply, ensure RFID card is registered, re-insert connector firmly, check vehicle's charging status. |
| Red LED indicator | Internal fault, overcurrent, overheating. | Disconnect power, wait 5 minutes, then reconnect. If error persists, contact support. |
| Connector not locking/unlocking | Obstruction, mechanical fault. | Ensure connector is clean and free of debris. Do not force. If issue persists, contact support. |
For issues not listed here or if solutions do not resolve the problem, please contact Masterplug customer support.
8. Specifications
| Feature | Specification |
|---|---|
| Model | EVCM3BS7BR |
| Input Voltage | 230V AC |
| Rated Current | 32A |
| Max Output Power | 7.4 kW |
| Phase | Single-phase |
| Connector Type | Type 2 |
| Ingress Protection (IP) Rating | IP65 |
| Impact Protection (IK) Rating | IK08 |
| Operating Temperature | -20°C to +50°C |
| Dimensions (L x W x H) | 300 x 335 x 90 mm |
| Weight | 4 kg |
| Safety Features | Overload, Short Circuit, Overheating, Leakage Protection |

Figure 11: Compatibility with Type 2 electric and hybrid vehicles.
9. Warranty
The Masterplug EV Wall Charging Station EVCM3BS7BR comes with a 3-year manufacturer's warranty. This warranty covers defects in materials and workmanship under normal use. Please retain your proof of purchase for warranty claims. The warranty does not cover damage caused by improper installation, misuse, unauthorized modifications, or natural disasters.
10. Support
For technical assistance, warranty claims, or further information regarding your Masterplug EV Wall Charging Station, please visit the official Masterplug website or contact your retailer. Ensure you have your product model number (EVCM3BS7BR) and proof of purchase available when seeking support.


