
Introduction
This manual provides detailed instructions for the setup, operation, and maintenance of your YUYIU Wireless 2.4GHz Controller. Please read this manual thoroughly before using the product to ensure optimal performance and longevity.

Image: The YUYIU Wireless 2.4GHz Controller in Snow White, showcasing its design and RGB lighting around the joysticks.
Package Contents
Please verify that all items are present in your package:
- YUYIU Wireless 2.4GHz Controller
- 2.4GHz Wireless Adapter
- Type-C Charging Cable
- User Manual (this document)
Product Overview
Familiarize yourself with the various buttons and ports on your controller.

Image: A detailed diagram labeling the buttons, joysticks, D-pad, triggers, programmable keys (ML/MR), Type-C port, reset button, and light setting key on the YUYIU Wireless Controller.
- Home Button: Powers on/off the controller and accesses system menus.
- View/Menu Buttons: Standard navigation buttons.
- A/B/X/Y Buttons: Action buttons.
- D-Pad: Directional pad for navigation.
- Left/Right Joysticks (L3/R3): For movement and camera control.
- Left/Right Bumpers (LB/RB): Shoulder buttons.
- Left/Right Triggers (LT/RT): Analog triggers.
- ML/MR Buttons: Programmable back paddles.
- Light Setting Key: Controls RGB lighting modes.
- Reset Button: For factory reset or troubleshooting.
- Type-C Port: For charging and wired connection.
- 3.5mm Audio Jack: For connecting headphones and microphones.
Setup
1. Wireless Connection (2.4GHz Adapter)
The controller connects wirelessly via a 2.4GHz USB adapter. No additional drivers are required for most compatible systems.
- Insert the 2.4GHz wireless adapter into an available USB port on your Xbox console (Xbox One, Xbox Series X|S) or PC (Windows 10 and above).
- Turn on the controller by pressing the Home button.
- The indicator light on the controller will flash slowly, and the indicator light on the receiver will also flash slowly.
- Press and hold the Home button on the controller to initiate pairing.
- After a few seconds, both the controller and receiver indicator lights will illuminate steadily, indicating a successful connection. The controller is now ready for use.
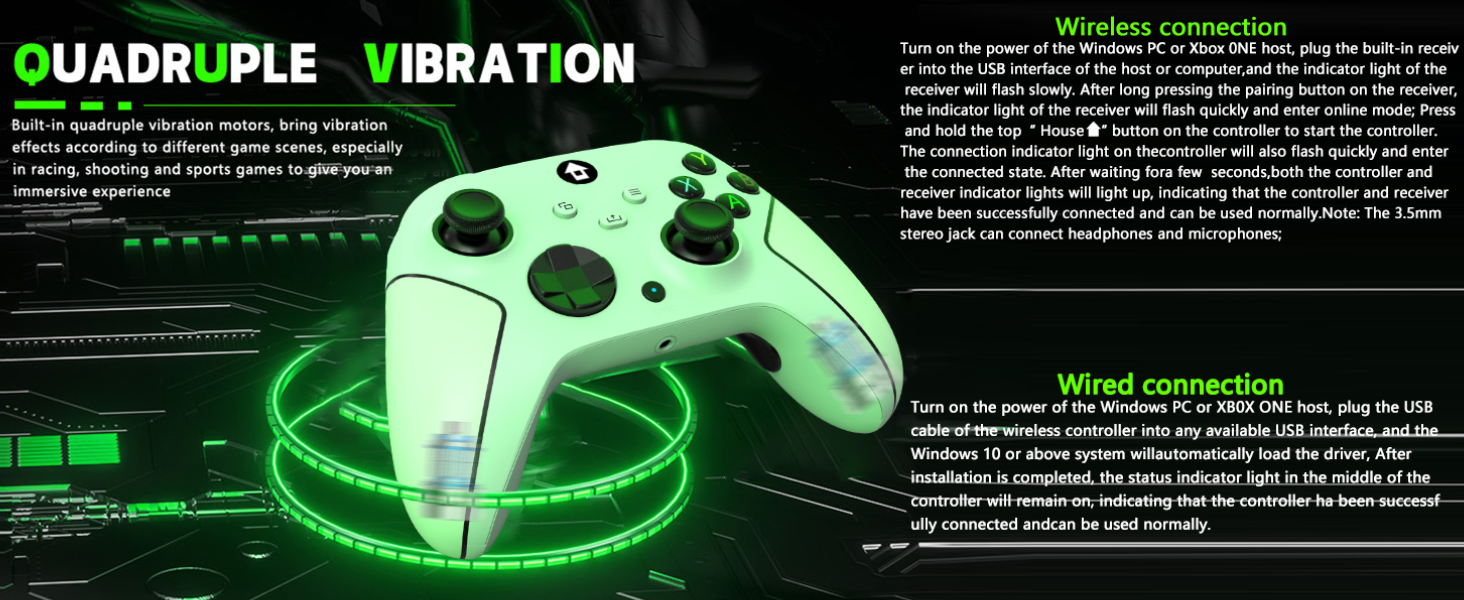
Image: Visual guide illustrating both wireless connection via 2.4GHz adapter and wired connection via USB-C cable, along with a description of the quadruple vibration feature.
Note: Some users report that the initial connection may require several attempts. If the controller does not connect immediately, try repeating the pairing steps.
2. Wired Connection
The controller can also be used in wired mode.
- Connect the Type-C end of the charging cable to the controller and the USB-A end to an available USB port on your Xbox console or PC.
- The controller will automatically be recognized by the system. The indicator light in the middle of the controller will remain on, signifying a successful wired connection.
Operating Instructions
1. RGB Lighting Modes
The controller features 7-color RGB lighting with multiple modes.
- Monochrome Constant On: Press the Light Setting Key + A button.
- Breathing Mode: Press the Light Setting Key + B button.
- Circle Running Marquee Changing Mode: Press the Light Setting Key + Y button.
- To turn off the RGB LED lights, cycle through the modes or refer to the specific instruction for turning off.

Image: An illustration showing the four distinct RGB lighting modes available on the YUYIU controller: RGB LED off, Flashing Light, Breath LED light, and Solid LED lights.
2. Programmable Keys (ML/MR)
The "ML" and "MR" buttons on the back of the controller can be programmed to map basic function keys (A/B/X/Y/LB/RB/L3/R3/D-PAD) or a combination of up to 16 function keys.
- Press the M button (next to the Light Setting Key) to enter programming mode. The indicator light will flash.
- Press the button(s) you wish to map (e.g., A, B, X, Y, LB, RB, L3, R3, D-PAD directions).
- Press either the ML or MR button to assign the mapped function(s). The indicator light will stop flashing, confirming the programming.
- To clear a programmed key, enter programming mode, then press the ML or MR button you wish to clear.

Image: An illustration detailing the programmable ML and MR buttons on the back of the controller, showing how they can be assigned functions from A/B/X/Y/LB/RB/L3/R3/D-PAD.
3. Turbo and Auto Turbo Functions
The Turbo function allows for rapid, repeated input of a button press. Auto Turbo automates this without holding the button.
- Set Turbo Function: Press the desired action button (A/B/X/Y/L1/L2/R1/R2) once, then press the Turbo key. The Turbo light will flash. Now, holding the action button will trigger rapid presses.
- Set Auto Turbo Function: With Turbo already set for a button, press the same action button again, then press the Turbo key again. The Turbo light will continue to flash. The button will now automatically repeat presses without being held.
- Clear Turbo Function: Press the action button and the Turbo key a third time to clear the Turbo/Auto Turbo function for that specific button.
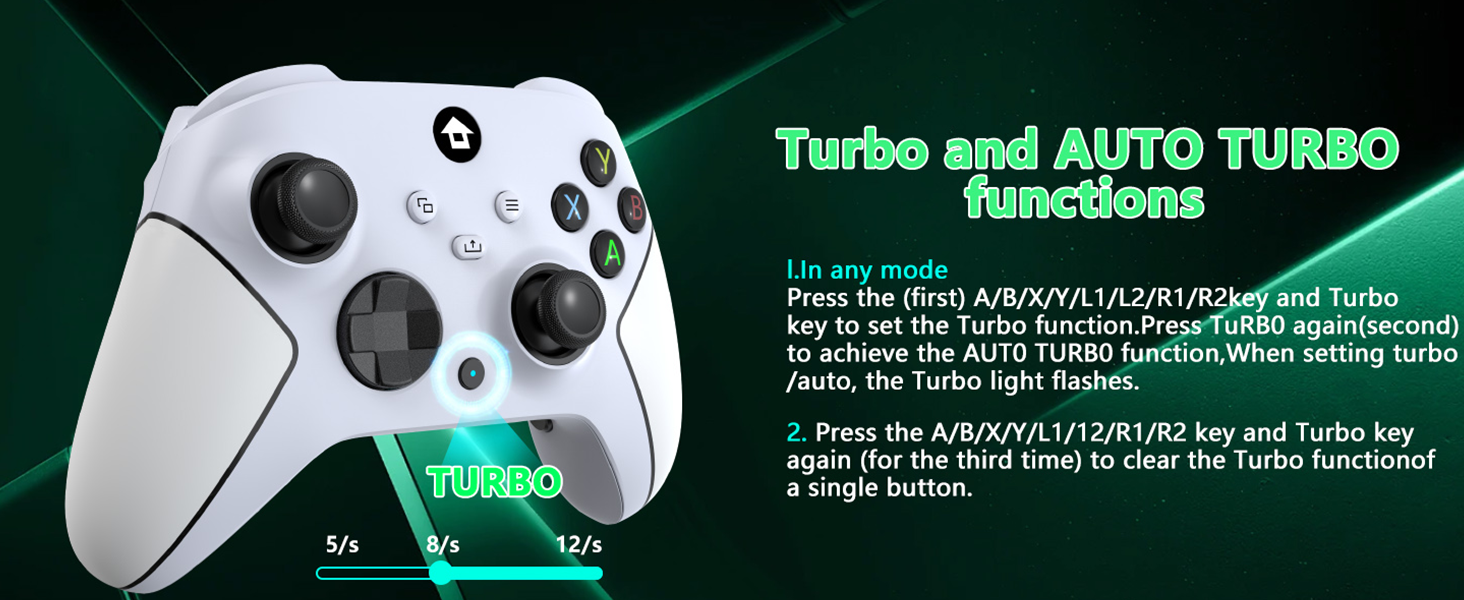
Image: A diagram explaining how to activate and deactivate Turbo and Auto Turbo functions for various buttons on the YUYIU controller, with visual indicators for different turbo speeds.
4. Dual Vibration Motors
The controller features dual vibration motors that provide tactile feedback during gameplay, enhancing immersion for various game scenarios like impacts and explosions.

Image: An illustration showing the internal dual vibration motors within the YUYIU controller, emphasizing their role in providing realistic haptic feedback during gameplay.
5. 3.5mm Audio Jack
A 3.5mm stereo jack is integrated into the controller, allowing you to connect headphones and microphones for simultaneous audio input and output.

Image: A close-up view of the YUYIU controller highlighting the 3.5mm audio jack for headset connection and the 360-degree joysticks for precise control.
Charging and Battery
The controller is equipped with a built-in 1000mAh lithium battery.
- Charging: Connect the controller to a USB power source (e.g., console, PC, USB wall adapter) using the provided Type-C charging cable. The indicator light on the controller will flash slowly during charging.
- Full Charge Indication: Once fully charged, the indicator light on the controller will remain steadily on.
- Charging Time: Approximately 2-3 hours for a full charge.
- Battery Life: A full charge provides approximately 10-14 hours of gameplay.

Image: An illustration of the YUYIU controller being charged via its Type-C port, highlighting the 1000mAh battery capacity and estimated charging/play times.
Maintenance
- Keep the controller dry and away from extreme temperatures.
- Clean the controller with a soft, dry cloth. Avoid using harsh chemicals or abrasive materials.
- Store the controller in a safe place to prevent physical damage.
- Avoid dropping the controller or subjecting it to strong impacts.
Troubleshooting
| Problem | Possible Cause / Solution |
|---|---|
| Controller does not connect wirelessly. |
|
| Controller does not charge or hold a charge. |
|
| Buttons or joysticks are unresponsive or sticky. |
|
| Controller is not recognized by the system in wired mode. |
|
| Controller is advertised as 2.4GHz wireless, not Bluetooth. |
|
Specifications
| Model | B0F7R6TZ3N |
| Connectivity | 2.4GHz Wireless (via USB adapter), Wired (Type-C) |
| Compatibility | Xbox One, Xbox One S, Xbox One X, Xbox Series X, Xbox Series S, Steam PC (Windows 10 and above) |
| Battery Capacity | 1000mAh Lithium Battery |
| Charging Port | Type-C |
| Charging Time | 2-3 hours |
| Play Time | 10-14 hours |
| Wireless Range | Up to 33 feet (10 meters) |
| Audio Jack | 3.5mm Stereo Jack |
| Dimensions | 3.94 x 3.15 x 1.97 inches |
| Weight | 11.7 ounces |
| Manufacturer | YUYIU |
Warranty and Support
YUYIU is committed to providing quality products. If you encounter any issues or have questions regarding your controller, please contact our customer service team.
For support, please refer to the contact information provided with your purchase or visit the official YUYIU store page on Amazon: YUYIU Store.
Please retain your proof of purchase for warranty claims.