
1. Introduction
The XenGro Mini Sticker Printer AHM2 is a portable, inkless thermal printer designed for various applications including creating labels, notes, photos, and DIY crafts. Its compact size and Bluetooth connectivity make it suitable for use at home, in the office, or on the go. This manual provides detailed instructions for setting up, operating, and maintaining your printer.
2. What's in the Box
Upon unpacking your XenGro Mini Sticker Printer AHM2, please ensure all the following items are present:
- 1 x XenGro Mini Sticker Printer (AH-M2)
- 4 x Rolls of Thermal Paper (1 pre-installed, 3 bonus rolls)
- 1 x USB-C Charging Cable
- 1 x User Manual
3. Specifications
| Brand | XenGro |
| Model Name | AHM2 |
| Connectivity Technology | Bluetooth |
| Printing Technology | Thermal |
| Printer Output | Monochrome (Black and White) |
| Max Print Speed Monochrome | 10 ppm |
| Resolution | 203 x 203 dpi |
| Item Weight | 9.6 ounces |
| Product Dimensions | 3.35"D x 3.06"W x 1.38"H |
| Compatible Devices | Smartphones, Tablets |
| Print Media | Thermal Paper (Self-adhesive sticker paper and regular thermal paper) |
4. Setup Guide
4.1. Charging the Printer
Before initial use, fully charge your XenGro Mini Sticker Printer using the provided USB-C cable. Connect the cable to the printer's charging port and a compatible USB power source. The indicator lights will show charging status.
4.2. Installing the Paper Roll
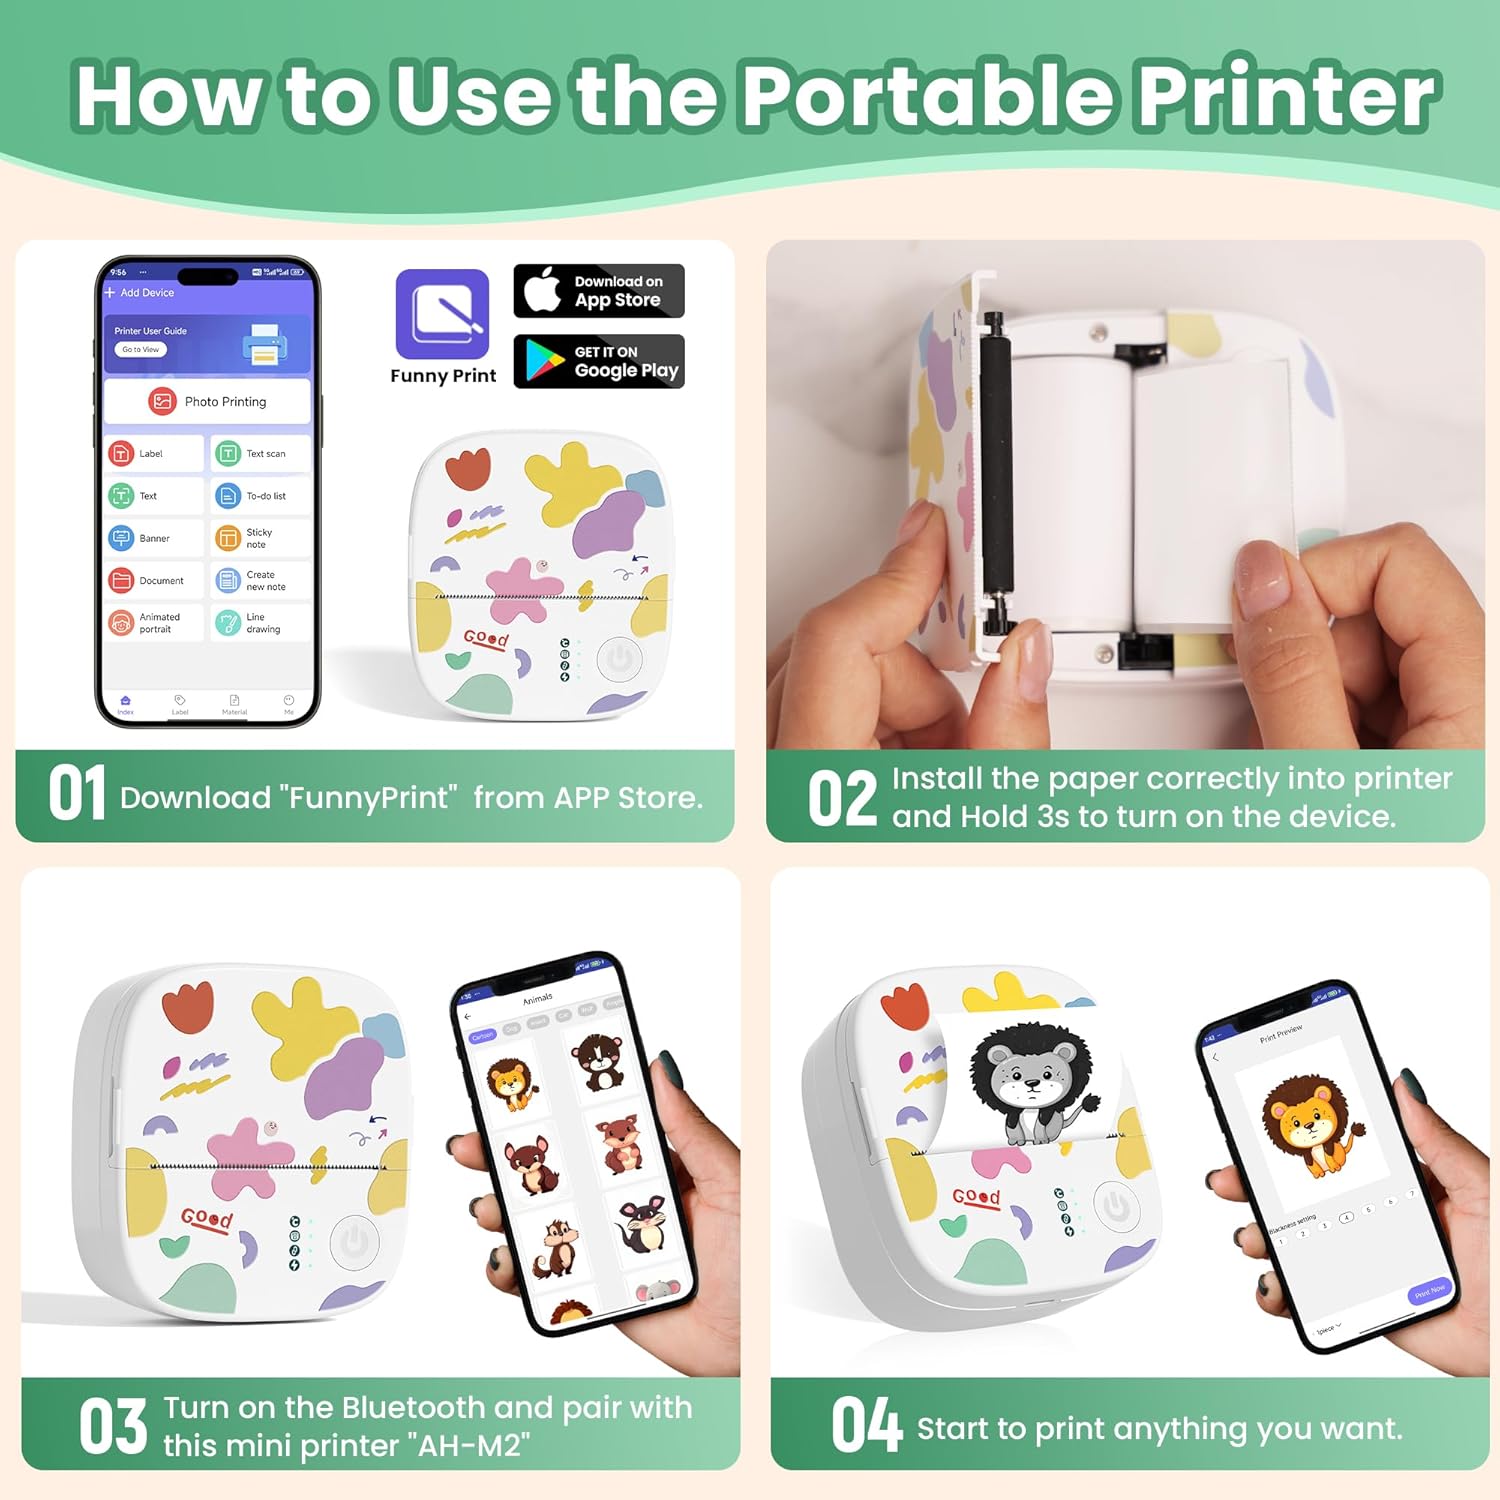
- Hold the handles on the left and right sides of the printer and lift up to open the top cover.
- Insert the thermal paper roll with the print-side facing up, ensuring it feeds smoothly into the printer mechanism.
- Close the top cover firmly until it clicks into place.

4.3. App Download and Bluetooth Connection
- Download the "FunnyPrint" app from your device's app store (available for iOS and Android).
- Long press the power button on the printer until the indicator light flashes, indicating it's in pairing mode.
- Open the "FunnyPrint" app, navigate to the device connection section, and select "AH-M2" to pair via Bluetooth. Important: Connect through the app, not your phone's Bluetooth settings directly.

5. Operating Instructions
5.1. Using the FunnyPrint App
The FunnyPrint app offers various features to enhance your printing experience:
- Photo Printing: Select images from your gallery to print. Adjust blackness and brightness settings for optimal results.
- Label Creation: Design custom labels for organization.
- Text Tools: Print text, banners, and sticky notes.
- Templates: Utilize pre-designed templates for to-do lists, journals, and more.
- Creative Features: Explore options like drag & zoom, OCR (Optical Character Recognition), animated portraits, and line drawing for creative projects.
5.2. Printing Process
- Ensure your printer is powered on and connected to the FunnyPrint app via Bluetooth.
- Within the app, select your desired printing function (e.g., Photo Printing, Label, Text).
- Choose or create your content. Adjust any settings like blackness or size as needed.
- Tap the "Print Now" or "Print" button in the app. The printer will begin printing your content.
- Once printing is complete, gently tear the paper upwards against the built-in sawtooth cutter for a clean edge.


6. Maintenance
6.1. Replacing Paper Rolls
When the paper roll runs out, follow the steps in Section 4.2 to replace it with a new one. For best printing quality and to extend the lifespan of your printer, it is recommended to use original XenGro refill paper.

6.2. Cleaning the Printer
To maintain optimal print quality, occasionally clean the print head and paper path. Use a soft, lint-free cloth lightly dampened with isopropyl alcohol. Ensure the printer is turned off and disconnected from power before cleaning. Allow all components to dry completely before use.
7. Troubleshooting
7.1. Printer Not Connecting via Bluetooth
- Ensure the printer is powered on and fully charged.
- Make sure Bluetooth is enabled on your smartphone or tablet.
- Always connect to the printer through the "FunnyPrint" app, not directly from your phone's Bluetooth settings.
- If the app doesn't find the device, try restarting both the printer and the app.
7.2. Poor Print Quality
- Check if the thermal paper is installed correctly with the print-side facing up.
- Adjust the "Blackness setting" and "Brightness Adjustment" within the FunnyPrint app.
- Ensure you are using genuine XenGro thermal paper for optimal results.
- Clean the print head as described in Section 6.2.
7.3. Paper Jams
- Open the top cover and carefully remove any jammed paper.
- Ensure the paper roll is properly seated and not too tight or loose.
- Use paper rolls that are within the recommended specifications for the printer.
8. Warranty and Support
8.1. Warranty Information
The XenGro Mini Sticker Printer AHM2 comes with a 2-year return and replacement guarantee. This limited warranty covers manufacturing defects and ensures peace of mind for your purchase.
8.2. Customer Support
If you have any questions, encounter issues, or require assistance with your XenGro Mini Sticker Printer, please contact our customer support team. Our team is ready to assist you with any inquiries regarding the printer or compatible paper rolls.
For support, please refer to the contact information provided on the product packaging or the official XenGro website.