
1. Introduction
This manual provides detailed instructions for the setup, operation, and maintenance of your LMBGM AR2090 Mono UHF Dual Channel Wireless In-Ear Monitoring System. Please read this manual thoroughly before using the product to ensure proper function and to maximize its performance and lifespan.
The AR2090 system is designed for professional audio monitoring applications, offering a wide bandwidth response and ultra-low latency for real-time audio control. It features a built-in limiter circuit to prevent distortion at high input levels.
2. Safety Information
- Do not expose the unit to rain or moisture.
- Do not disassemble the unit. Refer all servicing to qualified personnel.
- Avoid placing the unit near heat sources or in direct sunlight.
- Use only the provided power adapter.
- Prolonged listening at high volume levels can cause permanent hearing damage. Set the volume to a comfortable level.
3. Package Contents
Verify that all items listed below are included in your package:
- 1 x Transmitter Unit
- 6 x Bodypack Receivers (with earphones)
- 2 x Antennas
- 2 x Cable Lines
- 1 x Power Adapter
- 1 x User Manual (this document)
4. Product Overview
4.1 System Components

Figure 1: The complete LMBGM AR2090 system, showing the main transmitter unit and six bodypack receivers with attached earphones.
The AR2090 system consists of a main transmitter unit and multiple bodypack receivers. The transmitter sends audio signals wirelessly to the receivers, allowing performers to monitor their sound in real-time.
4.2 Front and Rear Panels of Transmitter

Figure 2: Detailed view of the transmitter's front and rear panels, highlighting various controls and ports.
The transmitter unit features a clear LCD display, power switch, volume controls, and input/output ports. Refer to Figure 2 for a visual guide to the following components:
- Headphone Volume Potentiometer: Adjusts the volume for the 6.35 mm headphone output.
- Infrared Indicator: Lights up during infrared frequency pairing.
- Setup Selection: Button for navigating menu options.
- LED Display: Shows frequency, channel, and other system information.
- Down Select: Button for adjusting settings.
- Power Switch: Turns the unit on or off.
- 6.35 mm Headphone Output: For direct monitoring from the transmitter.
- DC Power Socket: Connects to the power adapter.
- Right Channel Inlet / Volume Control Potentiometer: Audio input for the right channel and its volume adjustment.
- Left Channel Inlet / Volume Control Potentiometer: Audio input for the left channel and its volume adjustment.
- Antenna Ports: Connect the included antennas for wireless transmission.
4.3 Bodypack Receiver

Figure 3: Close-up of the bodypack receiver, showing its display and controls.
Each bodypack receiver allows individual monitoring. Key features include:
- Volume Adjustment Knob: Controls the listening volume for the connected earphones.
- LED Display: Shows current frequency, channel, and battery status.
- Channel Up/Down Buttons: For changing the receiving channel.
- Antenna: Receives signals from the transmitter.
- 3.5 mm Headphone Output: Connect your earphones here.
- Low Battery Indicator: An LED light indicates when the battery is low.
- RF Indicator: An LED light indicates RF signal reception.
5. Setup Instructions
5.1 Transmitter Setup
- Connect Antennas: Screw the two included antennas onto the antenna ports at the rear of the transmitter unit.
- Connect Power: Plug the power adapter into the DC Power Socket on the rear panel and then into a suitable power outlet.
- Connect Audio Source: Use the provided cable lines to connect your audio source (e.g., mixing console, audio interface) to the Left and Right Channel Inlets on the rear panel. Adjust the input volume potentiometers as needed.
- Power On: Press the Power Switch on the front panel to turn on the transmitter. The LCD display will illuminate.
5.2 Bodypack Receiver Setup
- Install Batteries: Open the battery compartment on the bodypack receiver and insert two AA batteries (user supplied). Ensure correct polarity.

Figure 4: Battery installation in the bodypack receiver.
- Connect Earphones: Plug the earphones into the 3.5 mm Headphone Output on the bodypack receiver.

Figure 5: Earphone connection to the bodypack receiver.
- Power On: Turn the Volume Adjustment Knob clockwise to power on the bodypack receiver. The LCD display will show the current channel and battery status.
6. Operating Instructions
6.1 Frequency Pairing (Infrared Sync)
The AR2090 system uses infrared technology for easy frequency alignment between the transmitter and bodypack receivers.
- Select Channel on Transmitter: On the transmitter unit, use the "Setup Selection" and "Down Select" buttons to choose your desired operating frequency/channel. The system offers 16 switchable frequencies within the 550 MHz-580 MHz range.
- Align Infrared Windows: Hold the bodypack receiver with its infrared window facing the transmitter's infrared window. Ensure they are within close proximity (a few centimeters).

Figure 6: Aligning the infrared windows for frequency synchronization.
- Initiate Sync: Press the sync button (often labeled "SET" or similar) on the transmitter. The infrared indicator on the transmitter will light up, and the bodypack receiver's display will update to show the synchronized frequency.
- Verify Connection: Once paired, the RF indicator on the bodypack receiver should light up, indicating a stable signal reception.
6.2 Adjusting Volume
- Transmitter Input Volume: Use the Left and Right Channel Inlet Volume Control Potentiometers on the rear of the transmitter to adjust the audio input level from your source.
- Bodypack Receiver Volume: Use the Volume Adjustment Knob on each bodypack receiver to set the desired listening volume for the earphones.
6.3 Real-Time Monitoring
The system provides real-time audio monitoring with ultra-low latency, ensuring accurate pitch and rhythm, especially in noisy environments.

Figure 7: The system enables clear real-time audio monitoring for performers.
7. Maintenance
7.1 Cleaning
Wipe the units with a soft, dry cloth. Do not use liquid cleaners or abrasive materials.
7.2 Battery Replacement (Bodypack Receiver)
The bodypack receivers operate on two AA batteries, providing approximately 4-5 hours of working time. Replace batteries when the low battery indicator illuminates or when audio quality degrades.
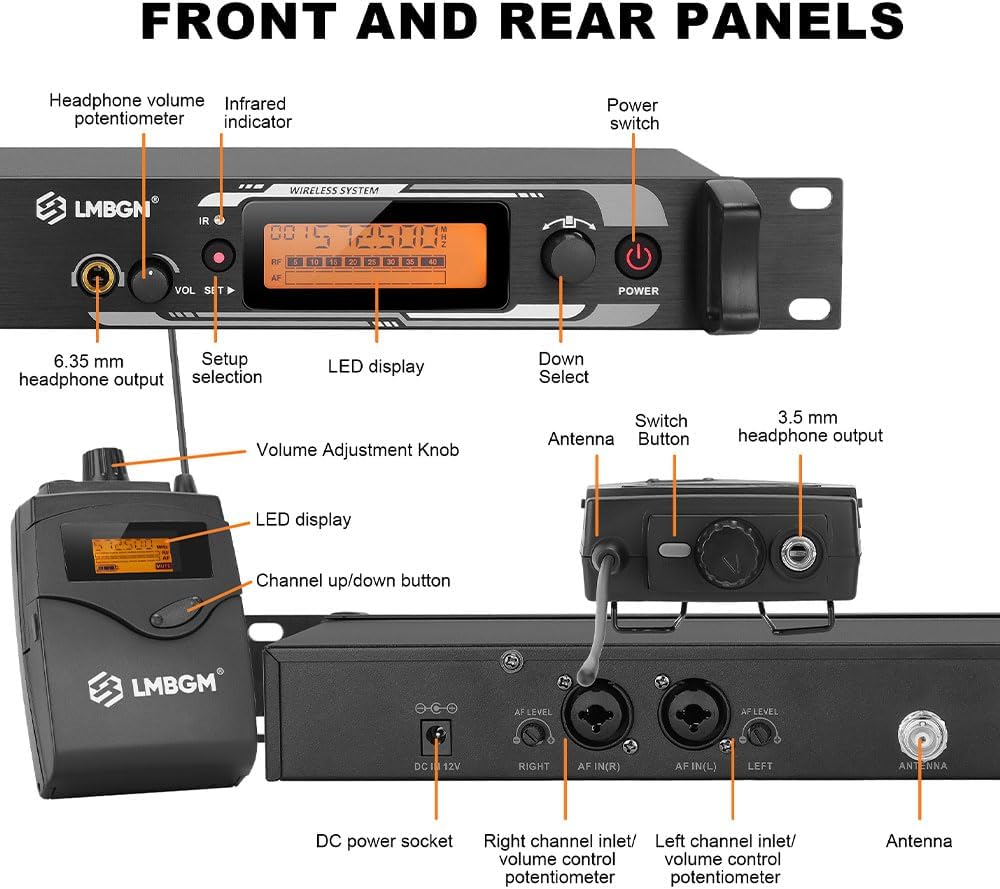
Figure 8: Battery life and replacement for the bodypack receiver.
8. Troubleshooting
| Problem | Possible Cause | Solution |
|---|---|---|
| No sound from receiver |
|
|
| Intermittent audio or static |
|
|
| Receiver display not working |
|
|
9. Specifications

Figure 9: Dimensions and key specifications of the AR2090 system.
| Feature | Specification |
|---|---|
| Model Name | AR2090 |
| Brand | LMBGM |
| Chassis Material | Metal Panel |
| Frequency Interval | 25 MHz |
| Frequency Range | 550 MHz - 580 MHz |
| Preset Channels | 16 Groups of Channels (set separately) |
| Transmit Output Power | 100 mW |
| Audio Input | XLR and 6.5 mm Composite Socket |
| Headphone Output (Transmitter) | 6.5 Stereo Socket, Volume Adjustable |
| Headphone Jack (Receiver) | 3.5 mm Jack |
| Current Consumption | DC12V/250mA |
| Antenna Input Base | TNC Socket |
| Wireless Communication Technology | RF (UHF) |
| Latency | Less than 5 milliseconds |
| Frequency Response | 50Hz to 20KHz (System), 15 KHz (Headphones) |
| Sensitivity | 78 dB |
| Impedance | 16 Ohm |
| Wireless Range | Up to 300 feet (250-350 FT normal range) |
| Bodypack Battery Life | 4-5 hours (with AA batteries) |
| Dimensions (Transmitter) | 48cm (18.9in) W x 14cm (5.51in) D x 4.8cm (1.89in) H |
| Dimensions (Bodypack) | Approx. 9.5cm (3.74in) H x 6cm (2.36in) W (excluding antenna) |
| Item Weight | 5.94 pounds (total package) |
10. Warranty and Support
For warranty information and technical support, please refer to the contact details provided with your purchase or visit the official LMBGM website. Keep your proof of purchase for warranty claims.
For further assistance, you may contact LMBGM customer service directly.
