1. Introduction
Welcome to the AOSEED X-Maker 3D Printer user manual. This guide provides essential information for setting up, operating, and maintaining your new 3D printer. The X-Maker is designed for kids and beginners, offering an effortless and high-precision 3D printing experience.

Figure 1.1: The AOSEED X-Maker 3D Printer alongside a set of colorful PLA filament spools.
2. Setup
2.1 Unboxing and Initial Placement
The AOSEED X-Maker 3D Printer comes fully assembled, ready for immediate use. Carefully remove the printer from its packaging. Place the printer on a stable, level surface in a well-ventilated area, away from direct sunlight and heat sources.
2.2 Power Connection
Connect the provided power adapter to the printer's power input port and then plug it into a standard electrical outlet. The printer will power on automatically or can be turned on using the power button.
2.3 Filament Loading
The X-Maker uses PLA filament. To load filament:
- Ensure the printer is powered on and the nozzle is heated to the appropriate PLA temperature (refer to filament packaging, typically 190-220°C).
- Insert the end of the filament into the filament input hole until it is gripped by the extruder mechanism.
- Follow the on-screen prompts or app instructions to feed the filament through the extruder until it emerges from the nozzle.

Figure 2.1: A selection of AOSEED PLA filament spools, highlighting the variety of colors available.
3. Operating the X-Maker
3.1 Wireless Smart One-Key Printing
The X-Maker supports Wi-Fi printing, allowing for convenient control via a mobile application. Download the official AOSEED app from your device's app store. Connect the printer to your Wi-Fi network through the app or the printer's touchscreen interface.
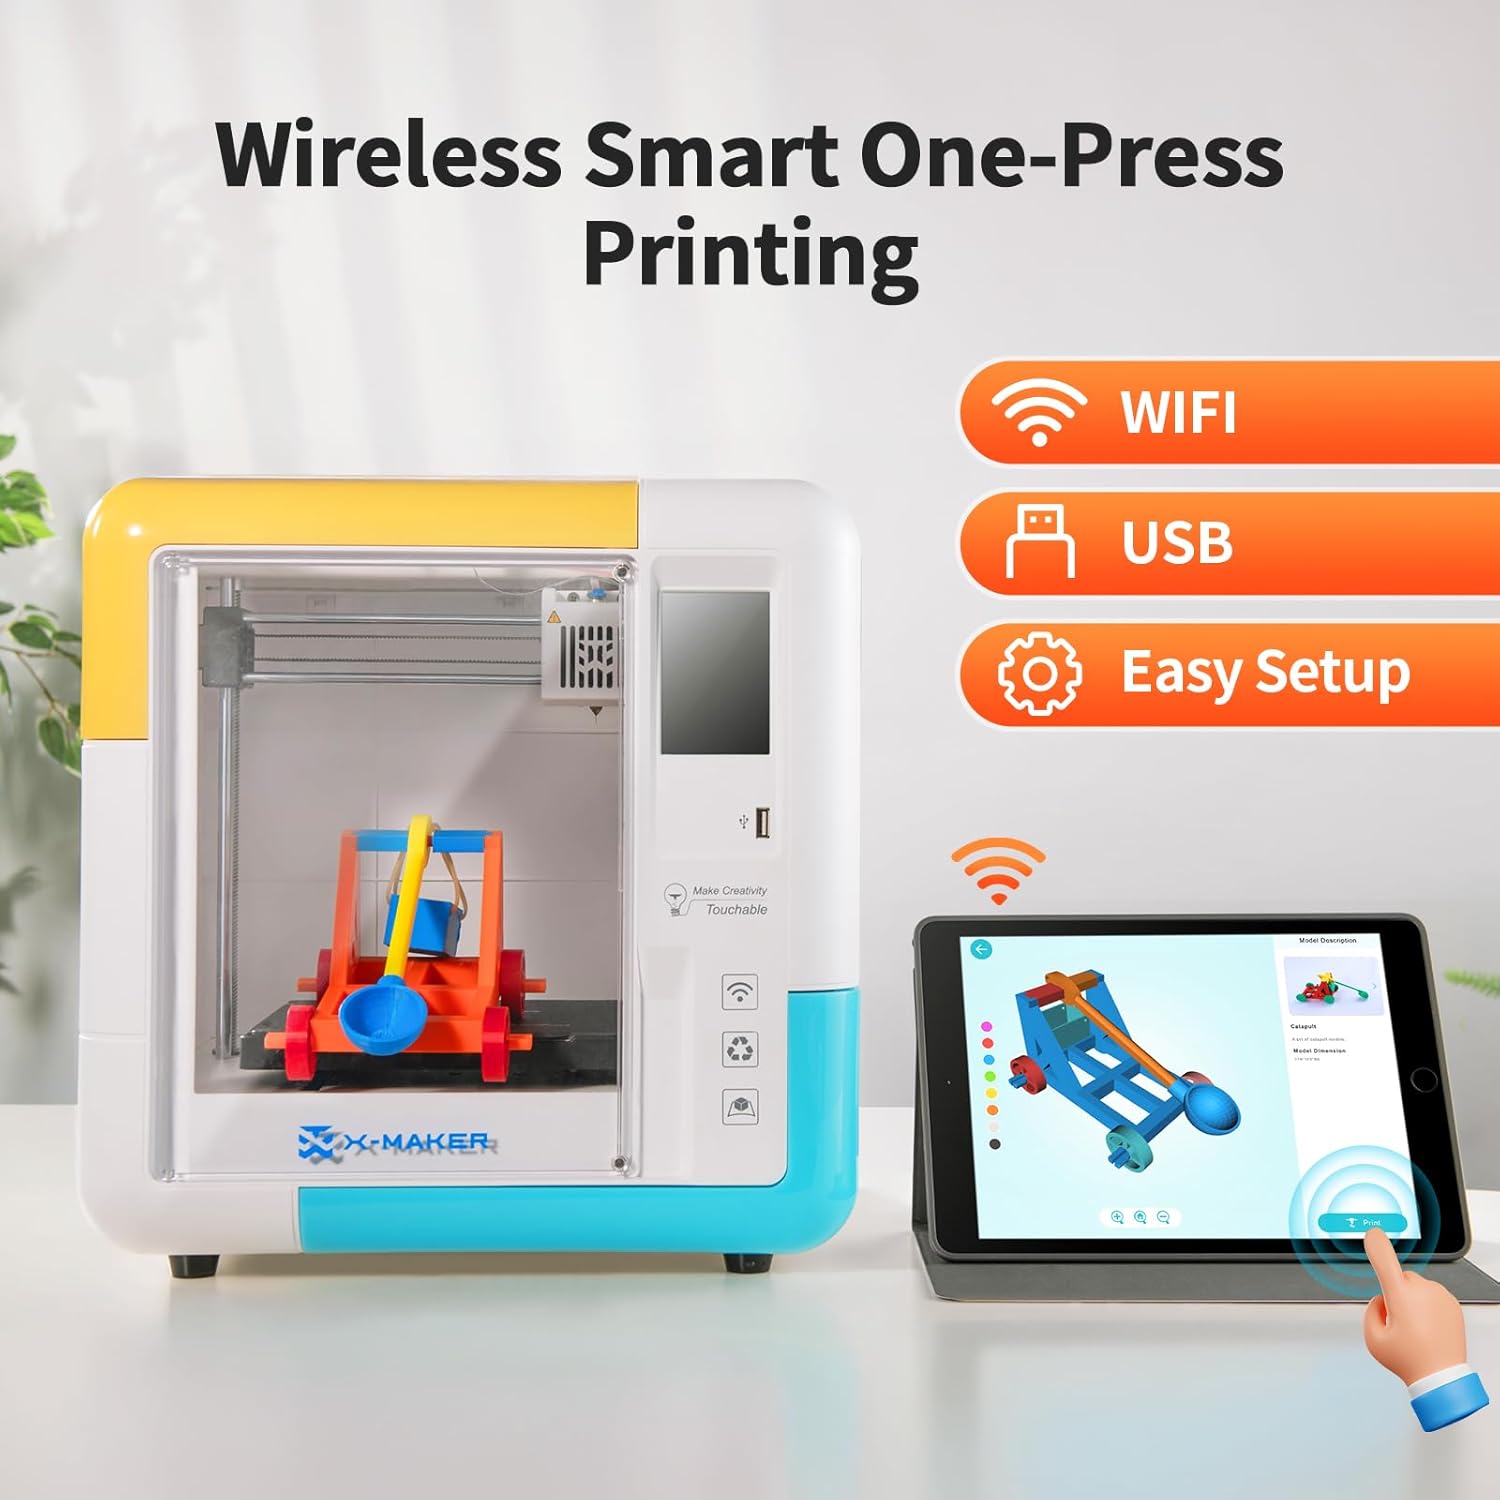
Figure 3.1: An illustration of the wireless smart one-key printing feature, showing the printer connected to a tablet via Wi-Fi.
3.2 Printing from SD Card/USB
Alternatively, you can print models directly from an SD card or USB drive. Save your .gcode files to the storage device, insert it into the printer's designated slot, and select the desired file from the printer's touchscreen menu.
3.3 Using the 15 Gamified 3D Design Mini-Apps
The AOSEED app includes 15 mini-apps designed to simplify 3D model creation, making it accessible for beginners and children. These apps allow for easy customization and generation of printable models.

Figure 3.2: A visual representation of the 15 gamified 3D design mini-apps, including names like Winder, Spinner, and CarMaker.
3.4 Resume Printing Function
The X-Maker features a power-off resume printing function. In case of a power outage or accidental disconnection, the printer can resume the print from where it left off once power is restored.
3.5 Removing Prints
The printer is equipped with a flexible magnetic build plate. Once a print is complete and the build plate has cooled, gently bend the plate to easily detach the printed object.
4. Maintenance
4.1 Cleaning the Build Plate
After each print, ensure the build plate is clean and free of any filament residue. Use a soft cloth and isopropyl alcohol if necessary. A clean build plate is crucial for good print adhesion.
4.2 Nozzle Care
Periodically check the nozzle for clogs. If a clog occurs, refer to the troubleshooting section or consult online resources for safe unclogging procedures. Avoid touching the hot nozzle.
4.3 Filament Storage
Store PLA filament in a cool, dry place, away from moisture. It is recommended to use the provided desiccant packs or airtight containers to prevent moisture absorption, which can degrade print quality.

Figure 4.1: A close-up view of neatly wound green PLA filament, emphasizing proper storage and handling for optimal print quality.
5. Troubleshooting
5.1 Common Printing Issues
- Print Not Sticking to Bed: Ensure the build plate is clean. Check if the nozzle is too far from the bed.
- Filament Not Extruding: Check for tangled filament, a clogged nozzle, or incorrect temperature settings.
- Poor Print Quality: Verify filament quality and storage. Ensure the printer is on a stable surface.
5.2 Error Messages
If an error message appears on the touchscreen or app, consult the AOSEED support website or contact customer service for specific guidance.
6. Specifications
| Feature | Detail |
|---|---|
| Model | X-Maker |
| Printing Technology | FDM (Fused Deposition Modeling) |
| Filament Type | PLA |
| Printing Precision | 0.1/0.05 mm |
| Printing Speed | Up to 160 mm/s |
| Connectivity | Wi-Fi, SD Card, USB |
| Build Plate | Flexible Magnetic Build Plate |
| Special Features | Fully Assembled, Leveling-Free Bed, Resume Printing, Enclosed Design, 3.5-inch Color Touch Screen, 15 Mini-Apps Model Library |

Figure 6.1: An illustration demonstrating the excellent print quality and precision of the X-Maker 3D printer.
7. Warranty and Support
7.1 Warranty Information
For detailed warranty information, please refer to the warranty card included with your product or visit the official AOSEED website. Keep your proof of purchase for warranty claims.
7.2 Customer Support
If you encounter any issues or have questions not covered in this manual, please contact AOSEED customer support. You can find contact details on the official AOSEED website or through the product's purchase platform.
Visit the AOSEED Store for more information and support resources.


