
Introduction
This instruction manual provides essential information for the proper installation, operation, and maintenance of the vynsnp Carburetor Kit, model K20-WAT. This kit is designed to replace worn or damaged components in compatible Walbro carburetors, restoring optimal performance.
The K20-WAT kit is compatible with various Walbro WA and WT series carburetors, including models such as WT707, WT772B, WT598, WT599, and WT600. Please verify your carburetor model against the kit's compatibility list before proceeding with installation.
Kit Components Overview
The vynsnp K20-WAT Carburetor Kit includes a comprehensive set of gaskets, diaphragms, and other small parts necessary for a complete carburetor rebuild. Familiarize yourself with all components before beginning the installation process.

Image 1: A complete view of the vynsnp K20-WAT Carburetor Kit components. This image displays multiple black and beige gaskets of various shapes, several small metal pins, springs, screws, and a diaphragm assembly, all laid out on a white background.
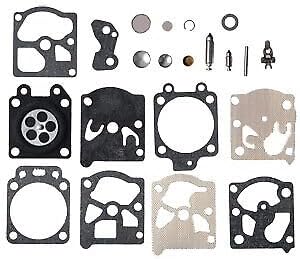
Image 2: An alternative perspective of the vynsnp K20-WAT Carburetor Kit components. This image highlights the intricate shapes of the gaskets and the small, precision-engineered metal parts, including needles and check valves, essential for carburetor function.
Setup and Installation
Proper installation of the carburetor kit is crucial for optimal engine performance and longevity. It is recommended that this procedure be performed by individuals with mechanical experience. Always refer to the specific service manual for your Walbro carburetor model for detailed disassembly and reassembly instructions.
Safety Precautions:
- Ensure the engine is cool and disconnected from any power source (e.g., spark plug wire removed).
- Work in a well-ventilated area.
- Wear appropriate personal protective equipment, such as gloves and eye protection.
- Have a fire extinguisher readily available when working with fuel.
General Installation Steps:
- Disassembly: Carefully remove the carburetor from the engine. Disassemble the carburetor, paying close attention to the order and orientation of all components. Take photos or make notes if necessary.
- Cleaning: Thoroughly clean all carburetor components with a suitable carburetor cleaner. Ensure all passages are clear and free of debris. Inspect the carburetor body for any damage or excessive wear.
- Component Replacement: Replace all gaskets, diaphragms, and other small parts with the new components from the vynsnp K20-WAT kit. Ensure each new part matches the old one in shape and size. Pay particular attention to the orientation of diaphragms and check valves.
- Reassembly: Reassemble the carburetor according to the manufacturer's specifications. Ensure all screws are tightened to the correct torque values, if specified.
- Reinstallation: Reinstall the carburetor onto the engine, ensuring all fuel lines and linkages are correctly connected.
- Initial Adjustment: After installation, the carburetor may require initial adjustment of idle speed and fuel mixture screws. Refer to your engine's service manual for specific adjustment procedures.
Operating Considerations
Once the carburetor kit is installed and the carburetor is reassembled and reinstalled, the operating characteristics of the engine should return to normal. This kit primarily addresses internal carburetor wear and sealing issues. For specific engine operating instructions, always refer to the owner's manual of the equipment the carburetor is installed on.
Post-Installation Checks:
- Check for any fuel leaks around the carburetor and fuel lines.
- Ensure all linkages operate smoothly without binding.
- Start the engine and allow it to warm up. Listen for unusual noises or rough idling.
- Perform any necessary carburetor adjustments (idle speed, high/low speed mixture) as per the engine manufacturer's guidelines.
Maintenance
Regular maintenance of your carburetor and fuel system is essential to ensure reliable performance and extend the life of your equipment. The components in this kit are designed for durability, but periodic inspection is recommended.
Recommended Maintenance Practices:
- Fuel Quality: Always use fresh, clean fuel. Stale or contaminated fuel is a primary cause of carburetor issues. Consider using a fuel stabilizer if the equipment will be stored for extended periods.
- Fuel Filter: Regularly inspect and replace the fuel filter to prevent debris from reaching the carburetor.
- Air Filter: Ensure the air filter is clean and properly installed to prevent dirt from entering the carburetor and engine.
- External Cleaning: Keep the exterior of the carburetor clean to prevent dirt from entering during adjustments or servicing.
- Periodic Inspection: Periodically inspect fuel lines, gaskets, and diaphragms for signs of cracking, hardening, or leaks. Replace components as needed.
Troubleshooting
If you experience issues after installing the carburetor kit, review the following common problems and solutions. Always ensure safety precautions are followed before attempting any troubleshooting.
| Problem | Possible Cause | Solution |
|---|---|---|
| Engine will not start or starts with difficulty |
|
|
| Engine runs rough or stalls |
|
|
| Fuel leaks from carburetor |
|
|
If problems persist after attempting these solutions, it is advisable to consult a qualified service technician or refer to the specific service manual for your equipment.
Specifications
- Product Model: K20-WAT
- Brand: vynsnp
- Compatibility: Walbro WA and WT series carburetors, including WT707, WT772B, WT598, WT599, WT600.
- Kit Contents: Gaskets, diaphragms, needles, and other small components for carburetor rebuild.
- Item Model Number (Manufacturer): 756371368118
- UPC: 756371368118
Warranty and Support
For information regarding warranty coverage, terms, and conditions for your vynsnp Carburetor Kit K20-WAT, please refer to the purchase documentation or contact the seller directly. Specific warranty details are provided at the point of sale.
If you require technical assistance or have questions not covered in this manual, please reach out to the customer support provided by your retailer or the manufacturer, vynsnp.