
1. Introduction and Safety Information
Thank you for purchasing the TOTAL Cordless Pressure Washer. This manual provides important information for the safe operation, maintenance, and troubleshooting of your device. Please read this manual thoroughly before first use and keep it for future reference.
General Safety Warnings
- Read All Instructions: Familiarize yourself with the controls and proper use of the pressure washer.
- Personal Safety: Always wear appropriate personal protective equipment (PPE), including safety glasses or goggles, gloves, and hearing protection. Do not direct the water jet at people, pets, or electrical devices.
- Electrical Safety: Use only the provided battery and charger. Do not operate the pressure washer with a damaged battery or charger. Keep the battery and charger dry.
- Water Pressure: The high-pressure jet can be dangerous if misused. Never allow children to operate the pressure washer.
- Work Area: Keep the work area clean and well-lit. Do not operate in explosive atmospheres, such as in the presence of flammable liquids, gases, or dust.
- Maintenance: Disconnect the battery before performing any maintenance or cleaning.
2. Package Contents
Please check the package contents upon unpacking. If any parts are missing or damaged, contact your retailer.
- TOTAL Cordless Pressure Washer Unit
- Spray Lance/Extension Wand
- Adjustable Spray Nozzle
- Water Inlet Hose (3 meters)
- Foam Bottle / Soap Dispenser
- 20V Lithium-Ion Battery
- Battery Charger
- Instruction Manual (this document)
3. Product Overview
Familiarize yourself with the components of your pressure washer.
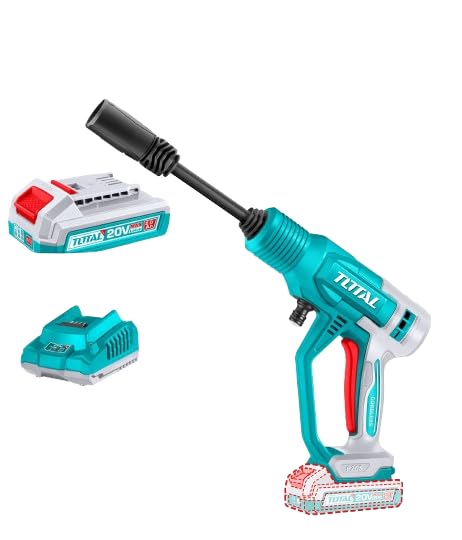
Figure 1: TOTAL Cordless Pressure Washer TPWLI20362. The image shows the main unit in teal and grey with a black spray lance attached. A 20V battery pack and a battery charger base are displayed separately.
Key Components:
- Spray Lance Connection: Point where the spray lance attaches.
- Water Inlet: Connection point for the water inlet hose.
- Trigger/Power Switch: Activates the pressure washer.
- Handle: Ergonomic grip for operation.
- Battery Compartment: Slot for inserting the 20V battery.
- Spray Lance: Extends the reach and directs the water flow.
- Adjustable Nozzle: Controls the spray pattern (e.g., wide fan, narrow jet).
- 20V Battery: Provides power to the unit.
- Battery Charger: Used to recharge the battery.
4. Setup
4.1 Charging the Battery
- Connect the battery charger to a suitable power outlet.
- Slide the 20V battery onto the charger base. Ensure it clicks into place.
- The indicator light on the charger will show the charging status (refer to charger manual for specific light patterns).
- Once fully charged, disconnect the charger from the power outlet and remove the battery.
4.2 Assembling the Pressure Washer
- Attach the Spray Lance: Insert the spray lance into the main unit's connection point until it locks securely.
- Attach the Nozzle: Connect the adjustable spray nozzle to the end of the spray lance. Ensure it is firmly attached.
- Connect Water Inlet Hose: Attach one end of the 3-meter water inlet hose to the water inlet on the pressure washer unit. Place the other end into a clean water source (e.g., a bucket of water or connect to a garden tap if applicable). Ensure the hose is fully submerged if drawing from a bucket.
- Insert Battery: Slide the fully charged 20V battery into the battery compartment on the pressure washer handle until it clicks securely into place.
5. Operating Instructions
5.1 Starting and Stopping
- Ensure all connections are secure and the water source is ready.
- Point the nozzle away from yourself and others.
- Press and hold the trigger to start the water flow. The pump will begin to draw water and build pressure.
- Release the trigger to stop the water flow.
5.2 Adjusting Spray Pattern
The adjustable nozzle allows you to change the spray pattern for different cleaning tasks:
- Narrow Jet: For stubborn dirt and concentrated cleaning.
- Wide Fan: For general cleaning, rinsing, and covering larger areas.
Rotate the nozzle head to select the desired spray pattern. Always adjust the nozzle when the unit is off or pointed away from the cleaning surface to avoid accidental damage.
5.3 Using the Foam Bottle
- Fill the foam bottle with appropriate pressure washer detergent (follow detergent manufacturer's instructions for dilution).
- Remove the standard nozzle and attach the foam bottle to the end of the spray lance.
- Operate the pressure washer as usual. The detergent will be mixed with water and sprayed as foam.
- After applying detergent, remove the foam bottle and reattach the standard nozzle to rinse the surface with clean water.
5.4 General Cleaning Tips
- Always test the spray on an inconspicuous area first to avoid damaging the surface.
- Start with a wider spray pattern and lower pressure, then adjust as needed.
- Keep the nozzle at an appropriate distance from the surface to prevent damage.
- Work from top to bottom when cleaning vertical surfaces to allow gravity to help remove dirt.
6. Maintenance
Regular maintenance ensures optimal performance and extends the lifespan of your pressure washer. Always disconnect the battery before performing any maintenance.
6.1 After Each Use
- Drain Water: Disconnect the water supply and run the pressure washer for a few seconds to clear any remaining water from the pump and hose.
- Clean Nozzle: Remove any debris or blockages from the nozzle opening.
- Clean Unit: Wipe down the exterior of the unit with a damp cloth. Do not use harsh chemicals.
6.2 Battery Care
- Store the battery in a cool, dry place, away from direct sunlight and extreme temperatures.
- Do not store the battery completely discharged. Charge it periodically if not used for extended periods.
- Use only the specified charger for your battery.
6.3 Storage
Store the pressure washer in a dry, frost-free location. Disconnect all accessories and store them neatly. Keep out of reach of children.
7. Troubleshooting
If you encounter problems with your pressure washer, refer to the table below for common issues and solutions.
| Problem | Possible Cause | Solution |
|---|---|---|
| Unit does not start | Battery not charged or not inserted correctly. | Ensure battery is fully charged and properly seated. |
| No water pressure or low pressure | No water supply; clogged nozzle; air in the system. | Check water source; clean nozzle; prime the pump by running without nozzle until water flows steadily. |
| Water leaks from connections | Loose connections; damaged O-rings. | Tighten all connections; inspect and replace O-rings if damaged. |
| Unit stops during operation | Battery depleted; motor overload. | Recharge battery; allow unit to cool down if motor overheats. |
If the problem persists after trying these solutions, please contact customer support.
8. Specifications
| Brand: | TOTAL |
| Model: | TPWLI20362 |
| Power Source: | Battery Powered (20V) |
| Max Pressure: | 24 Bar (approx. 348 PSI) |
| Hose Length: | 3 meters |
| Color: | Blue |
| Product Dimensions (L x W x H): | 5 cm x 3 cm x 3 cm (Note: Dimensions as provided by manufacturer, may refer to packaging or a specific component) |
9. Warranty and Support
This product comes with a standard manufacturer's warranty. Please refer to the warranty card included with your purchase or contact your retailer for specific warranty terms and conditions.
For technical support, spare parts, or service inquiries, please contact the retailer where you purchased the product or visit the official TOTAL tools website for contact information in your region.


