
Emerson CKS1500
Emerson CKS1500 SmartSet Dual Alarm Clock Radio
Instruction Manual
Model: CKS1500
1. Overview
The Emerson CKS1500 SmartSet Dual Alarm Clock Radio is designed for simplicity, accuracy, and a modern aesthetic. It features Emerson’s patented SmartSet technology for automatic time setting, dual alarms, a PLL AM/FM radio, and a 0.9” blue LED display with a 4-level dimmer. This compact unit also includes blue LED accent lighting and a battery backup system.
Key Features:
- SmartSet Automatic Time Setting: Automatically sets the correct time, date, and day, and adjusts for Daylight Saving Time, even after power interruptions.
- Dual Alarm Functionality: Set two independent alarms with options to wake to radio or buzzer.
- Compact 0.9” Blue LED Display: Easy-to-read digits with 4-level adjustable dimmer for ideal nighttime visibility.
- Digital PLL AM/FM Radio with 20 Presets: Tune into your favorite stations and save up to 20 presets for easy access.
- Blue LED Accent Light + Battery Backup: Dual-level LED décor adds ambient glow; included button cell maintains clock & alarm settings during outages.
2. Package Contents
Please check the box for the following items:
- Emerson CKS1500 SmartSet Dual Alarm Clock Radio
- Owner's Manual
3. Product Components

Figure 3.1: Front-side view of the Emerson CKS1500 alarm clock, displaying the time 12:38 in blue LED digits.

Figure 3.2: Direct front view highlighting the clear blue LED display.
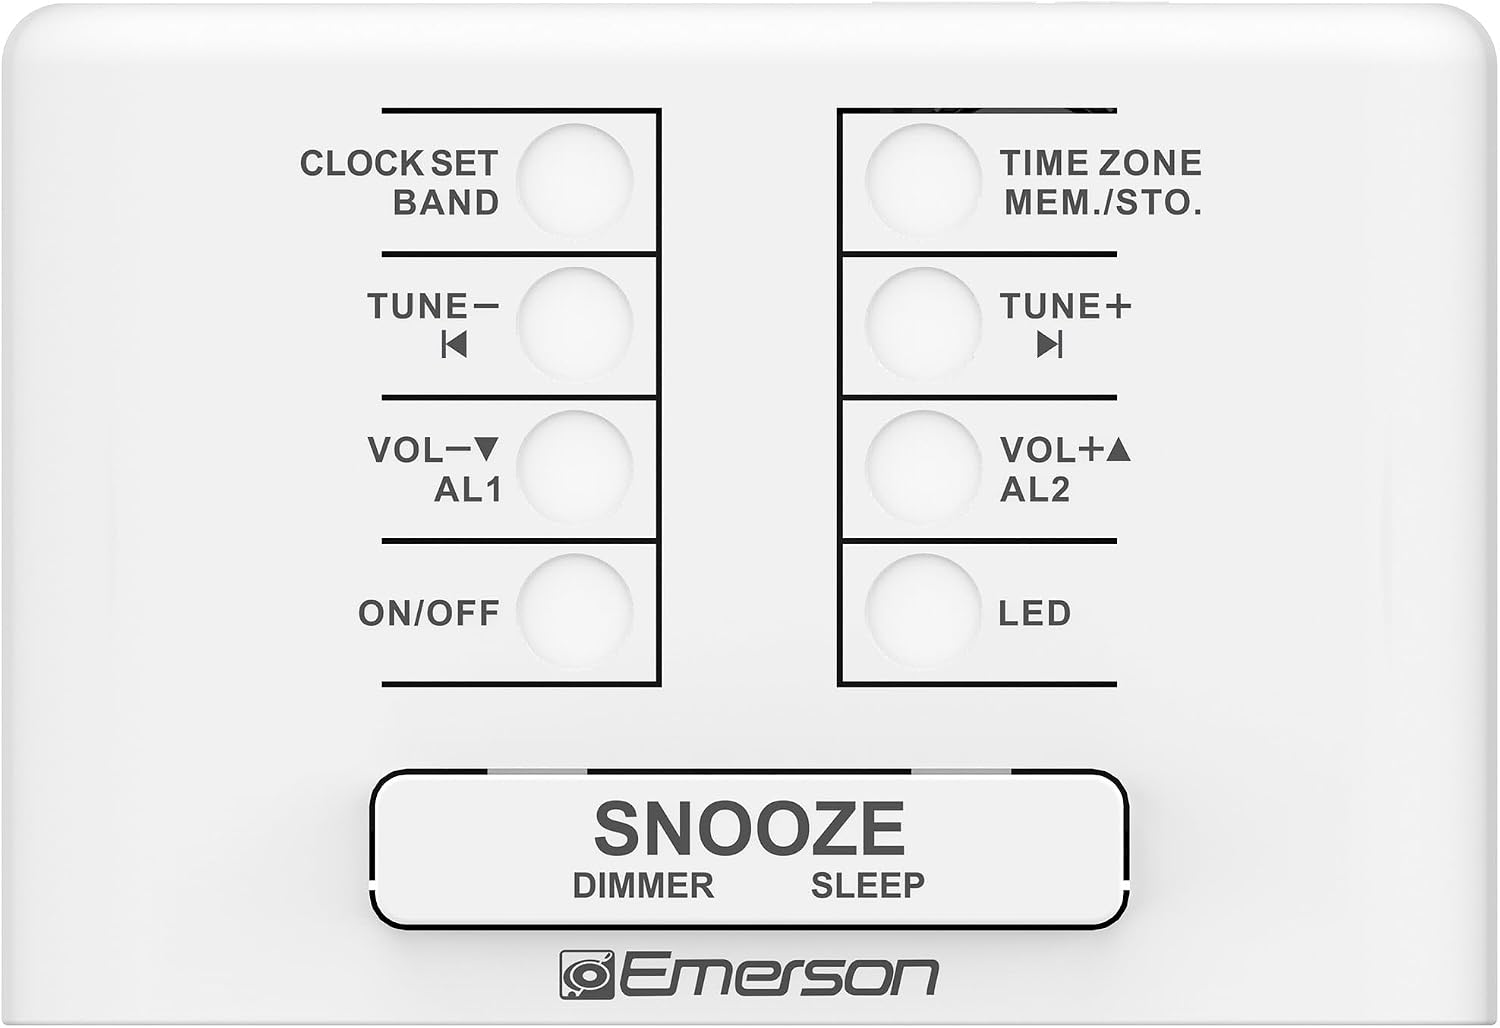
Figure 3.3: Top panel with clearly labeled control buttons for various functions.

Figure 3.4: Rear view showing the speaker grille and the battery backup compartment.

Figure 3.5: The alarm clock placed on a nightstand, demonstrating its blue accent light.
Product Overview Video
Official product video showcasing the features and design of the Emerson CKS1500 SmartSet Dual Alarm Clock Radio.
4. Setup
- Power Connection: Plug the non-detachable AC power supply into a standard wall outlet. The unit will automatically power on.
- SmartSet Automatic Time Setting: Upon initial power-up, the SmartSet technology will automatically set the year, month, date, day, and time. This process may take a few moments.
- Battery Backup: An included button cell battery (CR2032) is pre-installed to maintain clock and alarm settings during power outages. Ensure the battery tab is removed if present.
- Antenna Setup: For optimal AM/FM radio reception, extend the integrated AM/FM antennas fully. Position the wire antenna for FM and rotate the unit for best AM reception.
5. Operating Instructions
5.1. Setting Time Manually (if needed)
- Press and hold the CLOCK SET/BAND button until the display flashes.
- Use the TUNE- or TUNE+ buttons to adjust the hour. Press CLOCK SET/BAND to confirm.
- Use the TUNE- or TUNE+ buttons to adjust the minute. Press CLOCK SET/BAND to confirm.
- Continue to set the year, month, and date using the TUNE- or TUNE+ buttons and confirming with CLOCK SET/BAND.
5.2. Setting Alarms
The unit features two independent alarms (AL1 and AL2).
- Press and hold the VOL-AL1 button for Alarm 1 or VOL+AL2 button for Alarm 2 until the alarm time flashes.
- Use the TUNE- or TUNE+ buttons to adjust the alarm hour. Press the respective alarm button (VOL-AL1 or VOL+AL2) to confirm.
- Use the TUNE- or TUNE+ buttons to adjust the alarm minute. Press the respective alarm button to confirm.
- Select the alarm source (Buzzer or Radio) using the TUNE- or TUNE+ buttons. Press the respective alarm button to confirm and exit alarm setting mode.
5.3. Radio Operation
- Press the ON/OFF button to turn the radio on or off.
- Press the CLOCK SET/BAND button to switch between AM and FM bands.
- Use the TUNE- or TUNE+ buttons to manually tune to a station. Press and hold for automatic scanning.
- Saving Presets: Tune to your desired station. Press and hold the TIME ZONE/MEM./STO. button until the preset number flashes. Use TUNE- or TUNE+ to select a preset number (1-20). Press TIME ZONE/MEM./STO. again to save.
- Recalling Presets: Press the TIME ZONE/MEM./STO. button repeatedly to cycle through saved presets.
- Adjust volume using the VOL-AL1 and VOL+AL2 buttons.
5.4. Dimmer Control
Press the SNOOZE/DIMMER/SLEEP button repeatedly to cycle through the 4 levels of display brightness.
5.5. Snooze Function
When the alarm sounds, press the SNOOZE/DIMMER/SLEEP button to temporarily silence the alarm for approximately 9 minutes. The alarm will sound again after the snooze period.
5.6. Sleep Timer
While the radio is playing, press the SNOOZE/DIMMER/SLEEP button repeatedly to set the sleep timer (e.g., 90, 60, 30, 15 minutes, or OFF). The radio will automatically turn off after the selected time.
5.7. Blue Accent Light
Press the LED button to cycle through the two levels of blue LED accent light brightness or to turn it off.
6. Maintenance
- Cleaning: Wipe the unit with a soft, dry cloth. Do not use abrasive cleaners or solvents.
- Battery Replacement: If the backup battery (CR2032) needs replacement, open the battery compartment on the bottom of the unit. Replace with a new CR2032 battery, observing polarity.
- Storage: If storing the unit for an extended period, disconnect it from the power outlet and remove the backup battery.
7. Troubleshooting
| Problem | Possible Cause | Solution |
|---|---|---|
| Clock not setting automatically. | Initial setup incomplete or power interruption. | Ensure the unit is properly plugged in. Allow a few minutes for SmartSet to acquire time. If necessary, set time manually. |
| Alarm not sounding. | Alarm not set correctly or volume too low. | Verify alarm time and source are set. Ensure alarm volume is audible. Check if alarm is enabled (alarm indicator on display). |
| Radio static or poor reception. | Antenna not positioned correctly or interference. | Fully extend the FM wire antenna. Rotate the unit for better AM reception. Move unit away from other electronic devices that may cause interference. |
| Display too bright or too dim. | Dimmer setting needs adjustment. | Press the SNOOZE/DIMMER/SLEEP button repeatedly to cycle through the 4 brightness levels. |
| Unit produces a humming noise. | Electrical interference or unit placement. | Try plugging the unit into a different electrical outlet. Move the unit to a different location, away from other electronics. |
8. Specifications
| Feature | Detail |
|---|---|
| Brand | Emerson |
| Model Number | CKS1500 |
| Display Type | Digital LED (0.9" Blue) |
| Power Source | Corded Electric |
| Battery Backup | Yes (Button Cell, CR2032 included) |
| Radio Tuner | Digital PLL AM/FM |
| Radio Presets | 20 |
| Product Dimensions | 4.73” W x 3.15” D x 2.36” H (approx. 3"W x 3.88"H as per spec) |
| Item Weight | 0.75 Pounds (12 ounces) |
| UPC | 025806035124 |
9. Warranty and Support
For warranty information or technical support, please refer to the warranty card included with your product or visit the official Emerson website. Keep your purchase receipt as proof of purchase for any warranty claims.
Contact Information: Please refer to the contact details provided in your product packaging or on the official Emerson support website for assistance.
Related documentsCKS1500


Ask a question about this manual
Ask about setup, troubleshooting, compatibility, parts, safety, or missing instructions. Manuals+ will review the question and use this page’s manual context to help answer it.