Product Overview
The Positive Grid Spark 2 Pearl and Spark Control X Bundle offers a versatile and powerful solution for guitarists. The Spark 2 Pearl is a 50-watt smart guitar practice amplifier and Bluetooth speaker, featuring advanced AI capabilities, a built-in looper, and a comprehensive smart app. The Spark Control X is a wireless footswitch designed to seamlessly integrate with your Spark amp, allowing for hands-free control of presets and effects.
This bundle is designed to enhance your practice, recording, and jamming experience with its rich, detailed sound and intelligent features.
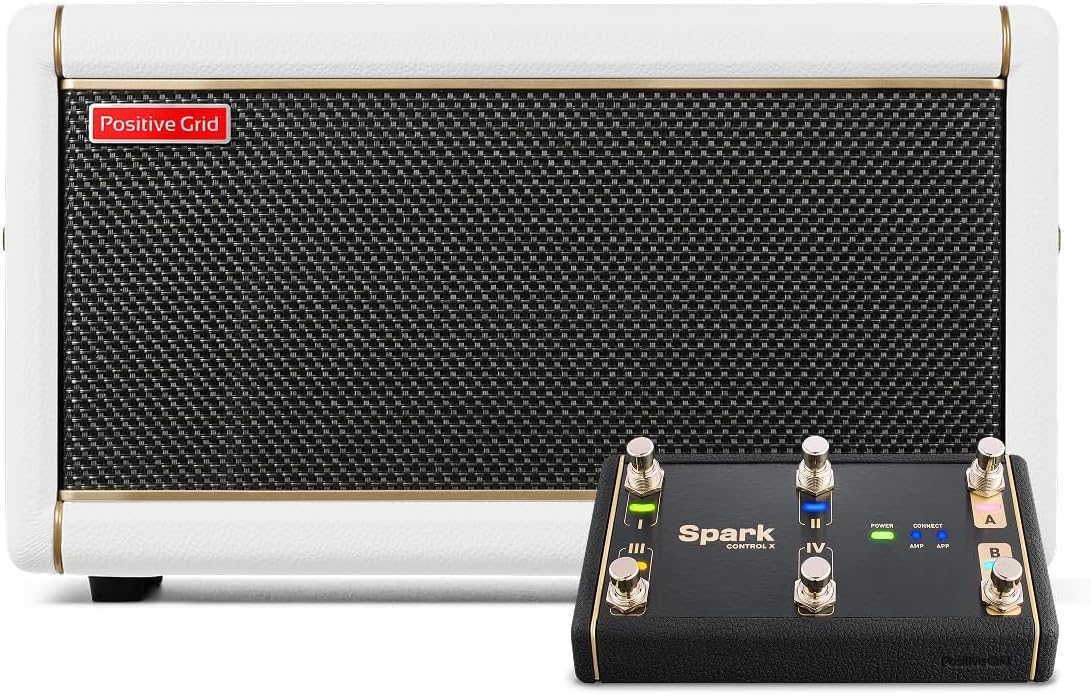
Figure 1: Positive Grid Spark 2 Pearl amplifier and Spark Control X footswitch.
Key Features:
- 50-Watts of Power: Delivers rich, detailed sound through Sonic IQ Computational Audio and premium angled FRFR speakers.
- Built-in Creative Groove Looper: Features hundreds of drum patterns for practice and songwriting.
- Exclusive HD Amp Models: Powered by an upgraded DSP with new tube emulation.
- Spark AI: Describe your desired tone, and Spark AI will automatically suggest matching tones.
- Spark Control X: Official wireless footswitch for hands-free control of presets and effects.
Setup Guide
1. Unboxing and Initial Inspection
Carefully remove all components from the packaging. Verify that all items listed in the product contents are present and undamaged. Retain the packaging for future transport or storage.
2. Powering the Spark 2 Pearl Amplifier
- Connect the included power adapter to the DC IN port on the rear of the Spark 2 Pearl amplifier.
- Plug the power adapter into a suitable wall outlet.
- Press the Power button located on the top panel of the amplifier to turn it on. The power indicator light will illuminate.

Figure 2: Rear panel connections of the Spark 2 Pearl amplifier.
3. Connecting Your Instrument
Plug your electric, acoustic, or bass guitar into the GUITAR INPUT jack on the top panel of the Spark 2 Pearl amplifier using a standard 1/4-inch instrument cable.
4. Installing Optional Battery (Spark 2 Pearl)
The Spark 2 Pearl supports an optional battery for portable use. To install, locate the battery compartment on the side of the amplifier, insert the compatible battery pack, and secure the cover.

Figure 3: Battery installation for the Spark 2 Pearl amplifier.
5. Pairing with the Spark App (Bluetooth)
- Download the Positive Grid Spark app from your device's app store (iOS or Android).
- Ensure Bluetooth is enabled on your mobile device.
- Open the Spark app. It will automatically search for nearby Spark amplifiers.
- Select your Spark 2 Pearl from the list of available devices to establish a Bluetooth connection. The Bluetooth indicator on the amp will turn solid blue when connected.

Figure 4: Spark 2 Pearl amplifier connected to the Spark app on a smartphone.
6. Setting up Spark Control X
- Ensure the Spark Control X is charged or has sufficient battery power.
- Press the Power button on the Spark Control X.
- The Spark Control X will automatically attempt to pair with your Spark 2 Pearl amplifier via Bluetooth. The 'CONNECT' indicator on the footswitch will illuminate when connected.

Figure 5: Spark Control X, Spark 2 Pearl, and Spark app in use.
Operating Instructions
Spark 2 Pearl Amplifier Controls

Figure 6: Spark 2 Pearl amplifier control panel.
- Power Button: Turns the amplifier on and off.
- Preset Knob: Selects between 4 programmable presets. Hold to save current settings to a preset.
- Gain: Adjusts the input gain for your guitar signal.
- Bass, Mid, Treble: Tone stack controls to shape your sound.
- Master: Controls the overall output volume of the amplifier.
- Mod, Delay, Reverb: Controls for built-in modulation, delay, and reverb effects.
- Music: Adjusts the volume of Bluetooth audio playback.
- Guitar: Adjusts the volume of your guitar signal.
- REC/DUB Button: Controls the looper's recording and overdubbing functions.
- Play/Stop Button: Controls looper playback.
- Clear/Hold Button: Clears the current loop. Hold for additional functions.
- Tuner/Hold Button: Activates the built-in tuner. Hold for additional functions.
- Tap Button: Sets the tempo for time-based effects and the looper.
Using the Spark App
The Spark app unlocks the full potential of your Spark 2 Pearl amplifier. It provides access to a vast library of tones, AI-powered features, and detailed control over your amp and effects settings.
- Tone Engine: Browse and customize thousands of amp and effect models.
- Smart Jam: The app listens to your playing and generates a bass and drum track to jam along with.
- Auto Chords: Displays chords for millions of songs in real-time.
- ToneCloud: Access a global community of tones created by other Spark users.
- Looper Control: Advanced control over the built-in looper, including drum pattern selection.

Figure 7: Adjusting amp settings via the Spark app and physical controls.
Spark Control X Footswitch Operation
The Spark Control X provides wireless, hands-free control over your Spark 2 Pearl amplifier, allowing you to switch presets, toggle effects, and control the looper without interrupting your playing.

Figure 8: Spark Control X footswitch.
- Footswitches I, II, III, IV: These four footswitches can be assigned to various functions within the Spark app, such as switching presets, toggling individual effects (drive, modulation, delay, reverb), or controlling looper functions (record, play, stop).
- A/B Buttons: These buttons typically allow you to cycle through banks of presets or control specific app functions.
- EXP1/EXP2 Ports: Connect optional expression pedals for real-time control over parameters like wah, volume, or effect intensity.
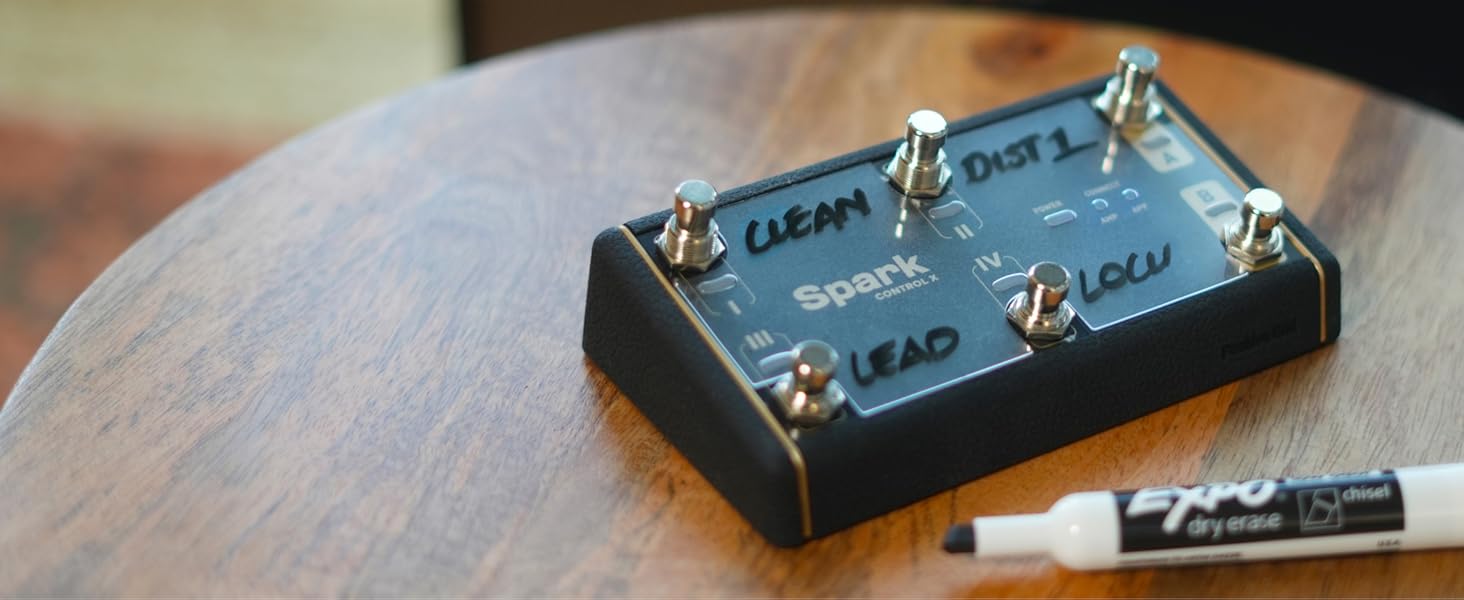
Figure 9: Spark Control X with custom labels for footswitch functions.
Maintenance
Cleaning
To clean the Spark 2 Pearl amplifier and Spark Control X footswitch, use a soft, dry cloth. For stubborn dirt, a slightly damp cloth can be used, but ensure no moisture enters any openings. Avoid using abrasive cleaners, solvents, or waxes, as these can damage the finish.
Storage
When not in use for extended periods, store the unit in a cool, dry place away from direct sunlight and extreme temperatures. If using the optional battery, consider removing it for long-term storage to prevent potential leakage.
Firmware Updates
Periodically check the Positive Grid website or the Spark app for firmware updates. Keeping your device's firmware up-to-date ensures optimal performance, new features, and bug fixes. Follow the instructions provided by Positive Grid for safe firmware updates.
Troubleshooting
No Power
- Ensure the power adapter is securely connected to both the amplifier and a working wall outlet.
- Verify the wall outlet is supplying power.
- If using the optional battery, ensure it is properly installed and charged.
No Sound from Amplifier
- Check that your guitar is properly plugged into the GUITAR INPUT.
- Ensure the Master volume and Guitar volume knobs on the amp are turned up.
- Verify that your guitar's volume knob is turned up.
- Test with a different instrument cable to rule out a faulty cable.
- If playing along with Bluetooth audio, ensure the Music volume knob is turned up and your device's volume is also up.
Bluetooth Connection Issues
- Ensure Bluetooth is enabled on your mobile device and the Spark 2 Pearl/Spark Control X.
- Move your device closer to the Spark unit to ensure it's within range.
- Try restarting both the Spark unit and your mobile device.
- Forget the device in your mobile device's Bluetooth settings and attempt to pair again.
Spark Control X Not Responding
- Ensure the Spark Control X is powered on and charged.
- Verify it is successfully paired with your Spark 2 Pearl amplifier (CONNECT indicator solid).
- Check the Spark app settings to ensure the footswitch functions are correctly assigned.
Specifications
| Feature | Specification |
|---|---|
| Brand | Positive Grid |
| Model | Spark 2 Pearl + Spark Control X Bundle |
| Output Wattage | 50 Watts |
| Compatible Devices | Electric Guitar, Acoustic Guitar, Bass Guitar |
| Color | White (Spark 2 Pearl) |
| Material | Composite |
| Connectivity | Bluetooth, USB-C, AUX IN, Line Out |
Warranty and Support
Positive Grid products are covered by a manufacturer's warranty. For detailed warranty information, including terms, conditions, and duration, please refer to the warranty card included with your product or visit the official Positive Grid website. Keep your proof of purchase for warranty claims.
For technical support, product registration, and frequently asked questions, please visit the Positive Grid support page on their official website. Online resources, including user forums and knowledge bases, are also available to assist you.


