1. Introduction
This manual provides essential instructions for setting up, operating, and maintaining your Hisense M2 Pro Triple Laser Smart Portable Projector. The M2 Pro is designed to deliver a high-quality visual experience with its triple laser light source, 4K UHD resolution, and Dolby Vision support. Its portable design and intelligent features make it suitable for various environments, from home entertainment to presentations.
Please read this manual thoroughly before using the projector to ensure proper operation and to maximize its performance and lifespan.
2. What's in the Box
Verify that all the following items are included in your package:
- Hisense M2 Pro Projector
- Power Cord
- Remote Control
- User Manual (this document)
- Cleaning Kit
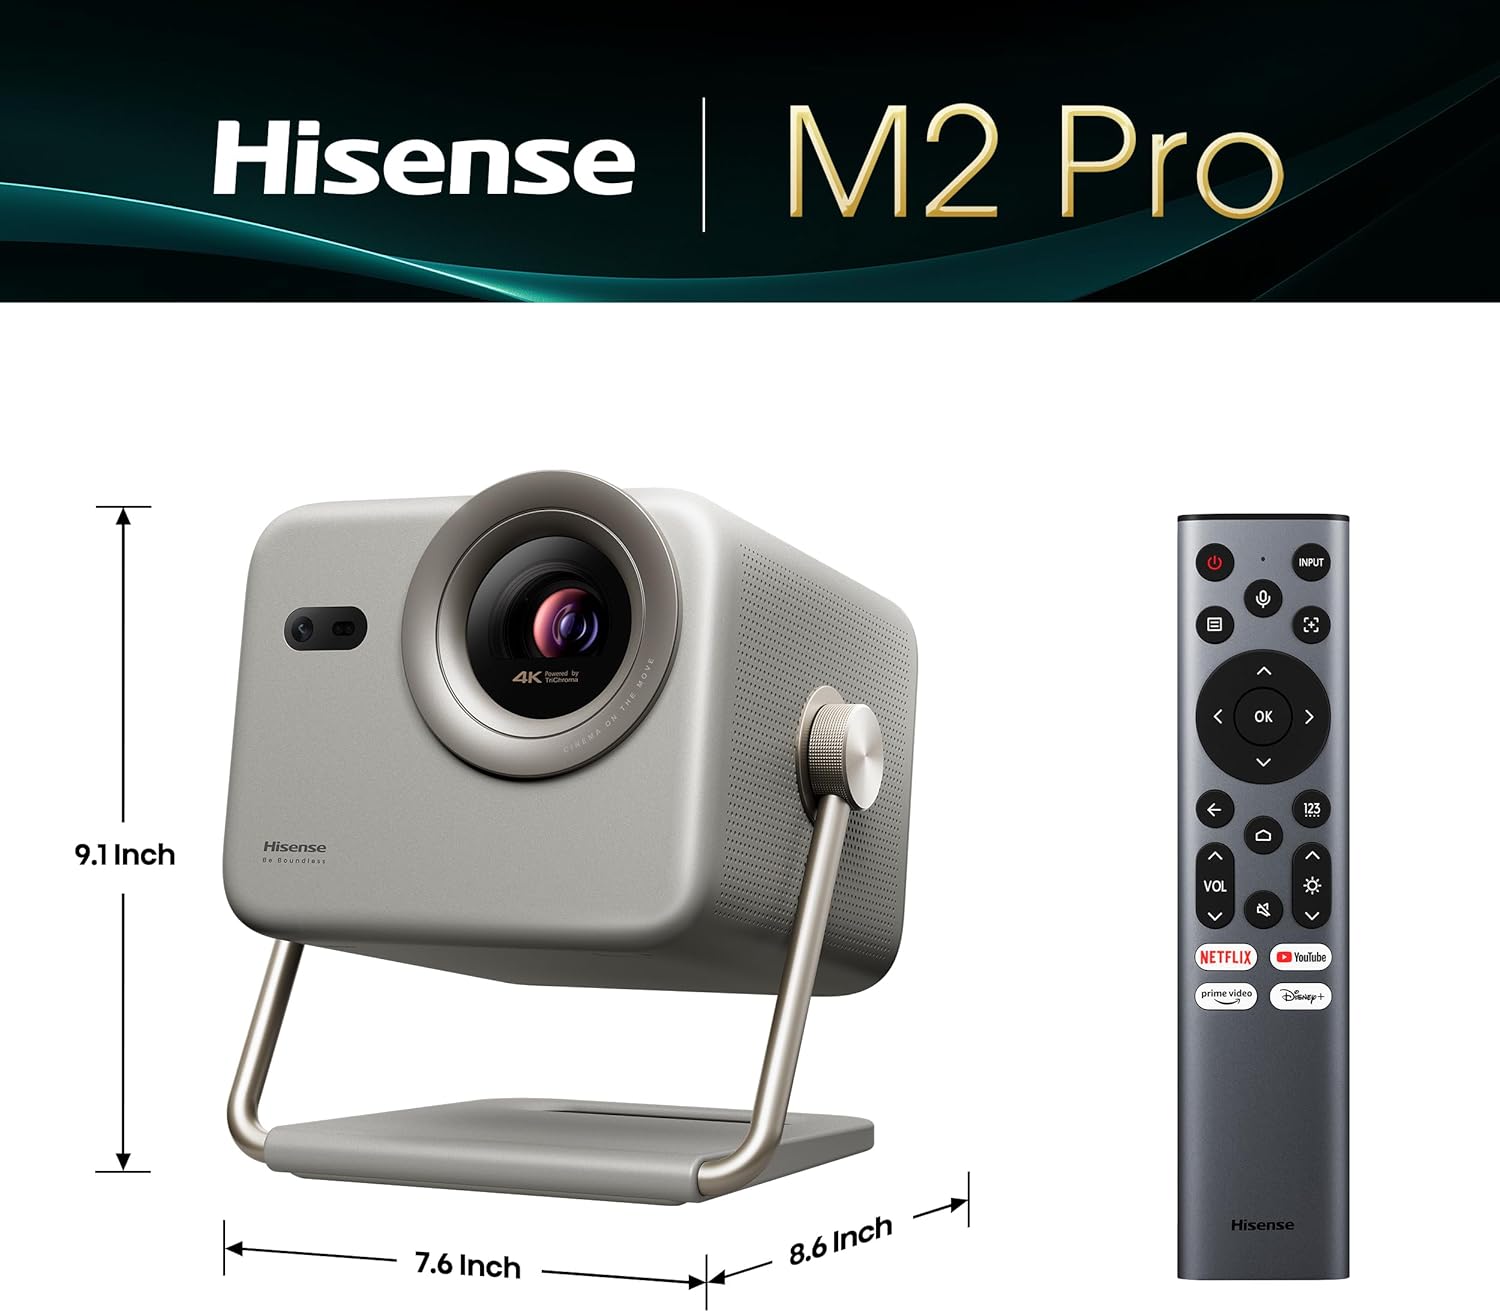
Image: Contents of the Hisense M2 Pro package, including the projector, remote, and power cord, within its protective carrying case.
3. Product Overview
3.1 Key Features
- Pure Triple Laser Light Source: Utilizes MCL38 triple-laser design for vivid color and clarity.
- 4K UHD Resolution: Delivers sharp images up to 200 inches.
- 1300 ANSI Lumens Brightness: Provides a clear viewing experience in various lighting conditions.
- Dolby Vision Support: Enhances contrast, brightness, and color for a cinematic experience.
- Optical Zoom (1.0-1.3 ratio): Adjusts image size without compromising 4K resolution.
- VIDAA Smart OS: Access streaming services like Netflix, YouTube, and Disney+.
- AutoMagic AI Adjusting: Features seamless auto keystone correction, auto focus, auto obstacle avoidance, intelligent eye protection, and intelligent wall color adaption.
- Immersive Gaming: Supports fast-paced gaming with low input lag and high refresh rates.
- 3D Capability: Offers immersive 3D viewing (requires DLP-link active shutter 3D glasses).
- Dolby Audio & DTS Virtual:X: Integrated sound system for clear and immersive audio.
3.2 Projector Components

Image: Front and side view of the Hisense M2 Pro projector, highlighting its compact design and lens.

Image: Rear panel of the projector, detailing the power button, HDMI (eARC), USB 3.0, and DC IN ports.
4. Setup
4.1 Placement
Position the projector on a stable, flat surface. Ensure there are no obstructions in front of the lens or around the ventilation areas. The M2 Pro can project images from 65 to 200 inches. Refer to the optical zoom table for recommended throw distances.
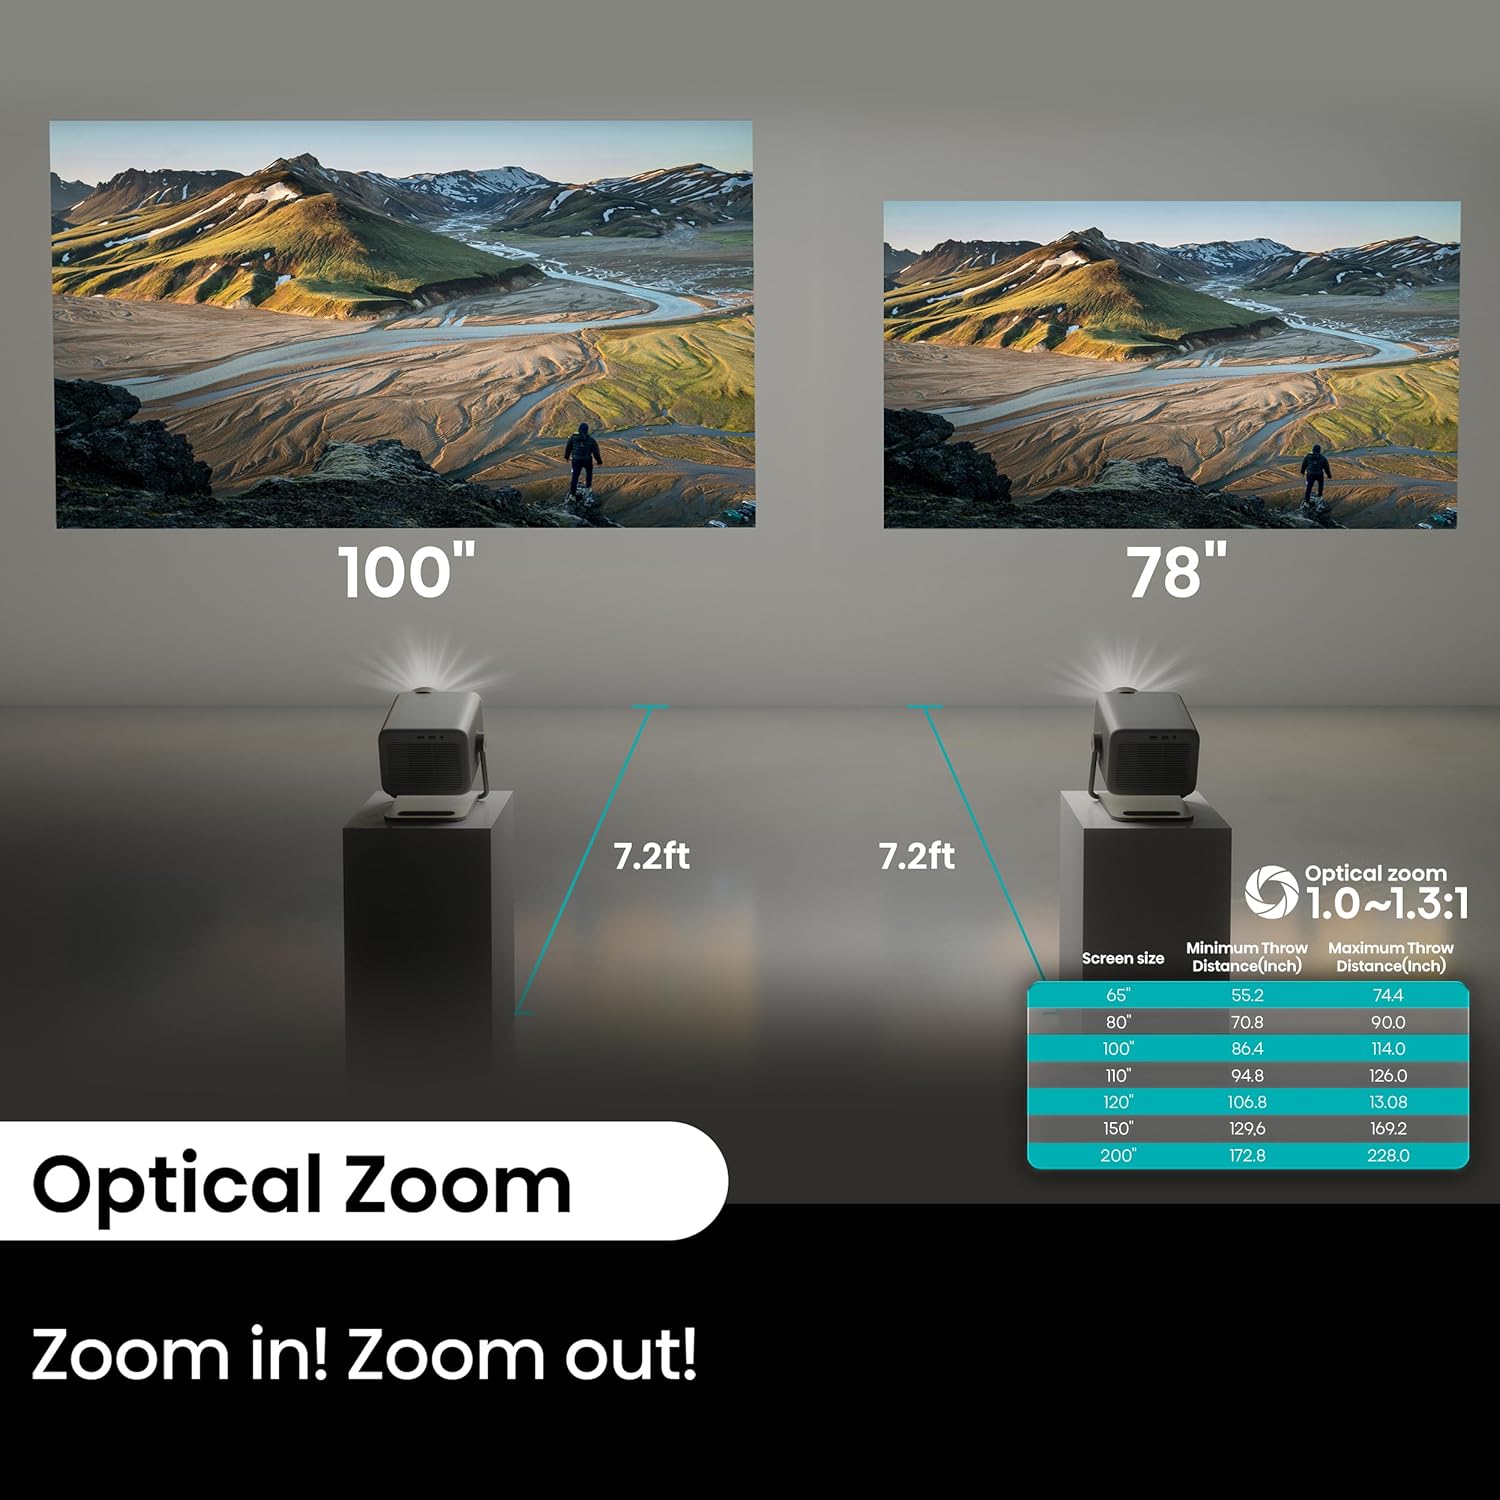
Image: Illustration of optical zoom capabilities and recommended throw distances for various screen sizes (65" to 200").
The projector features an adjustable stand (gimbal) for 360° vertical movement, allowing for flexible projection angles, including ceiling projection.

Image: Examples of flexible installation options for the projector, including tabletop, ceiling, and wall mounting.
4.2 Power Connection
- Connect the power cord to the DC IN port on the projector.
- Plug the other end of the power cord into a power outlet.
4.3 Initial Power-On and Adjustments
- Press the Power button on the projector or the remote control to turn on the device.
- The projector will automatically perform keystone correction and auto-focus. Allow a few moments for the image to stabilize and sharpen.
- The AutoMagic AI Adjusting system also includes auto obstacle avoidance, intelligent eye protection, and intelligent wall color adaption for an optimized viewing experience.

Image: Visual representation of the AutoMagic AI Adjusting 2.0 features, including seamless auto keystone correction and auto focus.
4.4 Connecting External Devices
Use the available ports to connect external devices:
- HDMI (eARC): Connect gaming consoles, Blu-ray players, or other HDMI-enabled devices.
- USB 3.0: Connect USB storage devices for media playback.
- Bluetooth: Pair with external audio devices like soundbars or headphones.
- Wi-Fi: Connect to your home network for internet access and streaming.

Image: Connectivity options for the Hisense M2 Pro, illustrating connections to soundbars, gaming consoles, and other devices via HDMI, USB, Bluetooth, and Wi-Fi.
5. Operating Instructions
5.1 Navigating VIDAA Smart OS
The projector runs on the VIDAA Smart OS, providing an intuitive interface for accessing content. Use the remote control to navigate menus, select applications, and adjust settings.

Image: The VIDAA Smart OS home screen displaying popular streaming applications like Netflix, YouTube, and Disney+.
5.2 Picture and Sound Settings
Access the settings menu to customize your viewing and listening experience. Adjust brightness, contrast, color, and sound modes to suit your preferences and environment.
- Brightness: The projector offers 1300 ANSI Lumens. Adjust as needed for optimal viewing in different ambient light conditions.
- Dolby Vision: This feature automatically optimizes picture quality for compatible content.
- Optical Zoom: Use the remote or projector controls to adjust the image size without moving the projector.
- Audio: The built-in speakers support Dolby Audio and DTS Virtual:X for immersive sound. External audio systems can be connected via HDMI (eARC) or Bluetooth.
5.3 3D Functionality
For an immersive 3D experience, ensure you have compatible DLP-link active shutter 3D glasses. The projector will automatically detect 3D content and prompt you to activate 3D mode.

Image: A scene depicting immersive 3D viewing with room-filling sound, emphasizing the projector's 3D capabilities.
5.4 Gaming Mode
The M2 Pro is optimized for gaming, offering low input lag and high refresh rates for a smooth experience. Connect your gaming console via HDMI and select the appropriate input source.

Image: A user engaged in lag-free gaming on a large projected screen, demonstrating the projector's suitability for immersive gaming.
6. Maintenance
6.1 Cleaning the Lens
Use the provided cleaning kit or a soft, lint-free cloth specifically designed for optical lenses. Gently wipe the lens surface to remove dust or smudges. Avoid using abrasive materials or harsh chemicals.
6.2 General Care
- Keep the projector in a well-ventilated area to prevent overheating.
- Avoid exposing the projector to extreme temperatures or humidity.
- When not in use, store the projector in its protective carrying case to prevent dust accumulation and damage.
7. Troubleshooting
This section addresses common issues you might encounter. If the problem persists, contact Hisense customer support.
| Problem | Possible Solution |
|---|---|
| No picture |
|
| Blurry image |
|
| No sound |
|
| Remote control not working |
|
8. Specifications
| Feature | Detail |
|---|---|
| Model Number | M2 Pro |
| Display Resolution | 3840 x 2160 (4K UHD) |
| Brightness | 1300 ANSI Lumens |
| Light Source | Triple Laser (MCL38) |
| Projection Size | 65" - 200" |
| Optical Zoom | 1.0 - 1.3 ratio |
| Operating System | VIDAA Smart OS |
| Special Features | 4K UHD, Auto Magic Adjusting System, Dolby Vision, High Refresh Rate, Netflix Included, Optical Zoom, Triple Laser |
| Connectivity | Bluetooth, HDMI (eARC), USB, Wi-Fi |
| Product Dimensions | 9.1 x 8.6 x 7.6 inches |
| Item Weight | 8.6 pounds |
| Recommended Uses | Business, Education, Entertainment, Gaming, Home Cinema |
9. Warranty and Support
Your Hisense M2 Pro Projector is covered by a manufacturer's warranty. Please refer to the warranty card included in your package for specific terms and conditions.
For technical support, troubleshooting assistance, or warranty claims, please visit the official Hisense support website or contact their customer service department. You can find more information and contact details on the Hisense Brand Store.