
1. Introduction
This manual provides essential instructions for the safe and efficient operation, installation, and maintenance of your SRSRS 4000W Solar Inverter Kit. This kit includes a modified sine wave power inverter, an 18W monocrystalline solar panel, and a 30A solar charge controller. Please read this manual thoroughly before using the product and retain it for future reference.
2. Safety Information
WARNING: Failure to follow these safety instructions may result in electric shock, fire, serious injury, or death.
- Always disconnect power before making or breaking electrical connections.
- Ensure all wiring is correctly polarized and securely connected to prevent damage to the unit or connected devices.
- Do not expose the inverter or charge controller to water, rain, or excessive moisture.
- Operate the inverter in a well-ventilated area to prevent overheating.
- Do not open the inverter or charge controller casing. There are no user-serviceable parts inside.
- Keep children away from the solar power system components.
- Wear appropriate personal protective equipment, such as insulated gloves and eye protection, when working with batteries and electrical connections.
- The solar panel generates electricity when exposed to light. Handle with care.
3. Package Contents
Verify that all items listed below are included in your package:
- 1 x SRSRS 4000W Modified Sine Wave Inverter
- 1 x 18W Monocrystalline Solar Panel
- 1 x 30A 12V/24V Automatic Solar Charge Controller (PWM)
- 2 x Battery Clips (Crocodile Clips)
- 1 x Cigarette Lighter Plug Cable
- 1 x User Manual (this document)
4. Product Overview
4.1. 4000W Modified Sine Wave Inverter
The inverter converts 12V DC power from a battery into 110V AC power, suitable for powering various household and outdoor appliances. It features multiple output ports and displays for monitoring.

Image: The SRSRS 4000W Solar Inverter Kit, showing its compact design and various ports.

Image: Detailed view of the inverter, highlighting the ON/OFF switch, 4 USB ports, DC voltage display, AC voltage display, Dual 12V DC output, 2 Universal AC outlets, DC negative terminal, DC positive terminal, and cooling fan.
4.2. 18W Monocrystalline Solar Panel
The 18W monocrystalline solar panel is designed to efficiently convert sunlight into electrical energy, providing a charging source for your battery system. It is waterproof and built for durability.

Image: The 18W monocrystalline solar panel, showing its design and included connection cables (cigarette lighter and crocodile clips).
4.3. 30A Solar Charge Controller
The 30A PWM solar charge controller manages the power flow from the solar panel to the battery, protecting the battery from overcharging and over-discharging. It features an LCD display for monitoring system status.
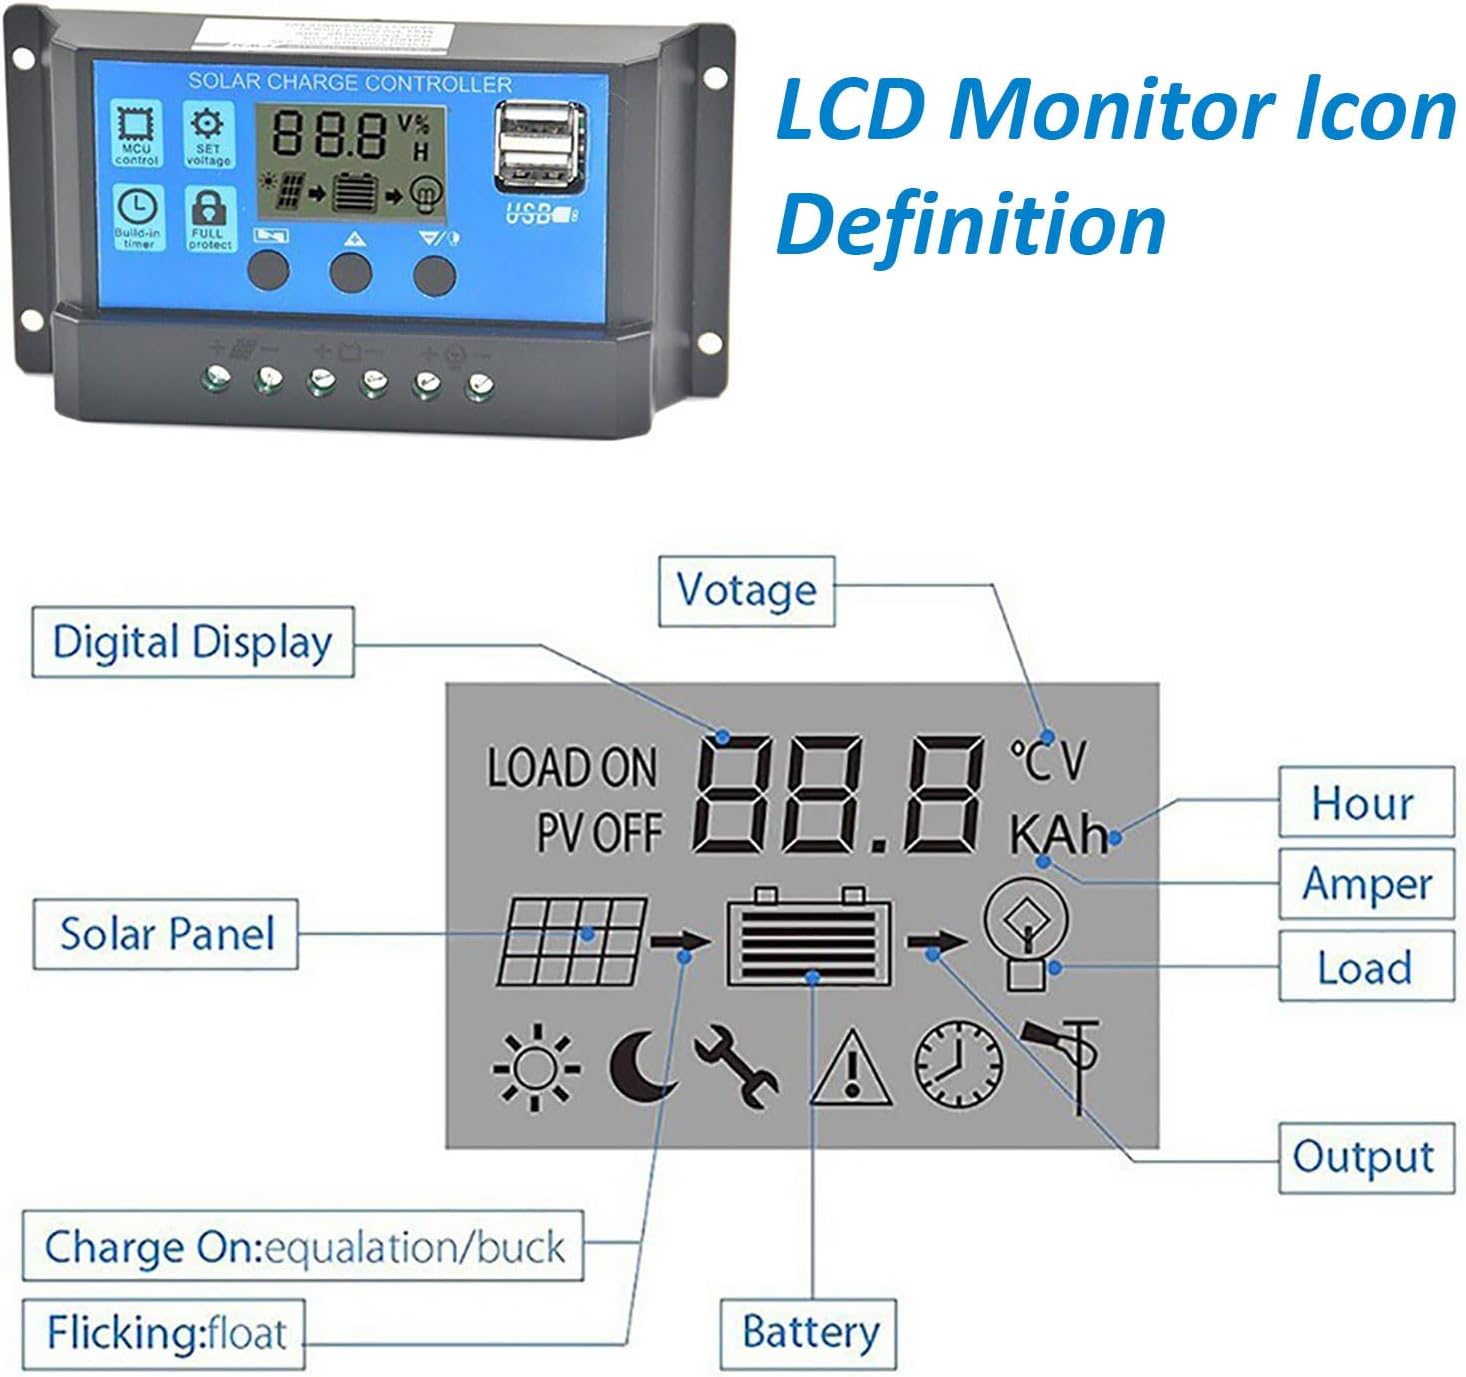
Image: Diagram illustrating the LCD monitor icons and their definitions on the solar charge controller, including digital display, voltage, hour, ampere, load, output, solar panel, battery, charge status, and lighting indicators.
5. Setup Instructions
Follow these steps to set up your solar inverter kit. Ensure all components are disconnected from power sources before beginning.
- Connect the Battery to the Charge Controller: Connect the positive (+) and negative (-) terminals of your 12V battery to the corresponding battery terminals on the solar charge controller. Ensure a secure connection. The charge controller LCD should illuminate.
- Connect the Solar Panel to the Charge Controller: Connect the solar panel's positive (+) and negative (-) output cables to the corresponding solar panel terminals on the charge controller. Ensure the solar panel is exposed to sunlight for charging.
- Connect the Inverter to the Battery: Using the provided battery clips or cigarette lighter plug, connect the inverter's DC input terminals to your 12V battery. Connect the red clip to the positive (+) terminal and the black clip to the negative (-) terminal. For the cigarette lighter plug, insert it into a 12V car socket.
- Power On the Inverter: Once all connections are secure, press the ON/OFF switch on the inverter to power it on. The inverter's display should show voltage readings.
- Connect AC/USB Devices: You can now plug your 110V AC appliances into the inverter's AC outlets or charge USB devices using the USB ports.
Note: Always connect the battery to the charge controller first, then the solar panel. When disconnecting, reverse the order: disconnect the solar panel first, then the battery.
6. Operating Instructions
6.1. Inverter Operation
- Power On/Off: Use the ON/OFF switch on the inverter's front panel to activate or deactivate the AC output.
- AC Outlets: Plug your 110V AC devices into the universal AC outlets. Ensure the total power consumption does not exceed the inverter's rated power of 300W (or peak power of 4000W for brief surges).
- USB Ports: Use the 4 USB ports (5V/3.6A total) to charge compatible USB devices like smartphones and tablets.
- DC Voltage Display: Monitors the input DC voltage from the battery.
- AC Voltage Display: Monitors the output AC voltage.
6.2. Charge Controller Operation
- LCD Display: The LCD shows real-time information such as battery voltage, charging current, discharge current, and load status. Refer to the 'LCD Monitor Icon Definition' image in Section 4.3 for icon meanings.
- Settings: The charge controller allows adjustment of various parameters like float charge voltage, discharge stop voltage, and discharge reconnection voltage. Consult the detailed charge controller manual (if provided separately) for advanced settings.
- Load Output: The charge controller has load output terminals (not directly used by the inverter in this kit configuration, but available for direct DC loads).
7. Maintenance
Regular maintenance ensures the longevity and optimal performance of your solar inverter kit.
- Cleaning: Keep the solar panel surface clean from dust, dirt, and debris to maximize sunlight absorption. Use a soft, damp cloth. Clean the inverter and charge controller with a dry cloth.
- Connections: Periodically check all electrical connections for tightness and corrosion. Loose connections can cause overheating and power loss.
- Ventilation: Ensure the inverter's cooling fan and vents are free from obstructions to prevent overheating.
- Battery Health: Monitor your battery's health. Ensure it is properly charged and maintained according to its manufacturer's guidelines.
- Storage: If storing the kit for an extended period, ensure the battery is fully charged and disconnect all components. Store in a cool, dry place.
8. Troubleshooting
This section addresses common issues you might encounter. For problems not listed here, contact customer support.
| Problem | Possible Cause | Solution |
|---|---|---|
| Inverter not turning on | Low battery voltage; Loose battery connection; Inverter fault | Check battery voltage (should be above 11V); Secure battery connections; If problem persists, contact support. |
| No AC output from inverter | Overload; Overheating; Low battery voltage; Short circuit | Reduce connected load; Allow inverter to cool down; Charge battery; Check for short circuits in connected devices. |
| Solar panel not charging battery | No sunlight; Dirty panel; Loose connections; Faulty charge controller | Ensure panel is in direct sunlight; Clean panel surface; Check all connections between panel and controller; Verify charge controller is functioning. |
| Charge controller LCD not displaying | No battery connected; Battery voltage too low; Controller fault | Connect battery first; Charge battery; If problem persists, contact support. |
9. Specifications
9.1. 4000W Modified Sine Wave Inverter
- Input Voltage: DC 12V
- Output Voltage: AC 110V
- Peak Power: 4000W
- Rated Power: 300W
- Maximum AC Current per Outlet: 8.33 Amps
- THD: <3%
- Efficiency: ≥90%
- No-Load Current: <0.6A
- USB Output: 4 ports, 5V/3.6A total
- Dimensions: Approximately 7.7 x 4.1 x 2.7 inches (19.6 x 10.4 x 6.9 cm)
- Weight: Approximately 1.76 ounces (0.05 kg) - Note: This weight seems incorrect for an inverter of this power. Please verify with manufacturer.

Image: The SRSRS inverter with its dimensions (7.7in, 4.1in, 2.7in) and the lengths of the cigarette lighter plug cable (42.5cm / 16.7in) and battery clip cable (46.8cm / 18.4in).
9.2. 18W Monocrystalline Solar Panel
- Power: 18W ±5%
- Dimensions: 420 x 280 x 2.5mm (16.5 x 11 x 0.1 inches)
- DC Output: 12V/1.5A
- Material: Monocrystalline silicon, aluminum substrate
- Weight: 0.7 kg (1.54 lbs)
9.3. 30A Solar Charge Controller
- Charging Current: 30A
- Voltage: DC 12V/24V (automatic intelligent conversion)
- Display Mode: LCD digital display
- Working Temperature: -35°C to +60°C (-31°F to +140°F)
- Maximum Solar Input: 12V system, up to 23V
- Float Charge: 13.7V (default, adjustable)
- Discharge Stop: 10.7V (default, adjustable)
- Discharge Reconnection: 12.6V (default, adjustable)
- Charge Reconnection: 13V
- Lighting Voltage (Solar Panel): 8V (delayed lighting)
- Lights-off Voltage (Solar Panel): 8V (delayed lights-off)
- Product Size: 148.5 x 78 x 35mm (5.85 x 3.07 x 1.38 inches)
10. Warranty and Support
For warranty information and customer support, please refer to the documentation provided at the time of purchase or contact your seller directly. Keep your purchase receipt as proof of purchase.